
A legacy BIOS asks for two things before a PC will boot from the network: a LAN option ROM and a place in the boot order. A UEFI board asks for more, and the options sit on three different menu pages. That is why the boot from the network BIOS setting on a current motherboard is rarely a single switch.
The items below are grouped by the menu page they live on, because that is the order you meet them in setup.
Two firmware generations, two lists
We built CCBoot to start Windows PCs from a server over the LAN, so every client PC we support goes through this firmware step once. What the step contains depends on the generation of the board.
On a legacy BIOS, network boot is carried by an option ROM, a small piece of code stored with the network adapter. Enable the ROM, put the network first in the boot order, and the list is complete.
On UEFI, the option ROM is replaced by a network stack inside the firmware. Most consumer boards ship with that stack switched off. The PXE option under it stays hidden until the stack is on, and Secure Boot checks the signature of any boot file that arrives over the wire. Each of those is a separate setting.
To find out which kind you have, open System Information in Windows and read the BIOS Mode line. It says UEFI or Legacy. On a PC without Windows, look through the setup for an option named CSM. Only UEFI firmware has one.
Item | Legacy BIOS | UEFI | Menu page |
Network boot code | LAN option ROM: | Network Stack: | Advanced |
PXE protocol | Part of the option | IPv4 PXE Support: | Advanced |
Compatibility | Not present | Launch CSM: | Boot |
Boot order | Network first | Network entry first | Boot |
Signature check | Not present | Secure Boot: | Security |
Before opening setup
Have four things ready.
- The setup key. It is Del or F2 on most boards and Esc on a few. Press it repeatedly right after power-on.
- Advanced mode. Many boards open in a simplified view that hides the network options. F7 switches views on ASUS and MSI boards, F6 on ASRock. GIGABYTE boards have an Advanced Mode button on the first screen.
- A cable in the onboard Ethernet port. The firmware boots through the wired adapter it knows about, so plug into the port on the motherboard.
- A USB drive, if Secure Boot stays on. It carries the certificate file used on the Security page.
For a batch of identical PCs, take the first one through the whole list and confirm that it boots before touching the rest. The other machines then get the same values with no guessing. If there is no boot server on the LAN yet, download the trial build and use one client PC to verify the firmware side.
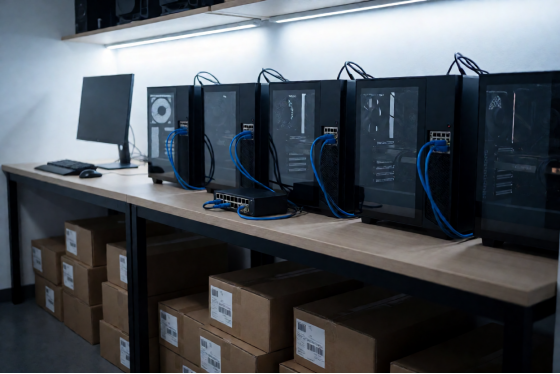
New gaming PCs on a workbench with network cables attached, waiting for firmware setup
Advanced page: the network stack
Network Stack loads the firmware's own network drivers and protocols. Nothing else on this checklist works until it is on. Set it to Enabled.
Once it is enabled, new lines appear below it. This is the design detail that sends people to the wrong page. The firmware does not list PXE options for a stack that is not loaded, so a board at factory defaults has no PXE line to find, on the Boot page or anywhere else.
Set the new lines as follows.
· IPv4 PXE Support: Enabled. This creates the IPv4 network boot entry.
· IPv6 PXE Support: Disabled, when the LAN hands out IPv4 addresses. That is the normal case on a gaming floor. Each of the two options creates its own boot entry, and leaving one keeps the boot list unambiguous.
· HTTP boot, PXE boot wait time, media detect count: leave at their defaults.
The stack sits in a different place on each brand.
Board brand | Path to the setting | Note |
ASUS | Advanced → Network Stack Configuration | Advanced mode first (F7) |
GIGABYTE | Settings → IO Ports → Network Stack Configuration | IPv4 PXE Support is on the same screen |
MSI | Settings → Advanced → Integrated Peripherals | Network Stack is listed with the onboard devices |
ASRock | Boot → Boot From Onboard LAN | One switch, on the Boot page |
Business desktops from the large OEMs use their own wording, usually with "UEFI Network Stack" or "PXE" in the name. Labels also move between firmware releases of the same board. If the path in the table is not there, use the search function that most current setup screens have and type "network".
Now save and restart, before going to the Boot page. The firmware builds its list of boot entries during startup. The network entry does not exist until the PC has gone through one restart with the stack enabled, and a boot order cannot include an entry that has not been created.
Diagram of the three firmware menu pages that hold the network boot settings: Advanced, Boot and Security
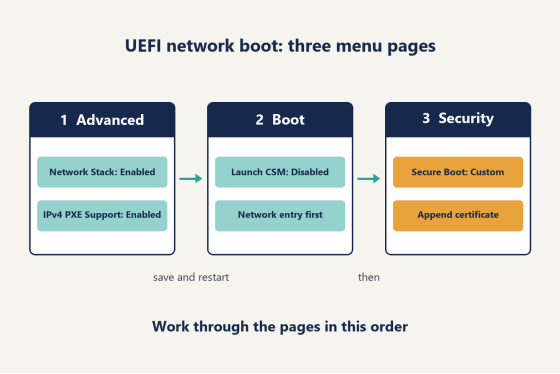
Boot page: CSM and boot order
CSM stands for Compatibility Support Module. It makes UEFI firmware behave like a legacy BIOS for older operating systems and option ROMs. For UEFI network boot, set Launch CSM to Disabled. With CSM off the board runs in pure UEFI mode, the network entry that appears is the UEFI one, and Secure Boot becomes available on the Security page.
Then set the order. After the restart, the boot priority list contains a new entry, usually named after the network adapter with "IPv4" in the label. This is the point where the boot from network BIOS setting most people were looking for finally shows up. Move it to the first position.
A board with two Ethernet ports lists two network entries, one per controller. Pick the entry for the port that holds the cable. The controller name in the label matches the name printed next to the port in the board manual.
A diskless client has no local drive, so the network entry is the only one that matters. A PC that keeps a local drive needs the network entry above that drive. Otherwise the firmware finds Windows on the disk and never asks the LAN.
To test one machine without changing its saved order, use the one-time boot menu. The key is F8, F11 or F12 during power-on, depending on the brand. Pick the network entry from the list.
The firmware side is done when the screen shows a line such as "Start PXE over IPv4" followed by the adapter's MAC address. That line means the PC is asking the LAN for an address and a boot file. What happens next is decided by the server.
Legacy boards: the LAN option ROM
Older PCs that stay in service use the short list. Open the Advanced page, then Integrated Peripherals, and look for one of these four names: Lan Option ROM, Boot from LAN, PXE OpROM, or Legacy PXE Boot Option ROM. Set it to Enabled, save and restart.
After the restart, open the Boot page. In Boot Sequence or Boot Priority, move Network to the first position. That completes a legacy board.
Security page: Secure Boot with network boot
Secure Boot lets the firmware run only boot files signed by a key in its database of authorized signatures. The Windows boot files are signed by keys that ship with the board. A network boot file comes from the vendor of the boot server software, so that vendor's certificate has to be added to the database once on each PC. For CCBoot the certificate is issued by Youngzsoft, the company that makes it.
Keep Secure Boot enabled on a gaming floor. Anti-cheat systems in several competitive titles read the Secure Boot state and can refuse to start a match when it is off. The right configuration is Secure Boot on, with the certificate in place.
1. Open the Secure Boot screen. It is on the Security page on MSI and ASRock boards and on the Boot page on ASUS and GIGABYTE boards. Confirm that Secure Boot is Enabled.
2. Set Secure Boot Mode to Custom. Standard mode locks the key list. Custom mode opens Key Management.
3. In Key Management, open Authorized Signatures. Some boards call it DB Management, and GIGABYTE calls it Authenticated Signatures.
4. Choose Append. The firmware asks whether to load factory defaults. Answer No, because Yes reloads the board's own keys and does not read your file.
5. Select the USB drive, then the certificate file.
6. For the file type, choose Public Key Certificate. Confirm with Yes.
7. Save and exit.
Leave DBX alone. DBX is the list of revoked signatures, and nothing in this procedure belongs there.
The signature database is stored on the motherboard, not on a drive. Replacing or rebuilding the boot image on the server does not touch it, so this procedure is done once per board and stays in place for every image that board starts afterwards.
The certificate file and the screen-by-screen steps for each brand are in the board-by-board pages in the setup wiki.
Two settings on other pages
Our board guides set two more options during the same visit. Neither decides whether the PC boots from the network today. Both are settings you would otherwise come back for.
- CPU virtualization. On Intel boards it is VT-d or Intel (VMX) Virtualization Technology, under CPU or chipset configuration. On AMD boards it is SVM. Set it to Enabled.
- The network wake event. MSI names it Resume By PCI-E/Network Device, and ASRock names it PCIE Devices Power On. Set it to Enabled so that the server can power the PC on later with Wake on LAN.
Server side: matching the PXE file to the firmware
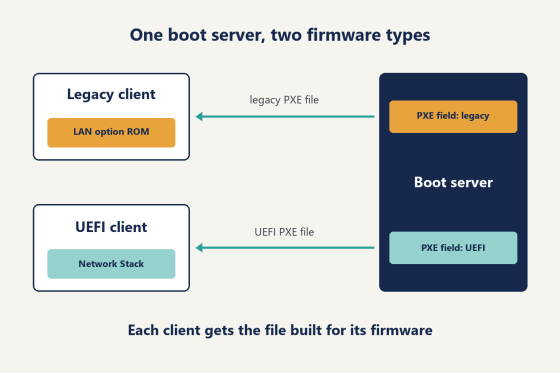
The firmware asks, and the server answers with a PXE file. That file has to be built for the same firmware type as the client. A UEFI client cannot run a legacy PXE file, and a legacy client cannot run a UEFI one.
In CCBoot this is one field per client. Open the Boot section of the admin panel, edit the client PC, and set the PXE field. Choose the current UEFI entry for PCs configured with the network stack. Choose the legacy entry for PCs that use the option ROM.
Because the field belongs to the client and not to the server, one server can boot a floor that mixes both generations. Take 40 seats where 32 are new UEFI machines and 8 are older legacy ones. That is two values, each set once per PC, and both groups start from the same server. PnP in CCBoot lets one image start PCs with different hardware, so a new batch of boards joins the image the floor already runs.
Diagram of a legacy client and a UEFI client each receiving its own PXE file from one boot server
Licensing is counted per client PC, with monthly and annual billing. The numbers are on the purchase page, where you can see the current per-PC pricing.
The boot from network BIOS setting on your exact board
Menu names change with the brand and the firmware release, and any table of labels ages. The logic behind the boot from network BIOS setting stays the same: load the stack, enable PXE, turn CSM off, put the network first, add the certificate.
If a line in your setup does not match anything above, collect three facts: the board brand and model, whether the firmware is UEFI or legacy, and whether Secure Boot is on. Then ask live support for the guide that matches your board. They will send the current steps for that board.