
A patch lands on Tuesday night. Wednesday at 11 you open the doors, the first customer sits down at seat 7, opens the launcher, and the big blue button under Overwatch says Install. Every file for that game is sitting on your server. The launcher doesn't believe it.
That one screen is what most people mean when they search for Battle.net games on diskless systems. Steam behaves, the Riot client behaves, and Blizzard's launcher is the one that keeps asking to download a game the room already has. The fix is short once you know where the launcher keeps its notes, and it's the same fix for a 24-seat LAN center and a 90-seat esports lounge.
Why does Battle.net forget its games after a reboot?
The launcher stores things in two places, and only one of them is the folder you picked.
The game files go where you tell them to go. If you chose a folder on the game disk, that's where Overwatch, Call of Duty, World of Warcraft, Diablo and Hearthstone live, and on a diskless floor that disk is shared from the server to every seat. So far, so good.
The second place is the part nobody picks. Battle.net keeps its own record of which products are installed, where they are, and which version of its background updater (the Agent) is current, and it writes all of that to ProgramData and AppData on the Windows system drive. On a normal desktop you never think about it. On a diskless client the system drive is the shared boot image, every change a seat makes goes to a temporary write-back file, and that file is thrown away at reboot. That's the feature you bought the system for: a customer can install anything they like at 9pm and the seat is clean again by the next boot.
Put those two facts together and the Install button makes sense. The game is on the game disk. The record that says "this game is installed, here" was written on one machine, at one moment, and it never reached the image the other 41 seats boot from. Each seat starts with a launcher that has a blank memory and a disk full of games it can't account for.
Diagram of why Battle.net shows Install after a diskless reboot and how linked folders fix it
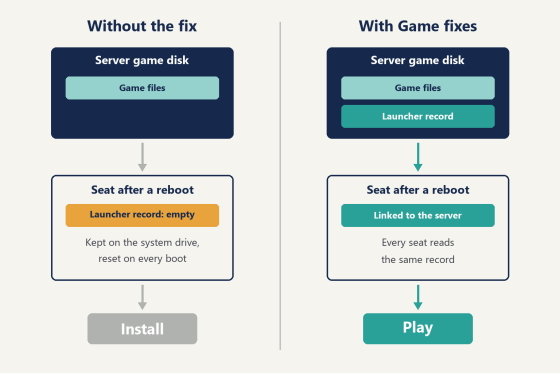
You don't fix this by switching the restore off. You move the launcher's record to the server side, next to the games, and let every seat read the same one. CCBoot does that with a feature called Game fixes, and the rest of this article is the order to do things in.
What you need before you start
Not much, and you probably have all of it.
The first thing is a diskless server that's already booting the floor, with a game disk attached. The official steps use D: for the game disk. Use whatever letter yours has and keep it the same everywhere, because that letter ends up typed into two different settings screens and they have to agree.
You need free space on that disk for the Blizzard titles you plan to carry. Check each game's current install size in the launcher on the day you do this (the numbers move every season, and a figure from last year's forum post will be wrong). You also need a Battle.net account to sign in with while you install. Any account works for downloading the free-to-play titles.
The last two are about the room. Pick a window when the floor is closed, and an hour before opening is enough for the first setup. Keep one client PC free that you can reboot a few times without anyone sitting at it.
That's the whole list. Setting up Battle.net games on diskless seats takes no extra hardware and no second image, which honestly surprises people who have spent a month fighting the Install button.
Install Battle.net games on diskless, on the server side
Everything in this section happens at the server, logged in to Windows on the server itself. Nothing is installed from a seat.
Put the launcher on the game disk
Download the Battle.net installer from Blizzard's site and run it on the server. When it asks where to install, don't accept the default under Program Files on C:. Pick the game disk and give it a short path: D:\Battle.net.
This is the step that decides whether the rest works. A launcher on C: belongs to the server's own Windows, and the seats never see it. A launcher on the game disk is visible to every client the moment it boots, at the same path, which is what the fix needs later.
Point game installs at the same disk
Sign in, then open Settings and go to Game Install/Update. Set the default install directory to a folder on the game disk, either D:\Battle.net itself or a folder beside it. Do this before you install the first title, so you aren't moving a large game later.
(If you carry both Blizzard and Activision titles, one folder for all of them is fine. The launcher keeps each game in its own subfolder.)
Install each title and launch it once
Now install the games you want on the floor. On each install dialog, read the path before you click, and confirm it's on the game disk. The launcher remembers your default, but it's worth the two seconds, because one title on the wrong drive is the kind of thing you find out about on a Friday night.
When a download finishes, start the game once from the launcher on the server. Let it reach the main menu, then quit. That first launch is when a lot of titles write their initial config and when the launcher marks the install as complete, and you want both of those done on the server before any seat touches the game.
Turn on Game fixes
This is the part that makes the Install button go away.
Game fixes creates links between the server and the clients for the AppData and ProgramData folders a launcher depends on. With the Battle.net fix on, the folder where the launcher keeps its record of installed games stops being a private, throwaway copy on each seat. Every client reads the record that was written on the server, so every client sees the same list of installed games.
Before you switch it on, close the launcher on the server. Properly close it: quit Battle.net from the system tray, then open Task Manager and make sure nothing named Battle.net or Agent is still running. The official instructions say to close all launcher processes before adding a fix, and this is the line people skim. If the Agent is still holding its files open when you save, the links get built around a folder that's in use, the seats come up showing Install, and it looks like the fix did nothing. It was the order.
Then, in the admin panel:
1. Open the Game Fix section in the game settings.
2. Find Battle.net in the list and switch it on. Enabled entries show their toggle lit.
3. In the Game path box next to it, enter the folder where you installed the launcher, for example D:\Battle.net.
4. Click Save.
The Game Fix list in the admin panel with Battle.net switched on and its game path filled in
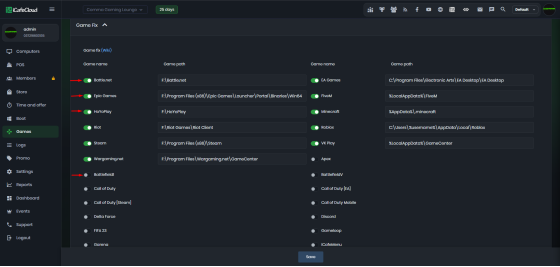
The floor in that screenshot keeps its games on F:, so its path reads F:\Battle.net. Yours should match your own game disk letter, character for character.
Saving runs the fix script on the server, so leave the server software running while you do it. After that, reboot the clients. The links are applied as a seat starts up, which means a PC that was already on when you saved won't show the change until its next boot.
The wiki walks through the same steps on the Battle.net page, and the full list of supported launchers and their default paths is on the Game fixes page.
Patch day, done once
Here's where the setup pays you back every week.
A Blizzard patch used to mean one of two bad mornings. Either the launcher on each seat noticed the new version and started pulling it down by itself, forty-odd copies of the same download landing in forty-odd write-back files that would all be gone by the next reboot, or it didn't, and customers found out at the login screen that their client was out of date.
With the launcher and its record both on the server, a patch is a single job:
1. With the floor closed, open Battle.net on the server and let it update the launcher and every game that has a patch waiting.
2. Launch each patched game once and get to the menu, the same as you did on install day.
3. Quit the launcher completely.
4. Reboot one client. Check that the game shows Play and starts.
5. Reboot the rest of the floor.
Step 4 is the one to keep even when you're in a hurry. One seat takes about as long to boot as it takes you to walk to it, and if something is off you've learned it on one machine with the doors still locked.
Timing matters more than speed. Game disk changes reach a client when it boots, so do the update before opening or after closing and reboot the room when it's finished. A seat that stays on through an update is still looking at the disk as it was when that seat started.
In practice the calendar helps you. Blizzard's big patches tend to arrive on a predictable weekday, so the update becomes a standing item on the opening checklist, right next to counting the till. If your room hosts a college Overwatch team on Thursday nights or runs a Call of Duty bracket on Saturdays, the patch that dropped two days earlier is already on every seat before the first player badges in. Nobody is standing behind a chair watching a progress bar while a team captain checks the clock.
Keeping Battle.net games on diskless clients is, at that point, the same routine as keeping any other game current: update the server, reboot, done.
Francis Tungpalan, who runs GetPoint Gaming in the Philippines, put it this way: "We have about 5 online games that update every week, now we only update the server. Imagine the bandwidth we've saved!" In a US room bandwidth is rarely the tight resource. Staff time is. If one person is covering the counter, the snack fridge and 48 seats, a patch that takes that person twenty minutes at the server before opening is a very different morning from a patch that has them walking the rows.
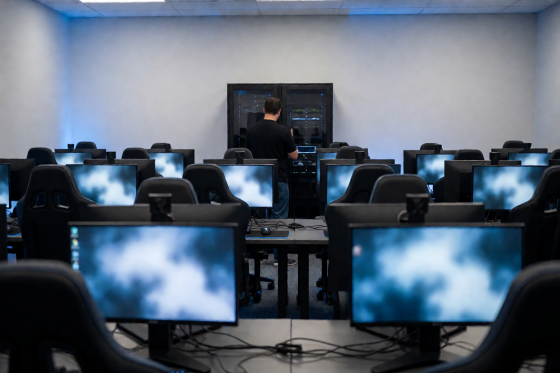
A gaming center before opening with one staff member at the server rack
The black launcher window
Sometimes the launcher opens as a black rectangle. The window is there, the buttons aren't.
The launcher draws its interface with an embedded browser, and that browser's hardware acceleration is what goes dark. Open Battle.net on the server, go to Settings, stay on the General tab, scroll all the way down, and untick "Use browser hardware acceleration when available". Restart the launcher.
Do it once on the server, with the fix already on, and the setting travels to every seat with everything else. (This one shows up most on floors with mixed graphics cards, where a few seats go black and the others look fine, which sends people hunting for a driver problem that isn't there.)
Shaders, Call of Duty, and the long first match
Call of Duty gets its own section because it has its own habit. The first time it runs on a machine it compiles shaders for that machine's graphics card, and until that finishes the first match stutters. On a floor where every seat starts fresh at boot, that "first time" would be every time.
Two settings take care of it. In the Game Fix list, Call of Duty has its own toggle, separate from Battle.net. Switch it on. Then go to Settings, Game Settings, and enable "save game shaders". From then on shader files are kept on the server's shared disk and are still there after a reboot, so a seat picks up where it left off, and a customer who has to restart a PC in the middle of a session gets back into the game without the wait.
Give that shared disk room. The guidance is at least 100GB free, and shader caches for several titles across mixed graphics cards will use it.
How to tell it worked
Don't trust the server. Trust a seat. The server will always look right, because the server is where you did the work, and the only honest test of Battle.net games on diskless hardware is a client that has just booted cold. Run these checks from one, in this order:
- Cold boot it, log in the way a customer would, and open Battle.net. Every title you installed should say Play.
- Watch the launcher for a minute. It should sit idle, with no download or "updating" bar for a game you already patched on the server.
- Start one game and get into a match or a practice range.
- Reboot the same PC and look again. A second clean boot that still says Play is the real pass.
- Repeat on a seat with a different motherboard or graphics card if your floor has more than one build.
If a seat still shows Install, look at the path first. Most of the time the Game path in the fix list doesn't match the folder the launcher is in, usually by a drive letter. Next, ask whether the launcher was fully closed when you saved. Close it, save again, reboot the seat. The server also writes a log for the fix at C:\CCBoot\Gamefix.err.log, and each client keeps its own under C:\CCBootClient\Log, which tells you whether the script ran and what it linked.
And if the logs don't settle it, have support look at it with you. They do this for launchers all day, and a remote session on a quiet morning is faster than a second evening of guessing.
Start with one game and one seat
You don't need to move your whole Blizzard library tonight. Pick the title your regulars ask for most, install it to the game disk, turn on the fix, and reboot a single PC twice. If the button says Play both times, the method works on your hardware and the remaining games are just download time.
If you aren't running a diskless floor yet and this is the part that worries you, the same test works on a bench: download the trial, boot one spare machine from it, and set up Battle.net games on diskless before you commit a single paying seat. Licensing is counted by the number of client PCs, and you can see the current per-PC pricing once you know how many seats you're covering. Next Wednesday at 11, seat 7 gets a Play button.