
One image. Forty seats. That is the whole promise of a diskless floor, and it is also why the afternoon you spend building that one image matters more than any other afternoon in the project.
Get it right and every machine in the building comes up on the same clean Windows, and next month's patch is one download instead of forty.
Get it wrong and you find out at seven on a Friday, on forty machines at once.
The procedure to create a diskless boot image is short and it has not changed in years. Ninety minutes of actual work, most of it waiting for Windows to install. What catches people is not difficulty. It is that two of the steps are counter-intuitive enough that most builders do the sensible thing instead of the correct thing, and both of those steps look fine until the image meets its second motherboard.
What you need before you create a diskless boot image
A master PC, a spare drive to build on, a USB stick, and a clean Windows ISO.
For the master PC, use one of your own client machines rather than a workstation from the office. If the floor has several generations of motherboard in it, build on the newest board you own. That is the official recommendation in the boot image pages in the wiki, and following it saves work at the other end.
The drive is temporary. It holds Windows while you build, it gets uploaded to the server at the end, and then it comes back out. A spare SSD you already have is fine (it does not need to be fast, and it does not need to be large, since the finished image is measured in tens of gigabytes rather than hundreds).
Resist the temptation to reuse a drive that already has Windows on it, however clean it looks. A fresh install is the point of the exercise. Anything already sitting on that drive, including the previous owner's drivers and whatever a manufacturer bundled at the factory, gets carried out to every seat in the building the moment the image goes live, and an image is a very efficient way to distribute a problem to forty machines at once.
One decision has to be made before you install anything, and it is the one people skip past.
Decide now whether this is a UEFI image or a legacy one, and set the master PC's BIOS to match before Windows goes on. A UEFI image is built with the board in UEFI mode. A legacy image is built with the board in legacy, or legacy plus UEFI, mode. The mode you install under is baked into the image, and changing your mind later means starting again from the ISO rather than flipping a setting.
Most rooms being built now go UEFI. Pick it deliberately rather than by default.
Flow diagram from master PC to server image disk to the clients on the floor
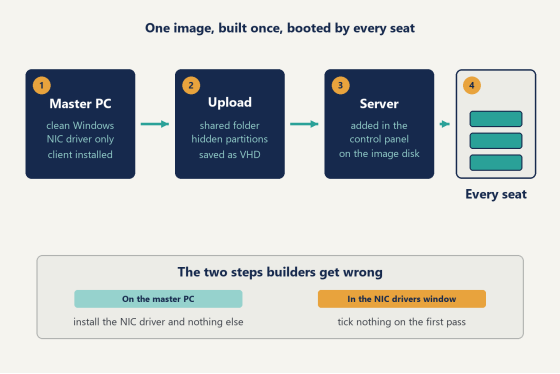
Install Windows the boring way
Use a clean Windows ISO, ideally straight from Microsoft, and write it to the USB stick with the media creation tool. Not the flash drive that has been in the desk drawer since the shop opened, and not an image somebody sent you.
Three choices during setup are worth getting right.
When the installer asks for a product key, take the option that says you do not have one. Activation happens later, in super client mode, once the image is running properly.
When it asks you to sign in, find the offline account option and create a local account. The setup flow pushes hard toward a Microsoft account and the button that avoids it sits quietly in a bottom corner. Take the local account anyway. An image carrying somebody's personal login out to forty seats is a support ticket with a delay fuse on it.
Once Windows is up, install the current patches and turn on the legacy .NET Framework feature in Windows Features. A surprising number of game launchers and anti-cheat components still expect it, and adding it now costs a click where adding it later costs a rebuild of the image.
Resist doing anything else at this stage. No browser, no utilities, no cleanup tool, no tweaking of visual settings, nothing that feels like making the machine nice. Everything you install now travels to every seat and every gigabyte you add is a gigabyte the server reads from and caches for the life of the room. There is a stage later, once the image is running properly from the server, where you add games and launchers in super client mode and those changes are saved back deliberately. This is not that stage. Right now you are building the smallest working Windows you can, and the discipline to create a diskless boot image that stays small is repaid on every boot the room ever does.
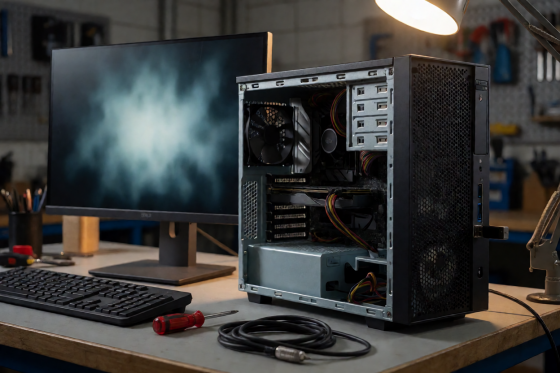
A master PC open on a workbench during a clean Windows install
The step everyone gets wrong
Install the network adapter driver. Install nothing else.
No chipset drivers. No graphics drivers. No motherboard utility bundle, no RGB suite, none of the things that feel like the obvious next move on a fresh Windows install. Get the NIC driver from Intel or Realtek directly, set a static IP on the adapter, and stop there.
This is the instruction people override, because installing drivers on a new build is muscle memory and skipping them feels careless. To be fair, on any other Windows build it would be. On this one it is the whole point: the image is going to be adapted to every board it meets, and a pile of board-specific drivers baked in at this stage works against that rather than helping it. The graphics driver in particular belongs to a later stage, handled on its own terms once the image is booting from the server, and putting it in now only makes the image larger and more opinionated about hardware it has not met yet.
Then run the NIC optimization pass, which is the same short procedure you run on the server, and install the CCBoot client on the master PC. The installer asks you to disable UAC, then asks which adapter to use.
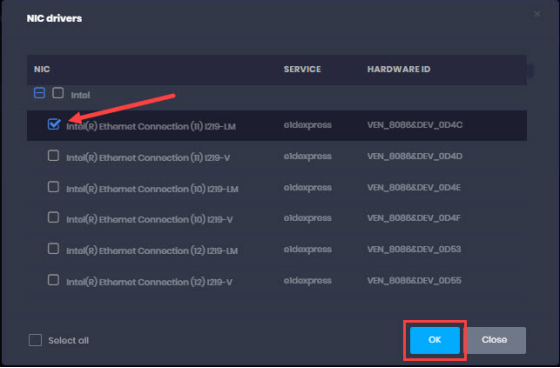
And then it shows you a window listing NIC drivers with checkboxes.
Tick nothing. Click OK with every box clear, finish the install, and reboot once.
You will meet that window again, and the second time the answer is different. When you carry the drive to a different motherboard later to teach the image about another adapter, you tick the entry for the adapter in front of you and click OK. First pass on the master PC, nothing ticked. Later passes on other boards, the one adapter you are adding. Getting those two the wrong way round produces an image that boots beautifully on the machine you built it on and refuses to come up anywhere else, which is a confusing failure to diagnose because the image itself is perfectly healthy.
The NIC drivers window in the CCBoot client installer with one adapter selected
Upload the image to the server
Before you click Upload Image, turn on file sharing at both ends.
The upload lands in a shared folder on the server, and when sharing is switched off on either machine the upload simply fails without explaining which of the two ends is the problem. Checking it first takes a minute. Diagnosing it afterwards takes considerably longer than that.
The upload also asks for an image volume size, which is the size the virtual disk will present to the clients rather than the size of the file itself. Give it comfortable room for the games you plan to hold and the launchers that will grow on their own, because expanding it later is a separate job. Being generous here costs you nothing today.
There are two ways to send it across, and either is fine. This is the point in the job to create a diskless boot image where the work stops being yours and becomes a progress bar, so pick one and let it run.
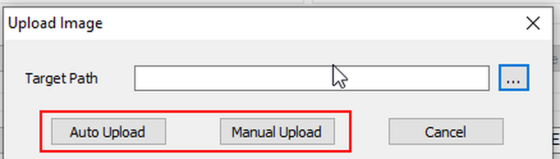
Auto Upload wants the server's shared folder path, in the form of the server IP followed by the share name, which sits on the server as a folder on its own drive. Enter the path, click Auto Upload, and the image travels on its own.
Manual Upload gives you the partition list instead. Select all the hidden partitions, because the ones Windows creates for boot and recovery are part of what makes the image bootable. Leave the Use VHDX box unchecked so the process produces a VHD, which is the format to use here. Then pick the destination path and start it.
The Upload Image dialog with Auto Upload and Manual Upload options
Add the image and boot exactly one client
On the server control panel, open the Boot page, go to the Image tab, and click the plus button. Give the image a name you will still understand in six months, browse to the file you just uploaded, and confirm. It appears in the list with its name and its path.
Now boot one machine.
One. Not the row, not the floor, one seat with a monitor you can actually watch. The first boot is where you find out whether the adapter, the BIOS mode and the upload all agree with each other, and finding that out on one machine is a ten-minute conversation while finding it out on forty is an evening.
If that seat reaches the desktop, the hard part is behind you.
That first successful boot is also where the image stops being a file and starts being something you maintain. From here on, changes go in through super client mode on one machine and get saved back to the image, which is the same routine you will use for every game install, every launcher update and every Windows change for as long as the room runs. Activate Windows in super client. Install the graphics driver. Put the first game on and watch it launch. Each of those is a change to one machine that lands on all of them, and getting used to that rhythm now, while nothing depends on it, is worth the extra half hour.
One image, every motherboard on the floor
Rooms buy hardware in batches, which means most floors are running two or three motherboard models even when they were bought as one fleet. The same image covers all of them.
Open the image in the control panel, edit it, and tick Enable NIC PnP. Then boot a machine with a different board on that image. The adapter driver is pulled down automatically and added to the image, and you can watch the NIC driver version appear on the client's boot screen while it happens. When the machine reaches the desktop, that board is now covered.
Repeat once per board model and you are done (and yes, you can do this with the floor half full, one machine at a time, as long as you are not in a rush). Different chipsets, different CPU vendors, Intel and AMD side by side, all booting the same file on the server. That is one image for clients of different specs working the way it is supposed to, and it is the feature that turns a mixed floor from a filing problem into a non-issue.
This is also the answer to the question every owner asks at some point, which is whether adding a new batch of machines next year means starting over. It does not. You create a diskless boot image once, and new boards join it one boot at a time for as long as the room exists.
If a board does not come up, open Image Restore on that image and look at the driver list. The adapter that was collected will be listed there by version, which tells you immediately whether the collection step happened or not.
Ready-made image or your own?
Both exist, and they answer different questions.
There are prepared images available, already optimized, with the common runtimes installed and a boot time under twenty seconds. Downloading one and pointing a client at it is the fastest way to see a diskless boot actually happen, and for an evening of evaluation that is exactly what you want.
For the floor you are going to run, the official recommendation is to build your own from one of your own client PCs, and that recommendation is worth taking. An image built on the hardware it will spend its life on starts from a position of already knowing that hardware.
So use a ready-made image to prove the concept this evening. Build your own for the room.
How to tell the image is actually good
Four checks, in order, before it goes anywhere near a paying customer.
Time a single boot from power button to usable desktop. You want the seat ready in well under a minute, and a number that sits far outside that is telling you something is wrong before the floor tells you.
Watch the boot screen for the driver version line. It confirms the adapter was collected rather than assumed.
Open Image Restore and read the driver list back. Everything you taught the image should be listed there.
Then boot a machine with a different motherboard. This is the check that separates an image that works from an image that works on exactly one machine, and it is the one most people skip precisely because the first boot went so well that a second test feels unnecessary, which is also why the problem it catches tends to surface later, on a busy evening, on the row of machines nobody thought to try.
If something in that sequence does not look right, ask support to look at it with you rather than rebuilding from the ISO on a hunch. Most first-image problems are one setting, and the setting is usually the BIOS mode or the driver pass.
Build one on the spare machine this week
You do not need the floor closed to try this. A spare client, a spare drive, a USB stick and a quiet afternoon will take you through the whole sequence, and the image you produce is a real image rather than a practice run.
Download CCBoot and build one on a spare machine, then boot a second machine with a different board on it. That second boot is the moment the whole approach stops being theoretical, because what you are watching is one file on a server running hardware it has never met. Once you have done it once, the decision to create a diskless boot image for the whole room is not really a decision any more. It is just the afternoon you already know how to spend.