
Every SSD listing leads with one big number, and for a diskless build it is close to the least useful number on the page. Sequential read speed, printed in the largest font on the box.
Your floor will never ask for it.
Picking an SSD for diskless server duty comes down to a figure that usually sits three scrolls further down the specification table, under a heading nobody reads. Random write IOPS. That is the shape of the actual work: forty seats writing small scattered blocks, all evening, all at the same time, into one machine in the back room.
The number on the box is the wrong number
A diskless server spends its day doing two things, and only one of them is what SSD marketing is written for.
Reads come in a burst at opening. Every machine powers on inside the same few minutes and asks for roughly the same boot data, which sounds punishing until you notice that the second machine onward is served from RAM cache rather than from the drive at all. Reads are the easy half, and RAM absorbs most of them before the SSD is even involved.
Writes are the other half and they never stop. Shader caches, game logs, temp files, Windows background chores, an anti-cheat writing to itself mid-session. Every one of those is small, scattered, and arriving from every occupied seat at once.
That is a random write workload, and it has almost nothing to do with the sequential figure on the box.
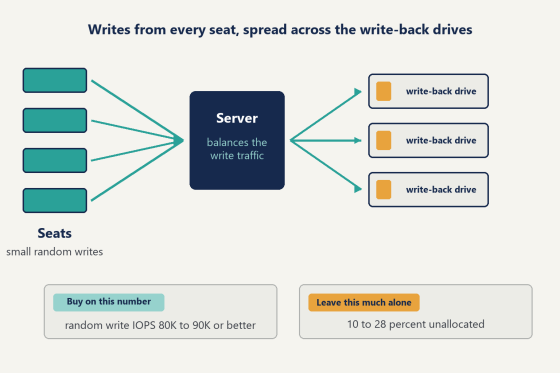
So the spec to shop against is random write IOPS. The guidance in the disk pages in the wiki puts the floor at 80,000 to 90,000 for a write-back drive, and above 90,000 is better. Any drive that clears that comfortably will do the job, whatever badge is on it, and any drive that does not will feel slow in a way no amount of server RAM can hide.
Worth checking the figure yourself rather than trusting a product blurb. Manufacturers quote random performance at a queue depth that flatters it (deep queues that a real floor rarely produces), and the honest comparison is between drives measured the same way at the same depth.
In practice that one figure decides more about an SSD for diskless server build than everything else on the specification sheet put together. Two drives at the same price and the same capacity can sit a long way apart on it, and nothing on the front of either box will tell you which is which.
Diagram of client writes spread across multiple write-back drives on the server
Four drives, four different purchases
A diskless server wants four storage jobs kept apart, and the useful way to think about them here is not what each one does but what each one needs you to pay for.
The Windows drive is the least interesting of the four. It holds the server's own operating system and the shared folder, it wants to be reliable rather than fast, and a mainstream SSD of around half a terabyte has been the sensible answer for years.
The image drive holds the client operating system that every seat boots from. It is read-heavy work and RAM covers most of it, so half a terabyte or more of any decent SSD is enough.
The game drive is a capacity purchase with read performance attached. Two terabytes is the starting point and plenty of rooms want four, and anything past two terabytes has to be initialized as GPT rather than MBR. Where the game drive is NVMe or a good SSD already, there is no need to layer an SSD cache on top of it. The drive is the cache.
Then the write-back drive, which is where the evening is won or lost, and which is the only one of the four where the IOPS number decides anything.
Why the write-back drive is the one to spend on
Once a room passes twenty or thirty seats, one write-back drive stops being enough. That is the official line and it matches what rooms report, usually in the form of a floor that feels fine on a Tuesday afternoon and sticky on a Friday night.
The answer is more drives rather than a bigger one.
CCBoot spreads client write traffic across every write-back drive you give it, so two drives share the load without any configuration beyond adding the second one. Three is normal in a busy room. Adding one is a twenty-minute job with the floor closed, and it moves the ceiling further than almost anything else you could spend the same money on.
The effect is visible the same evening. Write latency that had been climbing through the busy hours flattens out, and the seats that were taking a beat longer than their neighbours to load a map stop doing it. That is the whole reason the best SSD for diskless server write-back duty is rarely the most expensive drive in the shop. Two adequate drives sharing the work beat one excellent drive carrying all of it, and they cost less together.
Now the part that catches experienced builders, because it runs against instinct: do not put the write-back drives in a RAID array.
RAID 0 across SSDs raises sequential throughput. Sequential throughput is not what your floor generates, so the array buys you a number that looks good in a benchmark and does close to nothing for the workload you actually have. The balancing that the server already does across separate drives gives better random write performance than the array would. Separate drives also fail separately, which matters on a part that is consumed by writing. If you do want RAID 0 somewhere else in the build, create it in Windows disk management rather than in the BIOS.
Seats that happen to have a drive of their own can take a share of this load too. The local writeback cache settings let a client absorb part of its own write traffic, which takes pressure off both the server drives and the switch.
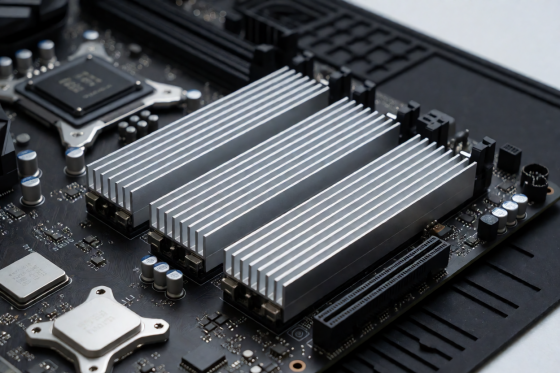
Three NVMe drives under their heatsinks in the M.2 slots of a server motherboard
Format it right before the games go on
Three settings, ten minutes, and they have to happen before the library is loaded.
Format every disk except the Windows partition with a 32K allocation unit rather than the 4K default. This one setting separates a room that feels fine at fifty seats from one that stutters at thirty-five, and it costs nothing at build time. Changing it afterward means reformatting the drive and reloading everything that was on it, which is how a ten-minute decision turns into a lost Sunday.
Do it first.
Use GPT rather than MBR on every drive, not only the ones over two terabytes. There is no upside to the old partition scheme here and there is a hard limit waiting at the two terabyte line.
Set SATA mode to AHCI in the server BIOS. It improves write-back performance and it is one toggle.
Label the drives in Windows disk management while they are still empty and you still remember which is which. Six months later, with the room busy and one drive misbehaving, the difference between a labelled set and four identical-looking volumes is an hour of your evening.
While you are in the server settings, the RAM cache allocation is worth getting right at the same time, because it changes how much the drives are asked to do at all. On a server with 32 GB, the suggested split is about 2 GB of cache for the image disk, 20 GB for the game disk, and 2 GB for write-back. Double the memory and the game disk cache roughly doubles with it while the other two stay where they are. The game disk takes the largest share every time because that is where the bytes players are waiting on live. Leave 8 to 10 GB free for the server's own operating system, always.
How much SSD for diskless server duty each room needs
Seats | Write-back drives | Cache per | Game drive | Windows and |
up to 20 | 1 SSD | 1024 MB | one SSD | one SSD each |
20 to 40 | 2 NVMe | 1024 to 2048 | NVMe, 2 TB | one SSD each |
40 to 70 | 2 to 3 NVMe | 2048 MB | NVMe, 2 TB | one SSD each |
70 to 100 | 3 NVMe | 2048 to 3072 | NVMe, 4 TB | one SSD each |
over 100 | 3 or more NVMe | 3072 MB | NVMe, 4 TB | one SSD each |
Read the write-back column as the one that scales with seats and the rest as roughly fixed. A 24-seat room and a 90-seat room can run identical game drives holding the same library, because the library does not get larger when you add desks.
Keeping the write-back drive fast: TRIM and headroom
This section is the one most rooms have never been told about, and it is the reason a drive that is benchmarked beautifully in March feels tired by September.
Here is what happens inside the drive. Sustained heavy writing works through the supply of clean NAND blocks faster than the controller can recycle them in the background. Once the clean supply runs low, garbage collection turns aggressive and starts competing with the writes your seats are making, which shows up on the floor as latency spikes rather than as a steady slowdown. The drive is not failing. It is busy tidying up at exactly the moment you need it to be writing.
An SSD for diskless server duty is a consumable part rather than a fixture, and these two settings decide how slowly it gets consumed. Both are one-time setups.
Scheduled TRIM. TRIM tells the drive which blocks hold data that no longer matters, so the controller can reclaim them in advance instead of during a rush. Run it as Administrator against the write-back drive:
defrag X: /L /U /V
Replace X: with the write-back drive letter. Frequency follows the pressure the drive is under rather than a calendar. The heavier the write load and the fewer drives sharing it, the more often it should run: hourly at the extreme end where a single drive is carrying a large busy room, weekly or monthly where several drives split the load in a smaller venue. Most rooms with two or three write-back drives sit comfortably at weekly. Put it in the Task Scheduler rather than trusting anyone to remember (nobody remembers, including the person who set it up).
Over-provisioning. Leave part of the drive unallocated and the controller uses that space for garbage collection, which cuts write amplification and extends the life of the drive. Shrink the partition so that somewhere between 10 and 28 percent of the total capacity is left unallocated, then run the TRIM command once afterward so the firmware learns the space is available. Some drive makers also expose this directly in their own utility.
The returns here are the kind that sound exaggerated until you understand that you are handing the controller room to work in. Industry testing puts 6 percent over-provisioning at roughly double the performance and lifespan, and 28 percent at around five times the lifespan. Those are ballpark figures rather than anything measured on your specific drive, and the direction is what matters: a little headroom pays for itself, and quite a lot of headroom pays for itself several times over.
Skipping the final TRIM after shrinking the partition is the common mistake. The space is there, the firmware does not know it is there, and the whole exercise achieves nothing.
Six solid state drives laid out in rows on a workbench mat
Watch the drives before they ask to be watched
Write-back drives are the one part of the build that gets used up, so they deserve a glance on a schedule rather than attention only after something goes wrong.
Check the health and the written-terabytes figure on the write-back drives once a quarter. Any drive utility will read it (the drive maker's own tool is usually the quickest way in). What you are looking for is the trend rather than the absolute number: a drive that has taken a predictable amount of writing per month is behaving, and one that has jumped is telling you the load moved onto it because another drive is misconfigured or missing from the set.
The other thing worth a quarterly look is whether all the write-back drives are still registered in the Disk tab. Drives get added, servers get rebuilt, and a set of three that quietly became a set of two carries fifty percent more load on each survivor without a single error message appearing anywhere.
Replace on the trend, not on a failure. A write-back drive that has done its life's work gives plenty of warning in its health figures, and swapping one out during a slow afternoon costs nothing except the swap itself.
Does a cheap drive actually cost less?
Not on this workload, no. Honestly, buying on price alone is the one shortcut here that reliably comes back around.
The official guidance is blunt about it. Low-quality and inexpensive drives are a poor choice for write-back and for the other primary roles, because corruption on one of them does not present as a drive problem. It presents as clients hanging, which sends you looking at the network, the image, the switch and the client BIOS before you get anywhere near the drive that caused it.
What to look for instead, in plain terms. TLC rather than QLC, because QLC gives up write endurance for capacity and write endurance is the thing this job consumes. A DRAM cache on the drive rather than a design that borrows system memory. An endurance rating in terabytes written that is published rather than absent. And the random write IOPS figure from earlier, verified rather than assumed.
That is a specification, not a shopping list, and that is deliberate. The drive that best fits it this quarter will be replaced by something else next year, so if you want the current answer rather than a durable one, ask support which drives rooms are running now. They see what is arriving without trouble across thirty thousand deployments, which is a better sample than any review roundup.
Measure the drive you already own
Before ordering anything, find out where you actually stand.
Run a random write benchmark against your current write-back drive, at a realistic queue depth, while the floor is closed. Compare it to the 80,000 to 90,000 IOPS line. If the drive clears it and the room still drags in the evening, add a second write-back drive before you replace the first one, because two adequate drives beat one excellent drive on this workload every time.
Then set up the TRIM task and leave the headroom before the floor gets busy, not after it starts complaining.
Download CCBoot and measure your own drive against a real evening rather than against a product page. The right SSD for diskless server work is not the one with the biggest number on the box. It is the one that keeps its random write speed on a Friday in month nine, with room left on it to breathe.