
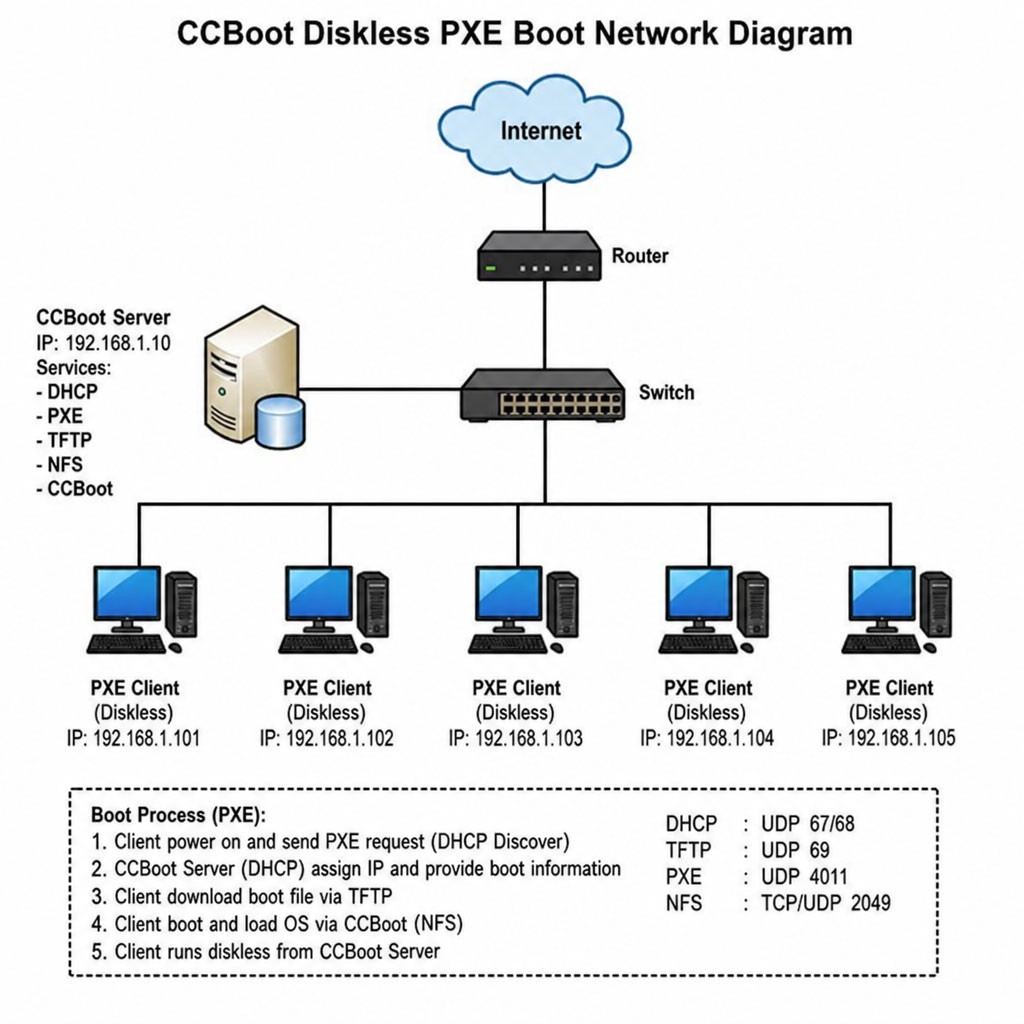
A single image multiple PC boot setup lets many computers start from one shared operating system image stored on a central server instead of each machine relying on its own local drive. In a diskless PXE boot environment, each client PC powers on, requests network boot instructions, downloads the boot loader, and then runs the OS image across the LAN. The result is a more centralized way to manage labs, gaming centers, classrooms, training rooms, and multi-PC workstations.
CCBoot is designed for this kind of diskless boot workflow. It combines PXE network booting with iSCSI-based OS image delivery, so client PCs can boot from a server-managed image while temporary changes are handled through cache and writeback settings. To learn more about the product, visit the CCBoot diskless boot software homepage. For the installer, manual, and related resources, use the official CCBoot download page.
Before You Start: What You Need
Plan the environment before installing anything. Diskless boot is highly dependent on network, storage, and driver compatibility.
Hardware and Network
You will need:
- A dedicated CCBoot server with enough CPU, RAM, and disk performance for your number of clients
- Wired client PCs with PXE-capable network adapters
- A stable gigabit network at minimum for small deployments
- 10GbE or multiple teamed NICs for larger environments, depending on workload
- Reliable switches, quality cabling, and a clean LAN design
- SSD or NVMe storage for image, cache, and writeback workloads where possible
Avoid wireless booting. PXE and iSCSI diskless boot should run over wired Ethernet.
Server OS and Software
Use a supported Windows or Windows Server version recommended by the current CCBoot documentation. Keep the server updated, but avoid making major OS or driver changes during business hours. Install CCBoot on a machine with a static IP address so clients always know where to boot from.
DHCP, TFTP, PXE, and iSCSI Basics
A typical CCBoot workflow uses:
- DHCP to give the client an IP address and boot information
- TFTP to deliver the PXE boot files
- PXE to start the client over the network
- iSCSI to stream the Windows boot image from the server
Make sure only one DHCP authority is active for your boot subnet, unless you intentionally configure your existing router or firewall DHCP service with the correct PXE options.
Storage Planning
Separate storage roles whenever possible:
- Image disk: Stores the master operating system image
- Writeback disk: Stores temporary client writes during sessions
- Cache disk: Improves performance for frequently accessed data
- Game or application disk: Optional shared data disk for large software libraries
Do not place everything on one slow disk. Diskless boot concentrates client storage activity on the server, so storage design matters.
Licensing
Before deployment, confirm licensing for:
- CCBoot server and client seats
- Windows operating systems
- Games, productivity apps, drivers, and any commercial software in the image
- Antivirus, endpoint tools, and management agents if used
Diskless boot simplifies deployment, but it does not replace proper software licensing.
Step 1: Install CCBoot Server
Download the current installer from the official CCBoot download page, then install the server component on your dedicated boot server.
After installation:
- Assign a static IP address to the server.
- Open the required firewall ports for DHCP, TFTP, iSCSI, image upload, and service control as specified by CCBoot documentation.
- Create or confirm storage paths for images and writeback data.
- Launch the CCBoot console and review the default options.
- Confirm that the server NIC is connected to the correct client LAN.
Best practice: keep the CCBoot server separate from unrelated heavy workloads such as file indexing, backup jobs during business hours, or large downloads.
Step 2: Prepare the Master PC
Choose one clean client PC as the master. Ideally, use hardware that represents the rest of your client fleet. If your PCs have different motherboards or NICs, start with the newest or most compatible system and test carefully.
On the master PC:
- Install Windows normally on a local SSD or hard drive.
- Apply essential Windows updates.
- Install chipset and network drivers first.
- Avoid unnecessary vendor utilities that may not apply to all PCs.
- Install core applications that every client needs.
- Set the network adapter to the configuration required by CCBoot guidance.
- Install the CCBoot client component.
- Select the correct boot NIC when prompted.
- Reboot once to verify the system is stable before capture.
For a reliable single image multiple PC boot setup, keep the master image clean. The more hardware-specific tools you install, the greater the chance of driver conflicts on other client models.
Step 3: Upload the Master Image to CCBoot
Open the CCBoot client tool on the master PC and use the image upload option to send the system image to the server.
Before uploading, check that:
- The server share is reachable from the master PC
- File sharing and permissions are correctly configured
- The image storage disk has enough free space
- The master PC is connected by wired Ethernet
- The image name is clear, such as Win11-Lab-Master.vhd
After upload, verify that the image appears in the CCBoot server console and is assigned to the correct storage path.
Step 4: Configure DHCP and PXE Boot
In the CCBoot server options, configure the boot network settings:
- Set the local server IP.
- Define the client IP range.
- Enter subnet mask, gateway, and DNS values.
- Confirm the iSCSI server address.
- Enable the CCBoot DHCP service if it will provide DHCP for the boot LAN.
- If using an external DHCP server, configure PXE boot options there instead.
Common pitfall: duplicate DHCP servers. If clients receive an IP address from the wrong device, they may never receive the correct PXE boot file.
Step 5: Add Client PCs
You can add clients manually or automatically.
For manual setup, collect each client’s:
- Computer name
- MAC address
- Intended IP address
- Gateway and DNS settings
- Assigned boot image
- Boot server address
In CCBoot, add the client and assign the uploaded image. For larger environments, create a default client template and enable automatic client addition so new PXE clients inherit the correct base settings.
Best practice: use a consistent naming system such as LAB-PC-001, LAB-PC-002, and so on. This makes troubleshooting much easier.
Step 6: Configure Cache and Writeback Settings
Cache settings affect performance and stability. Start conservative, then tune after testing.
Set up:
- Server RAM cache for frequently read image or application data
- SSD cache if your workload benefits from faster repeated reads
- Client RAM cache when client PCs have enough memory
- Writeback disks for temporary client writes
Do not allocate all server RAM to cache. Leave enough memory for Windows and CCBoot services. Also monitor writeback disk usage; full writeback storage can cause lag, boot problems, or client instability.
Step 7: Test One Client First
Before rolling out to every PC, test with one client.
- Disconnect or disable the local boot drive if appropriate.
- Enter BIOS or UEFI settings.
- Enable PXE/network boot.
- Match boot mode to the image type, such as Legacy or UEFI.
- Boot the PC from the network.
- Confirm it receives DHCP, downloads the PXE file, connects to iSCSI, and loads Windows.
- Log in, open applications, reboot, and verify that temporary changes reset as expected.
If the first client works, test a small group. Only expand to the full fleet after confirming boot speed, application performance, and reboot behavior.
Troubleshooting Common Problems
Client Does Not Get an IP Address
Check DHCP settings, VLAN configuration, switch ports, and cabling. If the clients are on another subnet, you may need DHCP relay or IP helper configuration.
PXE Starts but TFTP Fails
Check firewall rules, TFTP service status, boot file settings, and whether another security product is blocking transfers.
Windows Starts Booting but Blue Screens
This usually points to driver, boot mode, or image compatibility problems. Confirm the NIC driver is included, the image was captured correctly, and UEFI or Legacy mode matches the client settings.
Image Upload Fails
Check sharing permissions, server storage space, Windows firewall, and whether the CCBoot client and server versions match.
Clients Feel Slow
Look for bottlenecks in server disks, writeback disks, cache allocation, NIC utilization, switch uplinks, and background tasks on the server.
Best Practices for a Stable Deployment
- Use wired Ethernet only for boot clients.
- Keep the CCBoot server on a static IP address.
- Use fast SSD or NVMe storage for image and writeback workloads.
- Test every hardware model before production rollout.
- Keep backups of known-good images.
- Document client names, MAC addresses, and assigned images.
- Update the master image in a controlled maintenance window.
- Avoid unnecessary drivers and utilities in the base image.
- Monitor writeback space and cache performance regularly.
- Keep CCBoot server and client components aligned by version.
Final Setup Checklist
Before going live, confirm that:
- CCBoot server is installed and reachable
- DHCP/PXE settings are correct
- The master image uploads successfully
- At least one test client boots cleanly
- Cache and writeback settings are stable
- All client licenses are accounted for
- A rollback image or backup exists
A single image multiple PC boot environment can save significant administration time when it is planned carefully. With CCBoot, you can centralize image management, reduce repetitive setup work, and make multi-PC deployment easier to maintain. Start with a small pilot, tune the server and cache settings, then scale your diskless PXE boot setup with confidence.