
A web-managed boot environment lets administrators control how multiple PCs start, update, and recover from a central interface instead of maintaining each machine one by one. For internet cafés, classrooms, training labs, gaming centers, and multi-PC business spaces, that can turn daily maintenance from a repetitive local task into a streamlined server-side workflow.
With CCBoot, web-managed boot is built around diskless/PXE booting: client PCs start over the local network, load a centrally managed boot image, and can return to a clean state after reboot. CCBoot describes its solution as diskless boot and PXE boot software for internet cafés and enterprises, with centralized image-based management for many PCs. (ccboot.com)
If you are exploring diskless deployment for Windows workstations, start with the CCBoot homepage to understand the platform, then use the CCBoot download page when you are ready to install the software.
What Is Web-Managed Boot?
Web-managed boot is a modern way to control network booting, disk images, client settings, and maintenance tasks from a browser-accessible or cloud-connected management panel. Instead of installing, patching, and troubleshooting every workstation locally, the administrator manages the boot source centrally.
In a CCBoot-style deployment, the client PCs do not need to rely on their own local system drives for the operating system. They use PXE to begin the boot process, receive network boot instructions, and then load the assigned system image from the server. CCBoot documentation explains that PXE works with DHCP and TFTP during startup, while CCBoot extends the process with iSCSI to stream a full Windows OS image to the client PC. (ccboot.com)
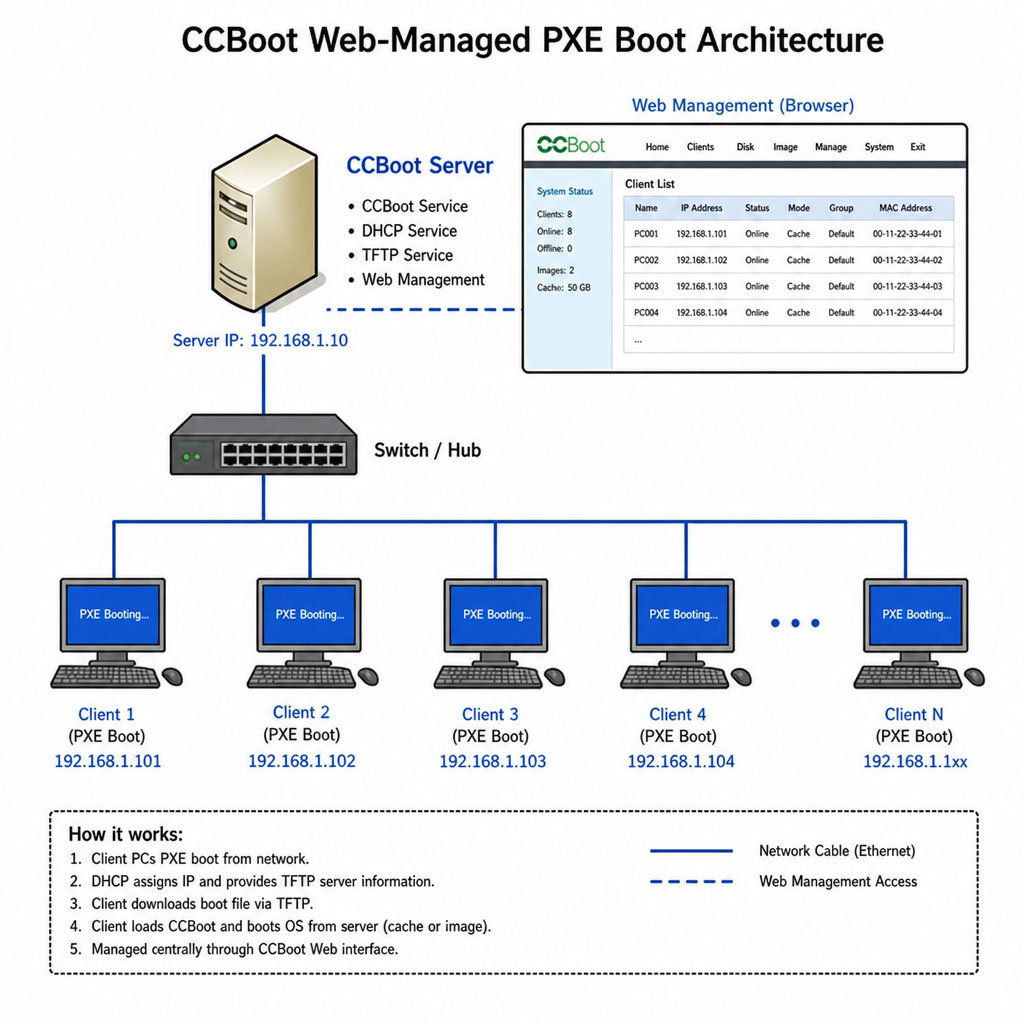
This model is especially useful when every computer should run a consistent environment. For example, a gaming center may want every station to use the same Windows image, game library, driver baseline, and security posture. A school lab may want students to start each class with a clean desktop. A business training room may need to reset machines quickly between sessions.
Why Use CCBoot for Web-Managed Boot?
CCBoot is designed for environments where many PCs need to be managed efficiently. The platform focuses on diskless boot, PXE boot, centralized images, client provisioning, and web-based control through CCBootCloud resources and the Cloud control panel. The CCBoot wiki includes management areas such as adding client computers, editing multiple PCs, running batch commands at clients, power control, remote control, Super Client, disk management, cache settings, and warning notifications. (ccboot.com)
Key Benefits
1. Centralized PC management
With web-managed boot, the server becomes the control point. Instead of updating each workstation separately, you update the master image or assigned image workflow and then reboot client machines as needed. CCBoot’s homepage highlights the ability to update many PCs through a master computer workflow, helping administrators avoid repetitive manual maintenance. (ccboot.com)
2. Cleaner workstations after reboot
In diskless environments, client changes can be discarded at restart, helping machines return to a known-good state. CCBoot describes this as making PCs feel fresh after reboot and reducing concerns about unwanted changes, malware, spyware, and user-caused configuration drift. (ccboot.com)
3. Reduced dependency on local hard drives
Because client PCs boot from a server-managed image, many deployments can reduce or eliminate local system drives on workstations. That can simplify hardware maintenance, especially in locations with many public-use PCs.
4. Faster rollout of software and games
For gaming centers and labs, the ability to centralize images and game disks can make software deployment more repeatable. CCBoot documentation describes disk roles such as image disk, write-back disk, game disk, RAM cache, and SSD cache within the control panel. (ccboot.com)
5. Easier scaling for multi-PC environments
Web-managed boot becomes more valuable as your PC count grows. Managing five computers manually may be tolerable. Managing 30, 100, or more workstations manually becomes costly and inconsistent. A CCBoot deployment gives administrators a structured way to add clients, assign images, configure disks, and standardize startup behavior.
Before You Begin: What You Need
Before setting up web-managed boot with CCBoot, prepare the following:
- A dedicated CCBoot server with reliable storage and network connectivity
- Client PCs with PXE-capable wired network adapters
- A stable LAN, preferably gigabit or better for production use
- A clean Windows master image or a prepared client PC for image creation
- Access to your router, switch, DHCP, and BIOS or UEFI settings
- A plan for server disks, including image storage and write-back storage
- Administrator access to install CCBoot server and client components
For best results, use wired Ethernet rather than Wi-Fi. CCBoot’s client hardware requirements note that PXE-compatible network adapters are required and that wireless NIC booting is not supported. (ccboot.com)
Step-by-Step Setup for Web-Managed Boot With CCBoot
The exact configuration may vary depending on your network, server hardware, Windows version, motherboard firmware, and licensing needs. Use the steps below as a practical setup path, then confirm details in the CCBoot wiki for your specific environment.
Step 1: Plan Your Boot Architecture
Start by deciding how clients will connect to the CCBoot server. In a typical setup, all client PCs are connected to the same local network as the CCBoot server. The server provides or coordinates the services needed for PXE booting, image delivery, and write-back handling.
Document the following before installing anything:
- Server IP address
- Gateway and DNS settings
- DHCP range for client PCs
- Which device will provide DHCP
- Where boot images will be stored
- Where write-back files will be stored
- Whether clients use Legacy BIOS, UEFI, or UEFI Secure Boot
- Whether you need separate images for different hardware groups
Good planning prevents the most common PXE problems, including clients receiving IP addresses from the wrong DHCP server, loading the wrong boot file, or failing because the image and client firmware mode do not match.
Step 2: Download and Install CCBoot
Go to the CCBoot download page and download the appropriate CCBoot package. The download page lists CCBoot install resources, manuals, and videos, making it the best internal starting point for setup files and supporting documentation. (ccboot.com)
Install the CCBoot server software on the machine that will host your boot services. During installation, keep the server connected to the production LAN or a test LAN that mirrors your final setup.
After installation, confirm that the CCBoot services are running and that the server can communicate with the client subnet.
Step 3: Prepare Network Services
PXE boot depends on the client receiving the correct network startup information. CCBoot documentation for server setup notes that CCBoot uses ports including DHCP, TFTP, iSCSI, image upload, and service control ports, and it recommends opening the required ports on the server firewall. (ccboot.com)
At this stage:
- Assign a static IP address to the CCBoot server.
- Check whether your router or another server is already providing DHCP.
- Decide whether CCBoot will provide DHCP or whether you will configure an existing DHCP server for PXE options.
- Avoid having competing DHCP services on the same LAN unless you intentionally design for that setup.
- Open the required firewall ports on the server.
- Test basic connectivity between the server and a client PC.
CCBoot’s older server setup documentation specifically warns administrators to shut down other DHCP services on the LAN when CCBoot is expected to handle DHCP, because client PCs need to receive addresses from the correct boot service. (ccboot.com)
Step 4: Configure Disks in the CCBoot Control Panel
Next, configure storage roles. In a web-managed boot environment, disk layout matters because every client depends on the server for image access and write-back handling.
In the CCBoot control panel, assign disk roles such as:
- Image disk: Stores boot images.
- Write-back disk: Stores temporary client write data.
- Game disk: Stores shared game or application content where applicable.
- SSD or cache disk: Helps accelerate frequently accessed data when configured.
- RAM cache: Uses server memory to improve repeated read performance.
CCBoot’s disk configuration guide explains that disks can be set from the Boot page and that at least one disk should be set as the write-back disk. (ccboot.com)
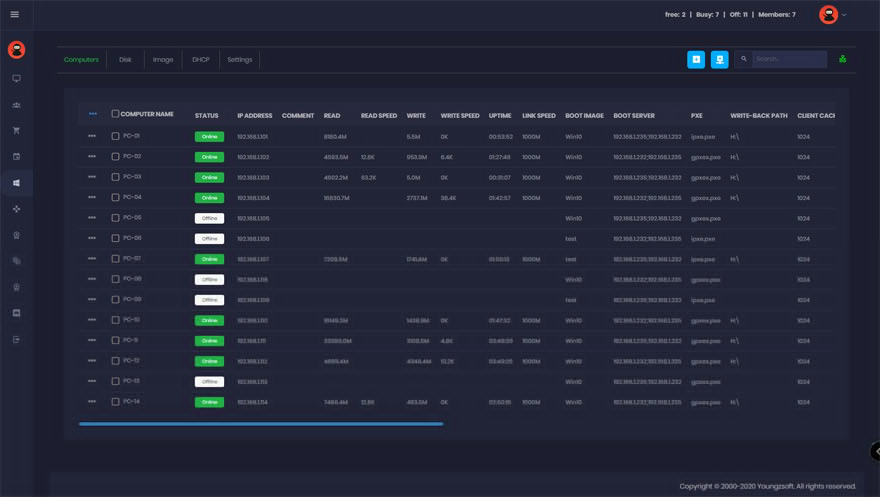
For production environments, avoid placing every role on a single slow disk. Separate image storage, write-back activity, and high-demand game or application data where possible. If you are starting small, you can begin with a simpler layout, then optimize once you understand client load and usage patterns.
Step 5: Create the Master Boot Image
A boot image is the operating system environment your client PCs will load. CCBoot recommends creating your own image from a client PC for the most reliable boot results, although ready-made images may be available in some workflows. (ccboot.com)
A practical image creation process looks like this:
- Choose one representative client PC as the master machine.
- Install Windows cleanly using the firmware mode you plan to use in production.
- Install Windows updates, chipset drivers, and NIC drivers.
- Avoid overloading the image with unnecessary hardware-specific drivers.
- Install the CCBoot Client component on the master PC.
- Reboot when prompted.
- Upload or create the image according to the CCBoot image creation workflow.
CCBoot’s boot image documentation recommends using a clean Windows ISO, installing only chipset and NIC drivers for wide compatibility, and adding other drivers later when appropriate. (ccboot.com)
Step 6: Add the Boot Image to CCBoot
Once the image is created or uploaded, add it to the CCBoot Cloud Panel. CCBoot’s “Add boot image” instructions describe going to the Boot page, opening the Image tab, clicking the add button, entering an image name, selecting the image file, and confirming the selection. (ccboot.com)
Use clear image names so administrators can identify them quickly. For example:
- Windows 11 Gaming Base
- Windows 10 Classroom Standard
- Training Room Clean Image
- AMD GPU Test Image
- Intel NIC Production Image
If your PCs use different motherboard models, GPUs, or NICs, consider grouping hardware and testing whether one image works reliably across all machines before rolling it out broadly.
Step 7: Add Client Computers
After the image exists in CCBoot, add your client PCs. CCBoot documentation for adding client computers explains that admins can add a client by entering details such as computer name, IP address, MAC address, hardware profile, and the selected image. (ccboot.com)
For each client, record:
- Computer name
- MAC address
- Assigned IP address
- Boot image
- Hardware profile
- Cache settings if needed
- Group or room locati0n
Start with one test client before adding the entire room. A single successful test gives you a known-good baseline for BIOS settings, DHCP behavior, image compatibility, and network performance.
Step 8: Select the Correct PXE Boot Option
Once an image is created, select the appropriate PXE option for the client firmware mode. CCBoot’s PXE selection guide explains that the Cloud Panel provides different PXE boot choices for UEFI and Legacy boot modes, including newer iPXE options. (ccboot.com)
Use the firmware mode that matches how the image was created:
- Use a Legacy-compatible image for Legacy BIOS clients.
- Use a UEFI-compatible image for UEFI clients.
- Review Secure Boot requirements if Secure Boot is part of your environment.
- Keep motherboard models consistent where possible.
- Document working PXE settings for each hardware group.
Do not mix firmware modes casually. A UEFI image and a Legacy boot configuration may fail even when the network and server are configured correctly.
Step 9: Configure Client BIOS or UEFI for Network Boot
On the client PC, enter BIOS or UEFI settings and enable network boot. For Legacy BIOS systems, CCBoot’s guide instructs administrators to enable options such as LAN Option ROM, Boot from LAN, PXE OpROM, or Legacy PXE Boot Option ROM, then set Network as the first boot priority. (ccboot.com)
A general process is:
- Start the client PC and enter BIOS or UEFI setup.
- Enable the onboard LAN controller if needed.
- Enable PXE, network stack, or LAN boot options.
- Move network boot to the top of the boot order.
- Save changes and restart.
- Watch the first PXE boot carefully for errors.
If the client does not appear in CCBoot or does not receive an IP address, troubleshoot DHCP first. If it receives an IP but fails later, check the selected boot file, firmware mode, image assignment, and firewall settings.
Step 10: Test One Client, Then Roll Out Gradually
Boot one client all the way into Windows. Confirm that the client:
- Receives the correct IP address
- Loads the assigned image
- Reaches the Windows desktop
- Uses the expected computer name
- Can access required applications or games
- Reboots back to a clean state
- Performs acceptably under normal workload
After one client works, test several more with the same hardware. Then test any different motherboard, NIC, or GPU models. Gradual rollout makes troubleshooting much easier than turning on every workstation at once.
Step 11: Optimize Performance
Once basic booting works, tune the environment for daily use. Focus on the areas that affect user experience most:
- Server storage speed
- Network bandwidth
- Switch quality
- NIC drivers
- RAM cache allocation
- Write-back disk performance
- Image size and cleanliness
- Number of simultaneous client boots
For busy gaming centers or classrooms, stagger mass boot events when possible. Even a strong server can experience a spike if every PC requests the boot image at exactly the same time.
Step 12: Maintain Images Through the Web-Based Workflow
The long-term value of web-managed boot comes from repeatable maintenance. Instead of treating each PC as separate, maintain a small number of approved images and update them intentionally.
A simple maintenance routine can include:
- Schedule image updates during off-hours.
- Test Windows updates before applying them to production images.
- Keep a backup of the last known-good image.
- Use clear version names when creating new images.
- Reboot test clients before broad rollout.
- Remove unused images and old write-back data periodically.
- Monitor server storage and cache usage.
This workflow helps administrators deliver a consistent user experience while reducing hands-on workstation maintenance.
Common Setup Mistakes to Avoid
Avoid these issues when deploying CCBoot for web-managed boot:
- Running multiple DHCP services without a clear design
- Creating the image in Legacy mode but booting clients in UEFI mode
- Forgetting to assign a write-back disk
- Using unsupported or unreliable network adapters
- Relying on Wi-Fi for boot clients
- Skipping NIC driver installation in the master image
- Adding every client before testing one machine successfully
- Using unclear image names that confuse future maintenance
- Underestimating storage and network load
Most PXE boot problems come down to three areas: DHCP, boot file selection, or image compatibility. Check those first before rebuilding the whole environment.
When Web-Managed Boot Makes the Most Sense
CCBoot is a strong fit when you manage many PCs that should behave consistently. Consider it if you run:
- Internet cafés
- Esports centers
- Gaming lounges
- School computer labs
- University training rooms
- Hotel or apartment business centers
- Enterprise testing labs
- Shared workstation environments
If your team spends too much time reinstalling Windows, cleaning infected machines, updating games, or reconfiguring public PCs, web-managed boot can simplify the entire lifecycle.
Get Started With CCBoot
Web-managed boot gives administrators a practical way to centralize PC startup, image management, and recovery. With CCBoot, you can combine PXE boot, diskless workstation management, centralized images, and web-based control into a workflow built for multi-PC environments.
To learn more, visit the CCBoot homepage. When you are ready to test the software, go to the CCBoot download page, review the available install resources, and begin with a small pilot deployment before rolling out to your full network.