2025-10-30
boot, VHD, usb
The following explains how to boot VHD files directly from a USB stick and how to convert VHD to USB or how to create images directly from ISO to USB files.
- Prepare a fast external removable USB disk. Avoid using a USB stick unless you're certain of its speed. We recommend using an external USB disk with an SSD inside. Ensure the disk has enough space for the VHD image file. (Figure 1)

Figure 1
Format USB
- Insert the USB disk into the server.
- Format the disk as NTFS.
- Open CCBoot folder and run CCVHDUSB.exe (C:\CCBoot\CCVHDUsb.exe)
- The program will automatically detect the USB disk.
- Select "Format USB" as the "Convert type", choose the correct USB disk, and click "Create" to proceed.
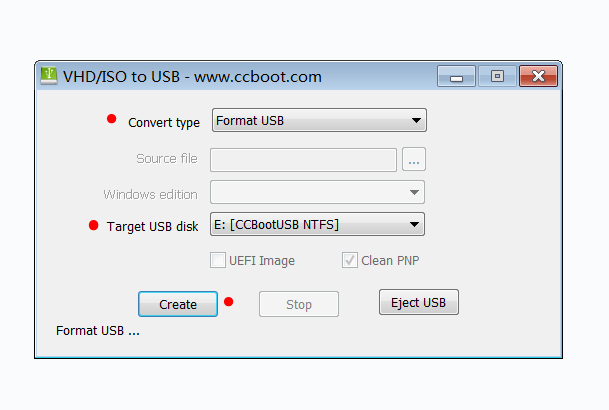
Figure 2
Create image from ISO
- Download the Windows ISO file from Microsoft’s website then mount the ISO or unzip its contents.
- Open CCVHDUsb.exe and set the Convert Type to “ISO to USB.” Select the source file install.wim (C:\Win11_25H2_English_x64\sources\install.wim), choose Windows Edition as Windows 11 Pro, ensure the USB drive is detected automatically, check the UEFI Image option, and click Create to start the process.
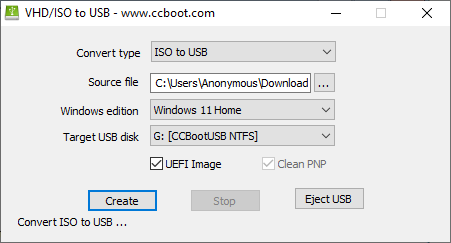
Figure 3
- Once the process completes successfully, the USB will automatically eject. Inside the USB, a new file named CCBoot.vhd will be created.
- On the client PC, plug in the USB , set the client PC's BIOS boot priority to USB first
- Once Windows has loaded, download and install CCBootClient to complete the setup.
- Shutdown the client PC, unplug the USB from it, and plug the USB back into the server PC.
- Copy the CCBoot.vhd file to your image disk, add the CCBoot.vhd as an image, then boot the client PCs from the network. Your new image will be ready.
VHD to USB
- After formatting the USB, go to cp.icafecloud.com → Boot → Image → select your image → Restore Points.
- Merge all restore points of the image, then copy the final VHD file to the USB drive. Rename the file to “CCBoot.vhd”.
- Back at the VHD to USB app select "VHD to USB" as the "Convert type", choose the correct USB disk, and check "UEFI Image" if your image uses UEFI. Also, check "Clean PNP". Finally, click "Create" to proceed.(Figure 3)
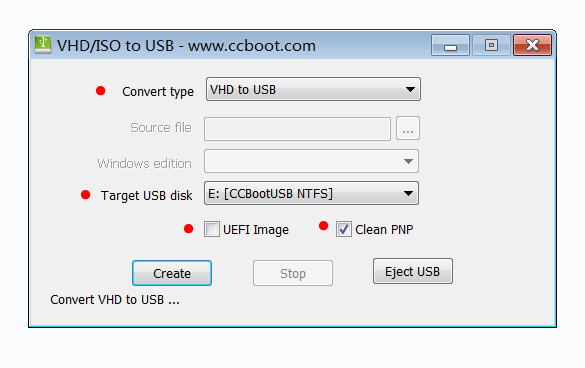
Figure 3
- Once the process is complete, click the “Eject USB” button to eject the USB disk.
- Set the client PC's BIOS boot priority to USB first, and boot the client using the USB disk. (Sometimes the Motherboard didn’t recognize the USB disk, reboot twice. If it still fails, please try another PC)