
2026-09-24
ccboot, hybrid, solution
The following explains CCBoot Hybrid Solution creates a VHD image from the server image and stores it directly on the client PC’s local SSD. The client PC boots Windows directly from the local VHD image, while games and shared data remain centrally managed on the CCBoot server.
Enable hybrid
- Open cloud panel
- Go to settings -> Center settings -> in diskless mode select Hybrid and click save (Figure 1)
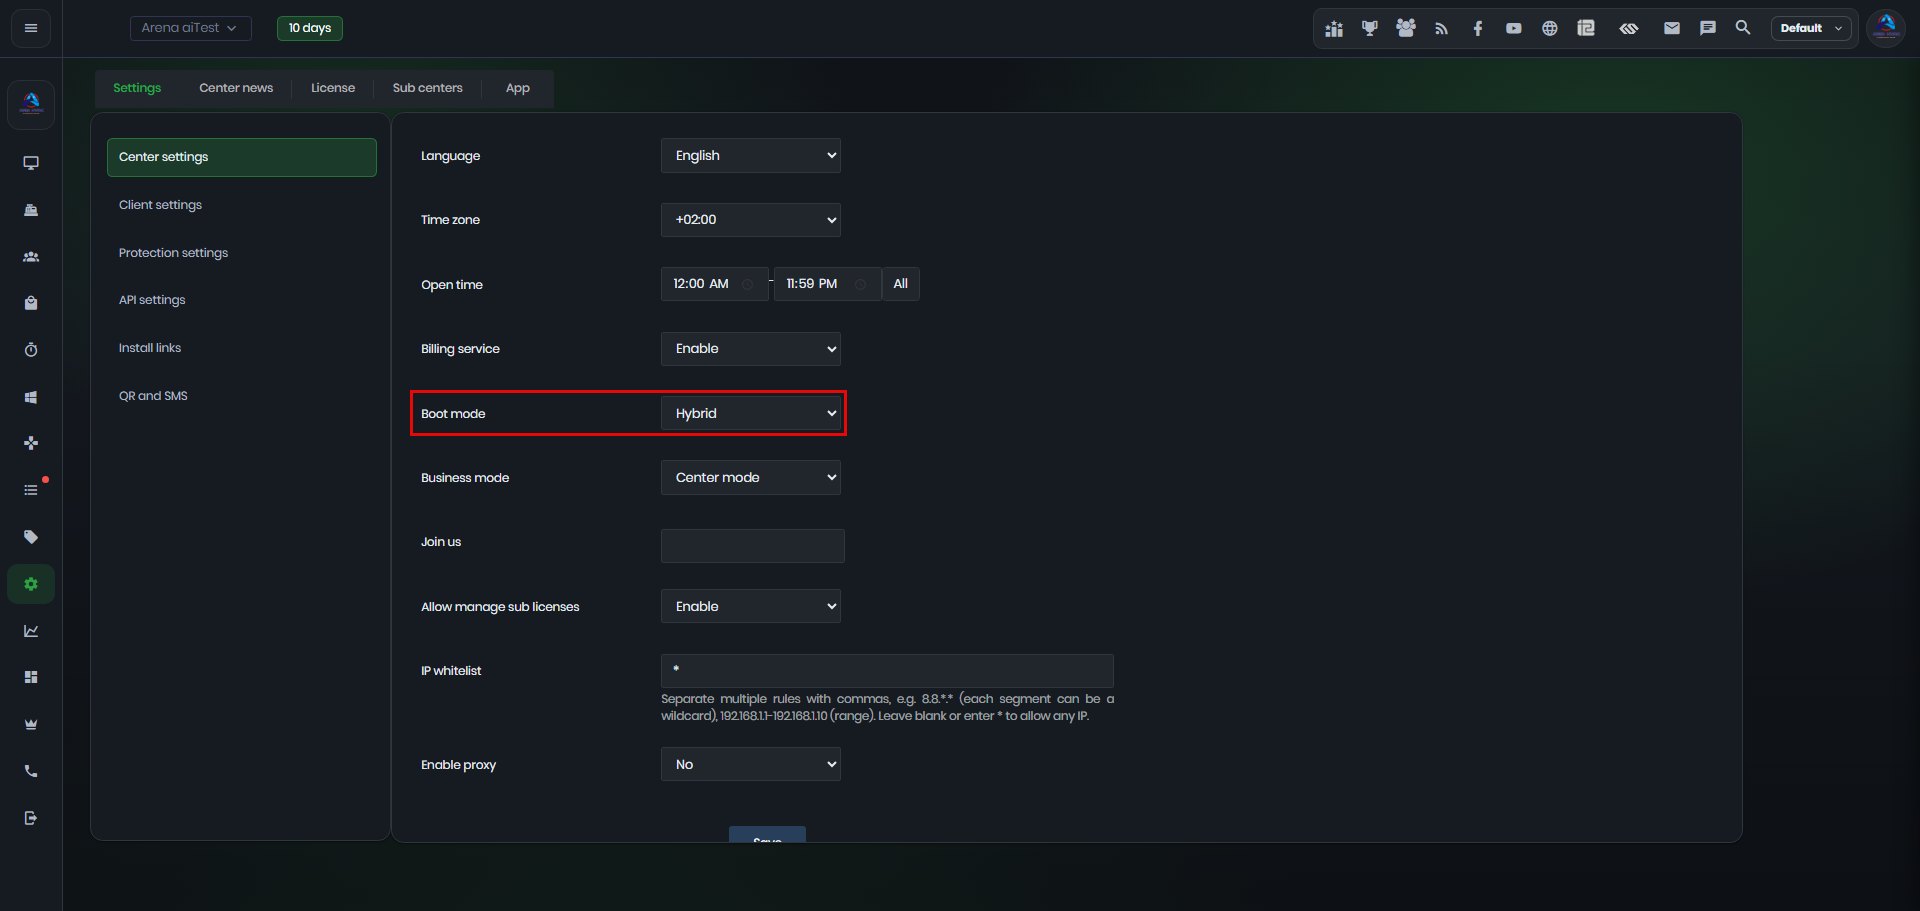
Figure 1
- Once Hybrid is enabled it will stop TFTP services , DHCP services, DHCP proxy services.(Figure 2)
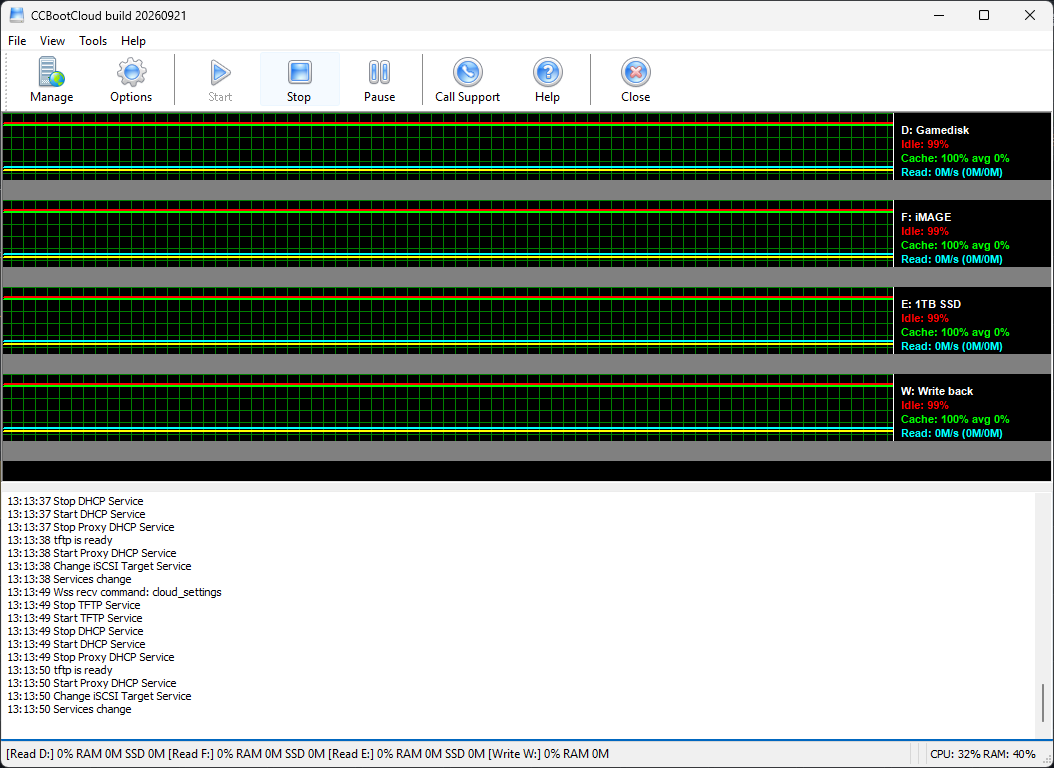
Figure 2
- The page will change to Disks once Hybrid mode is enabled. (Figure 3)
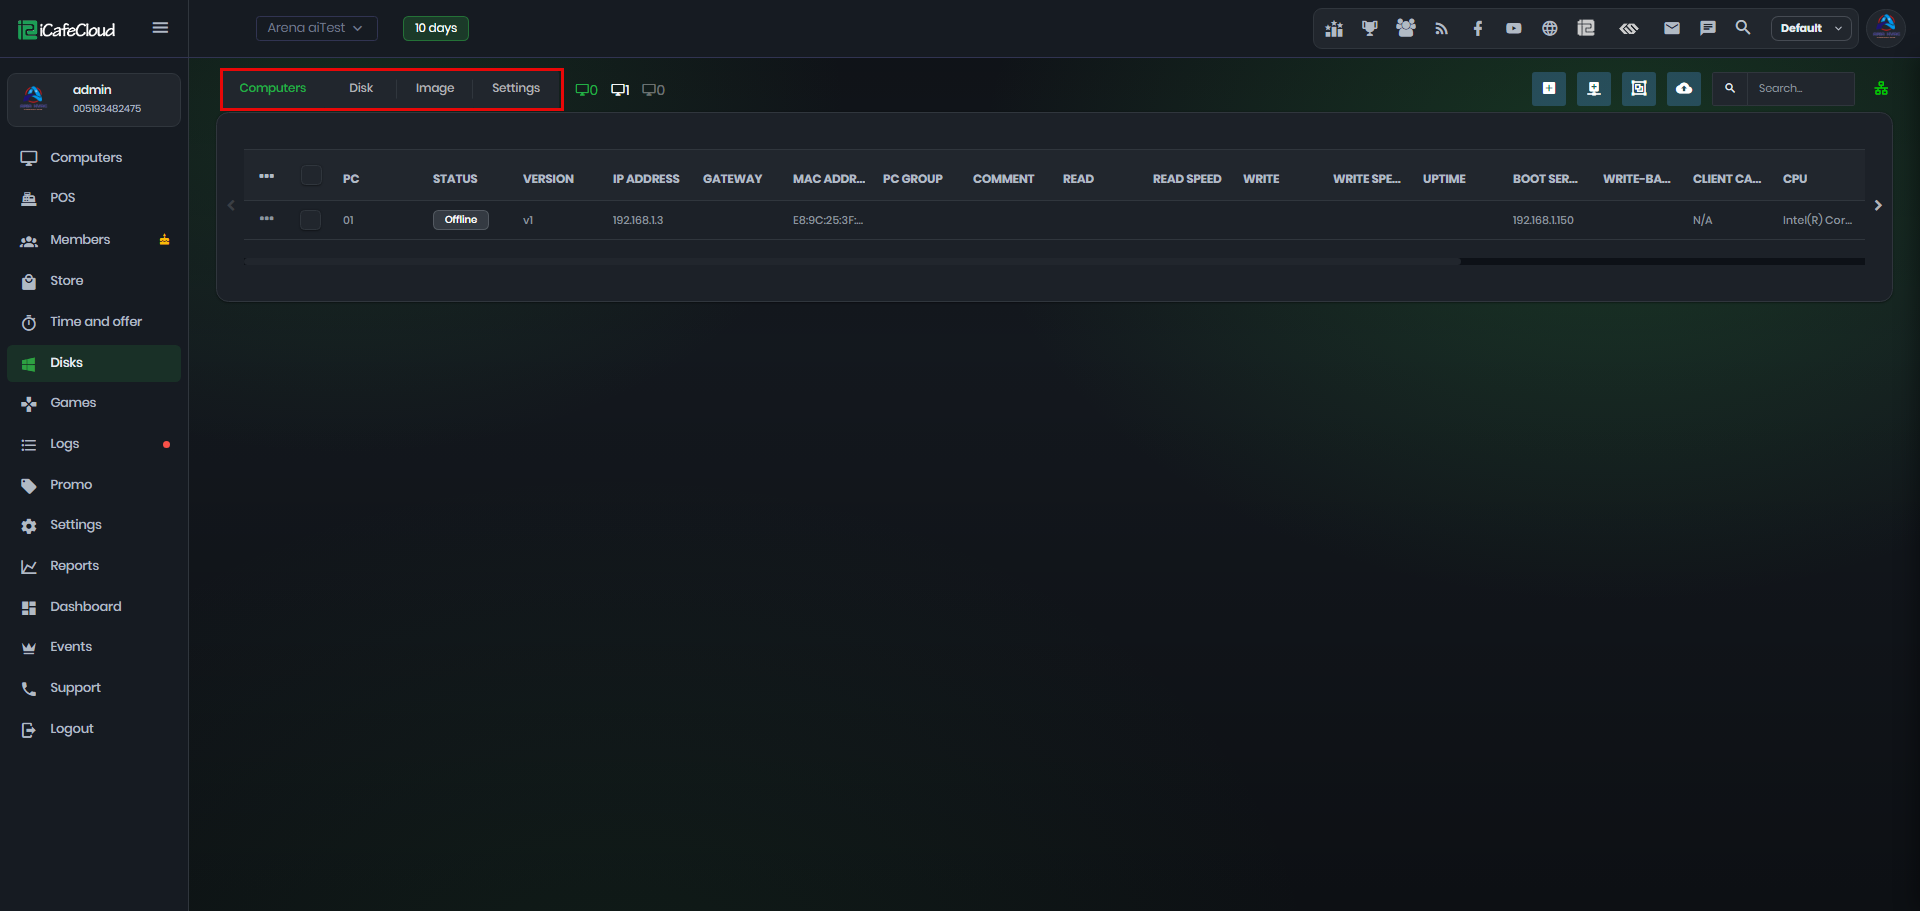
Figure 3
- The setup files can be found at settings - install links - CCBootCloud for the CCDisk server and client setup. (Figure 4)
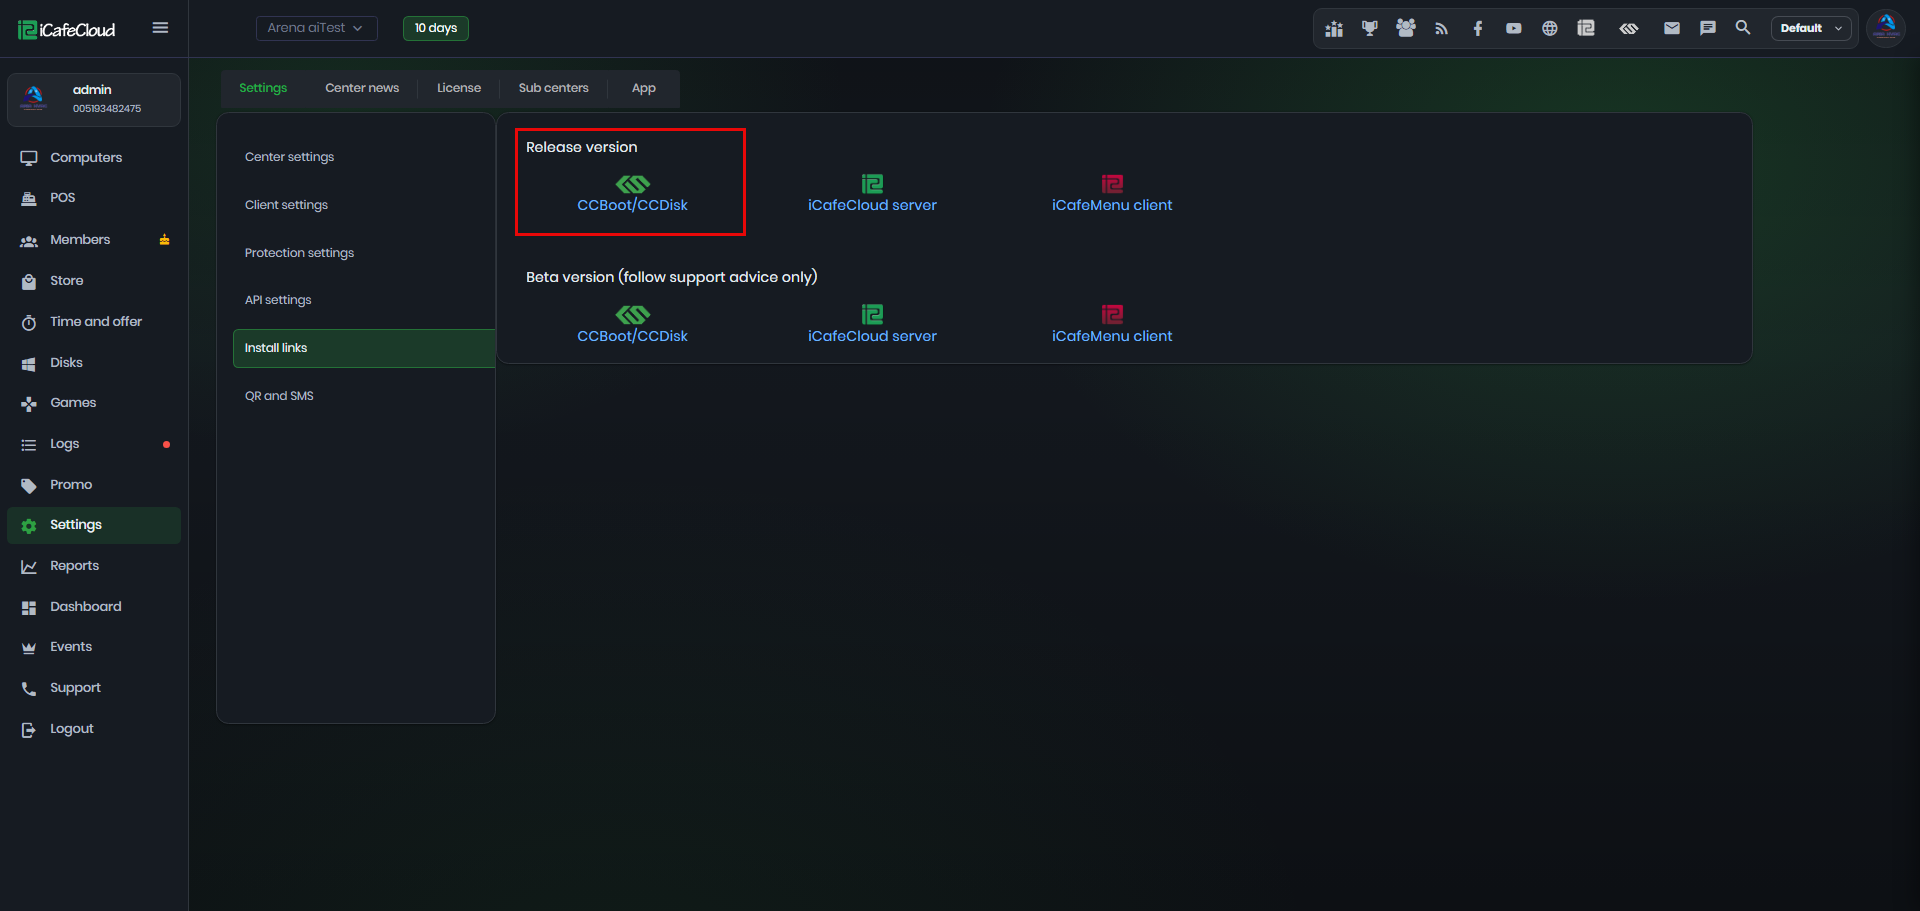
Figure 4
Server installation
- Once the CCBootCloud file is downloaded, double-click on it to start the setup. In the setup window, choose "CCBoot server installation" and click "Next”. (Figure 5)
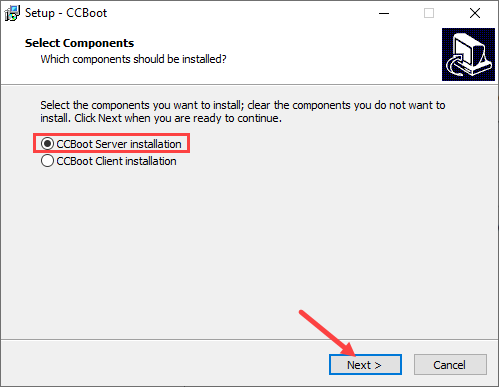
Figure 5
- On the destination folder leave it as default C:\CCBoot and click next. (Figure 6)
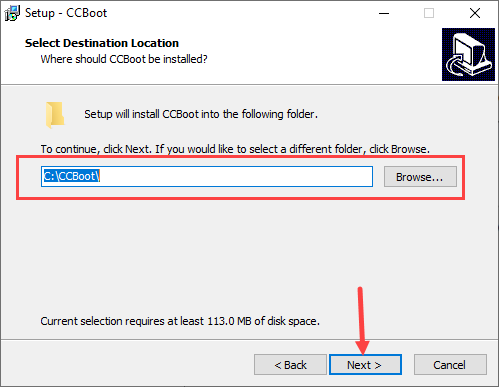
Figure 6
- After selecting "CCBoot server installation," click "Next" on the "Select start menu folder" window, then click "Next" again on the "Select additional tasks" window. Finally, click "Install" to finish the installation. (Figure 7)
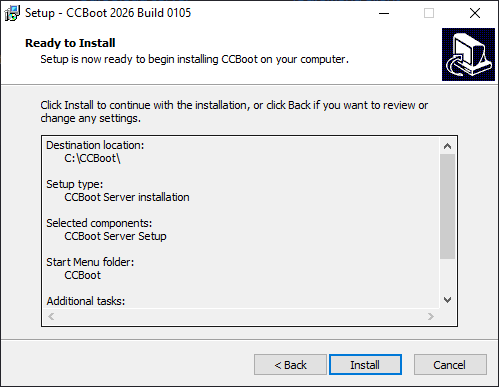
Figure 7
- Once the setup is complete, the CCBootCloud server will open and ask for your license and password. After you fill in this information, click "OK," and it will connect with the cloud.(Figure 8)
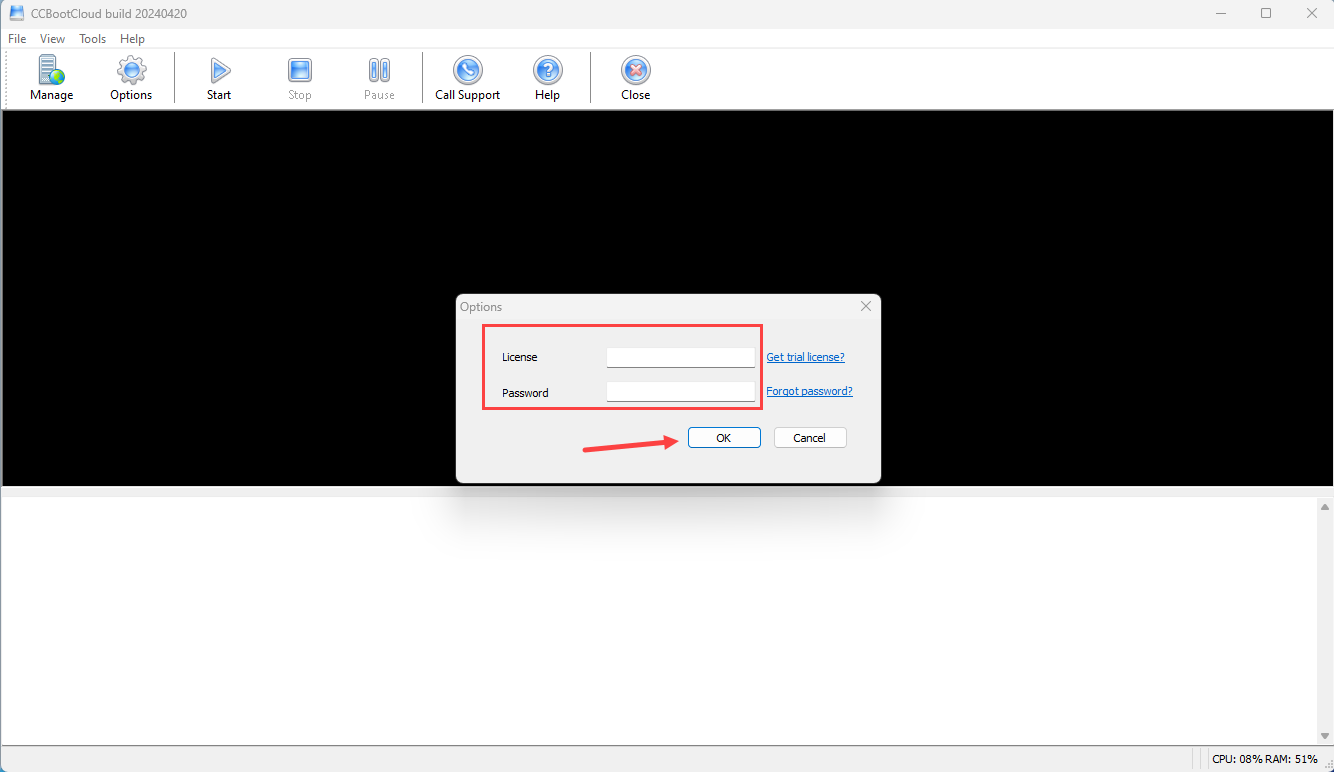
Figure 8
Install VHD on USB
- Prepare a fast USB drive or an NVMe USB drive with read/write speeds of at least 300 MB/s. This will help speed up the setup process.
- Download the SUPER image. Extract it and copy the .VHD file to the image disk.
- On the server, open C:\CCBoot\CCBootUSB.exe and run the application (Figure 1).
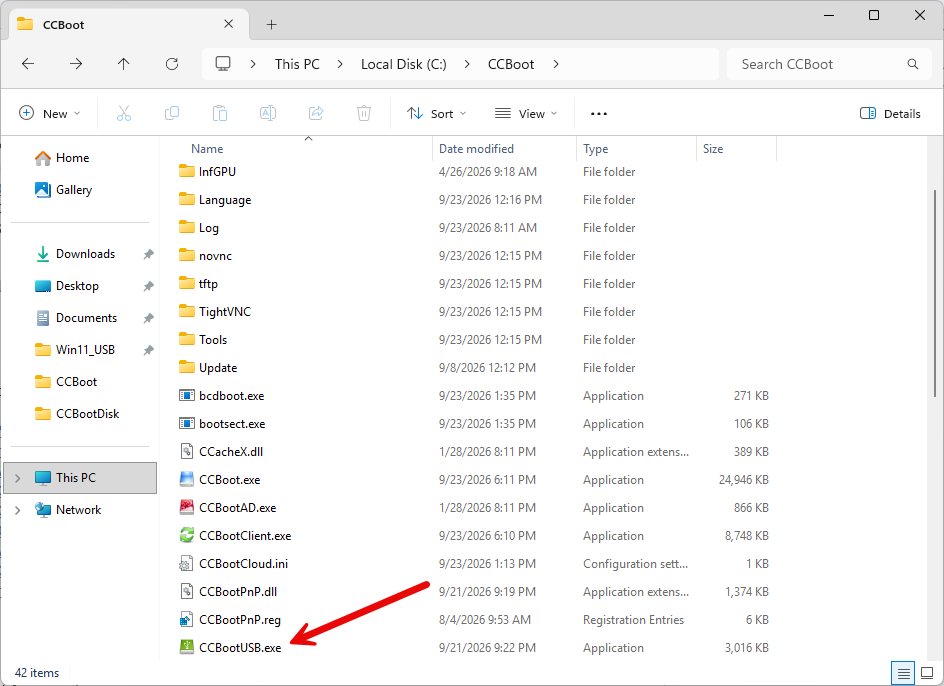
Figure 1
- Select Install VHD to USB (Figure 2)
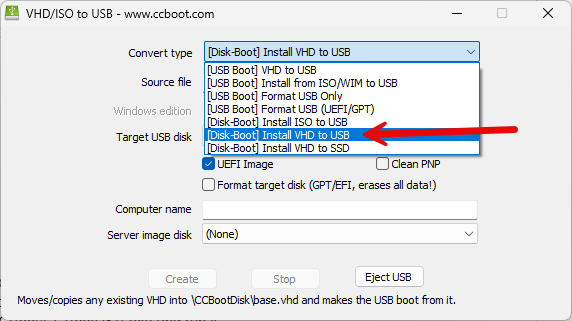
Figure 2
- Source Files – Select the Super image or VHD image you created yourself.
- Target USB – Plug in the USB drive you prepared earlier.
- Click UEFI Image.
- Click Format Target Disk – this will format the write-back disk.
- Computer Name – Enter any name you prefer.
- Server Image Disk – Select the disk where your image is located on the server.(Figure 3)
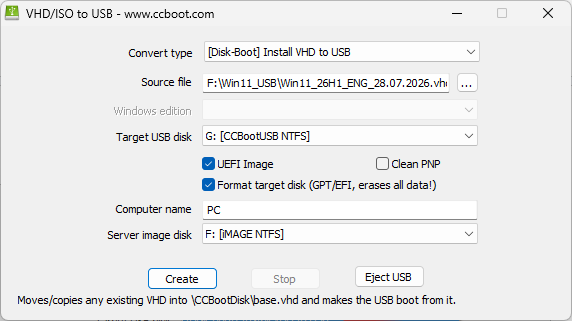
Figure 3
- Click the Create button. A confirmation window will appear warning that all data on the selected drive will be erased. Click Yes to proceed (Figure 4).
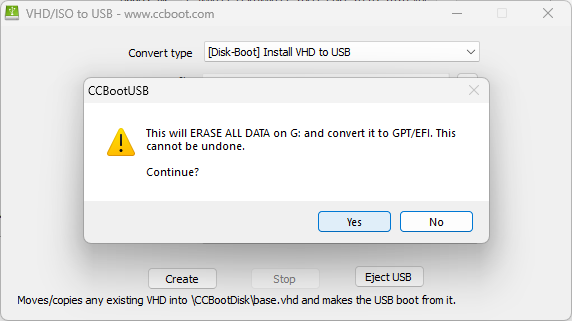
Figure 4
- The process will begin copying the .VHD file, and the progress percentage will be displayed at the bottom of the window (Figure 5).
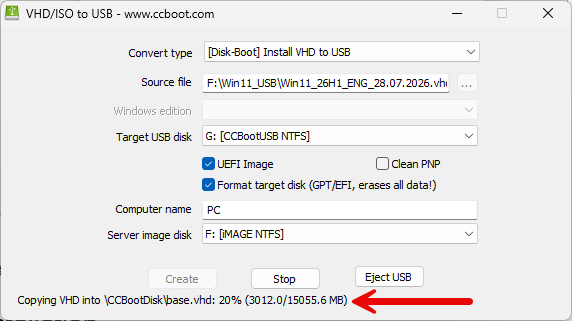
Figure 5
- Once the process is complete, the message “Install USB Ready” will be displayed. Click OK, then safely eject the USB drive (Figure 6).
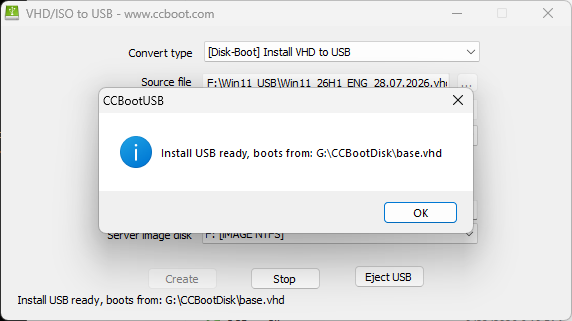
Figure 6
- The USB drive will contain four VHD image files: base-a.vhd, base-b.vhd, data-a.vhd, and data-b.vhd. It will also include the CCBootClient, CCBootUSB tools, and the CCBootDisk.ini configuration file (Figure 7).
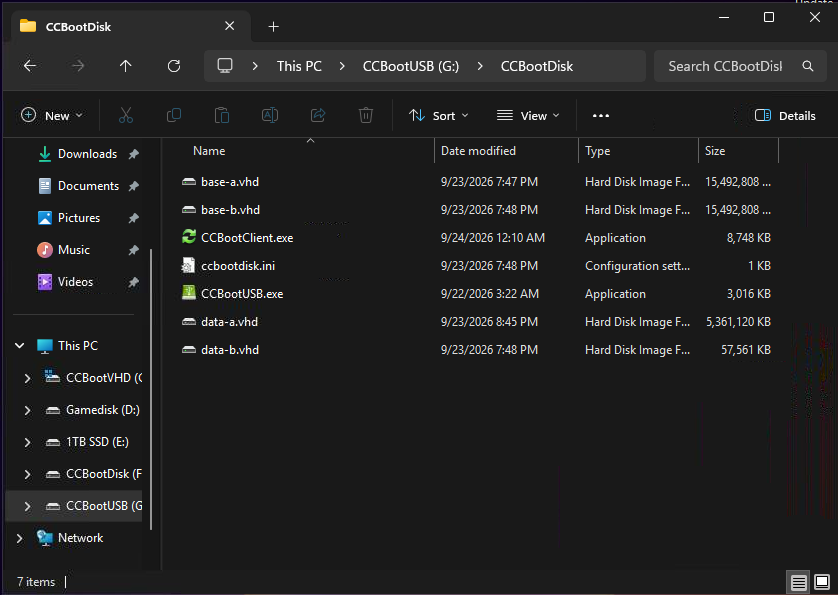
Figure 7
Install VHD to SSD
- Ensure that the client PC already has an SSD or NVMe drive installed before starting the setup.
- Plug in the USB drive prepared on the server, as described in the previous section.
- Press Del to enter the BIOS. In the Boot section, select the USB drive as the boot device to start the system from the USB.
- Once the PC has booted, Windows will start normally.
- Locate the USB drive labeled CCBootDisk, then open and run the CCBootUSB.exe file. (Figure 1)
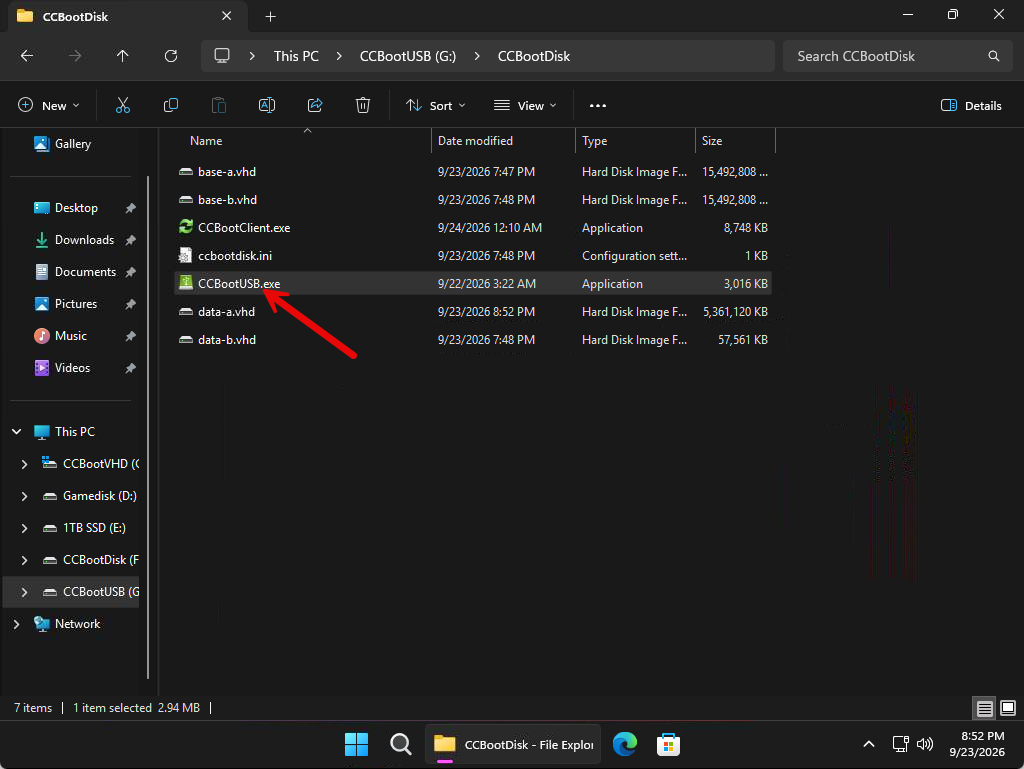
Figure 1
- To start the SSD installation, configure the following options:
- Convert Type – Select Install VHD to SSD.
- Target SSD Disk – Select the SSD where you want to install the image.
- Select the UEFI Image option.
- Select Format Target Disk.
- Computer Name – Enter the preferred computer name. (Figure 2)
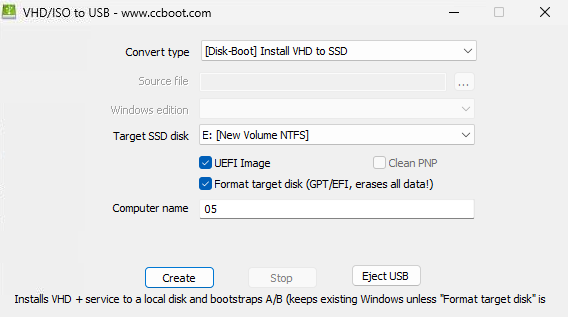
Figure 2
- Click Create to start the process, then wait for it to complete. (Figure 3)
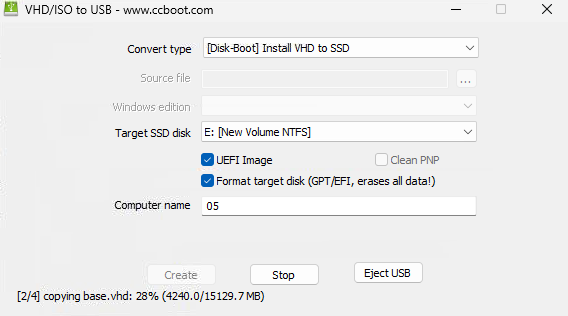
Figure 3
- Once the process is complete, click OK, shut down the PC, and unplug the USB drive. The PC is now ready to boot from its own SSD.(Figure 4)
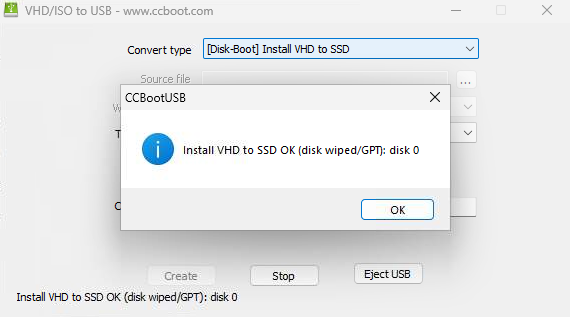
Figure 4
- Boot the PC again. The PC's disk will be divided into two partitions: 100 GB will be used for the C: drive, while the remaining space will be assigned to the CCBootDisk drive. (Figure 5)
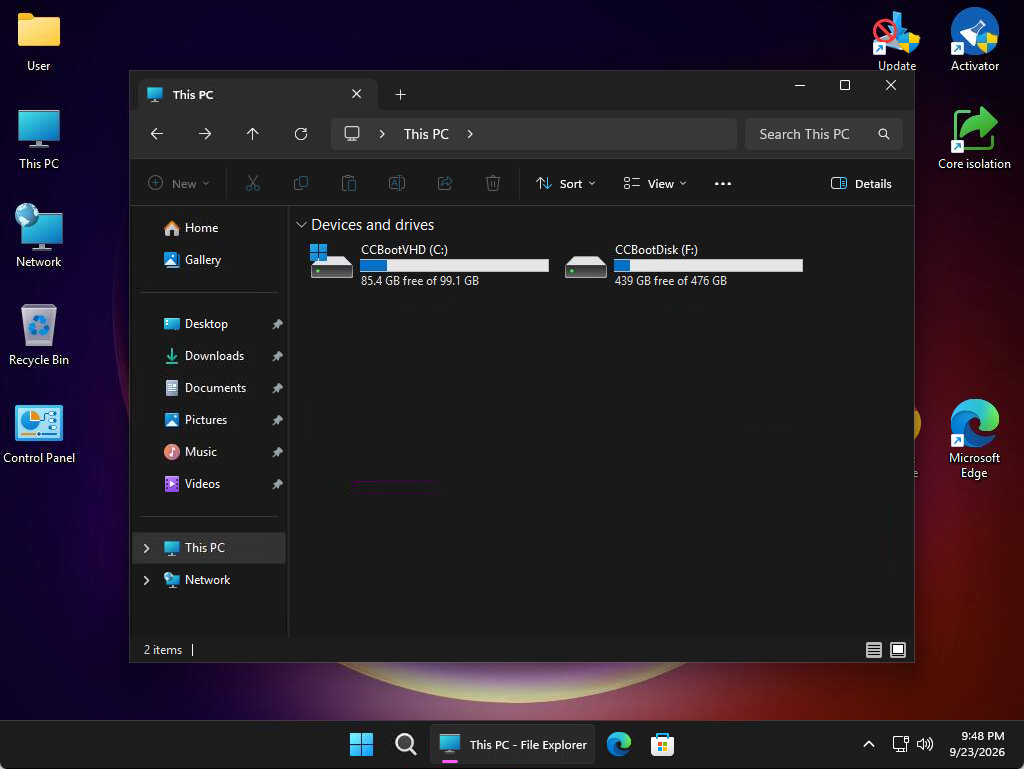
Figure 5
- To finish the setup we need to initialize the disk boot and for that we need super client
- Enable Super Client on the Disk page. The client PC does not need to be shut down manually; once Super Client is enabled, the PC will automatically reboot. (Figure 6)
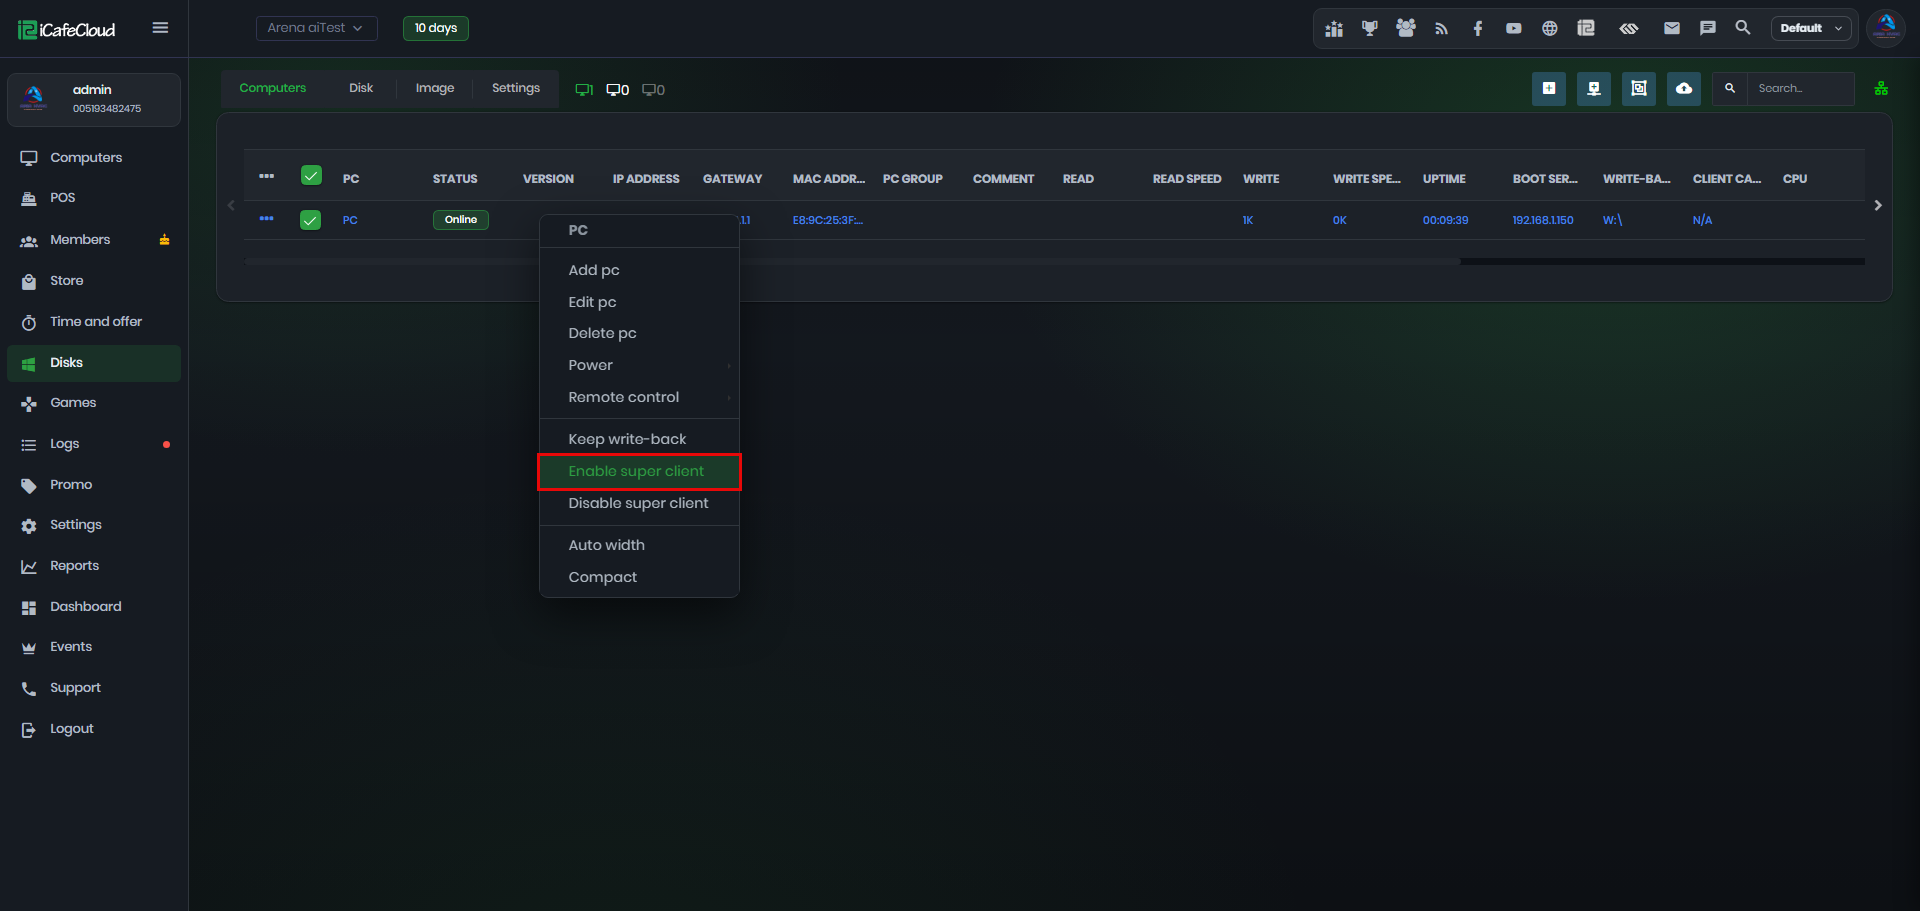
Figure 6
- Select Set the Local Image as Super Mode, then click OK. (Figure 7)
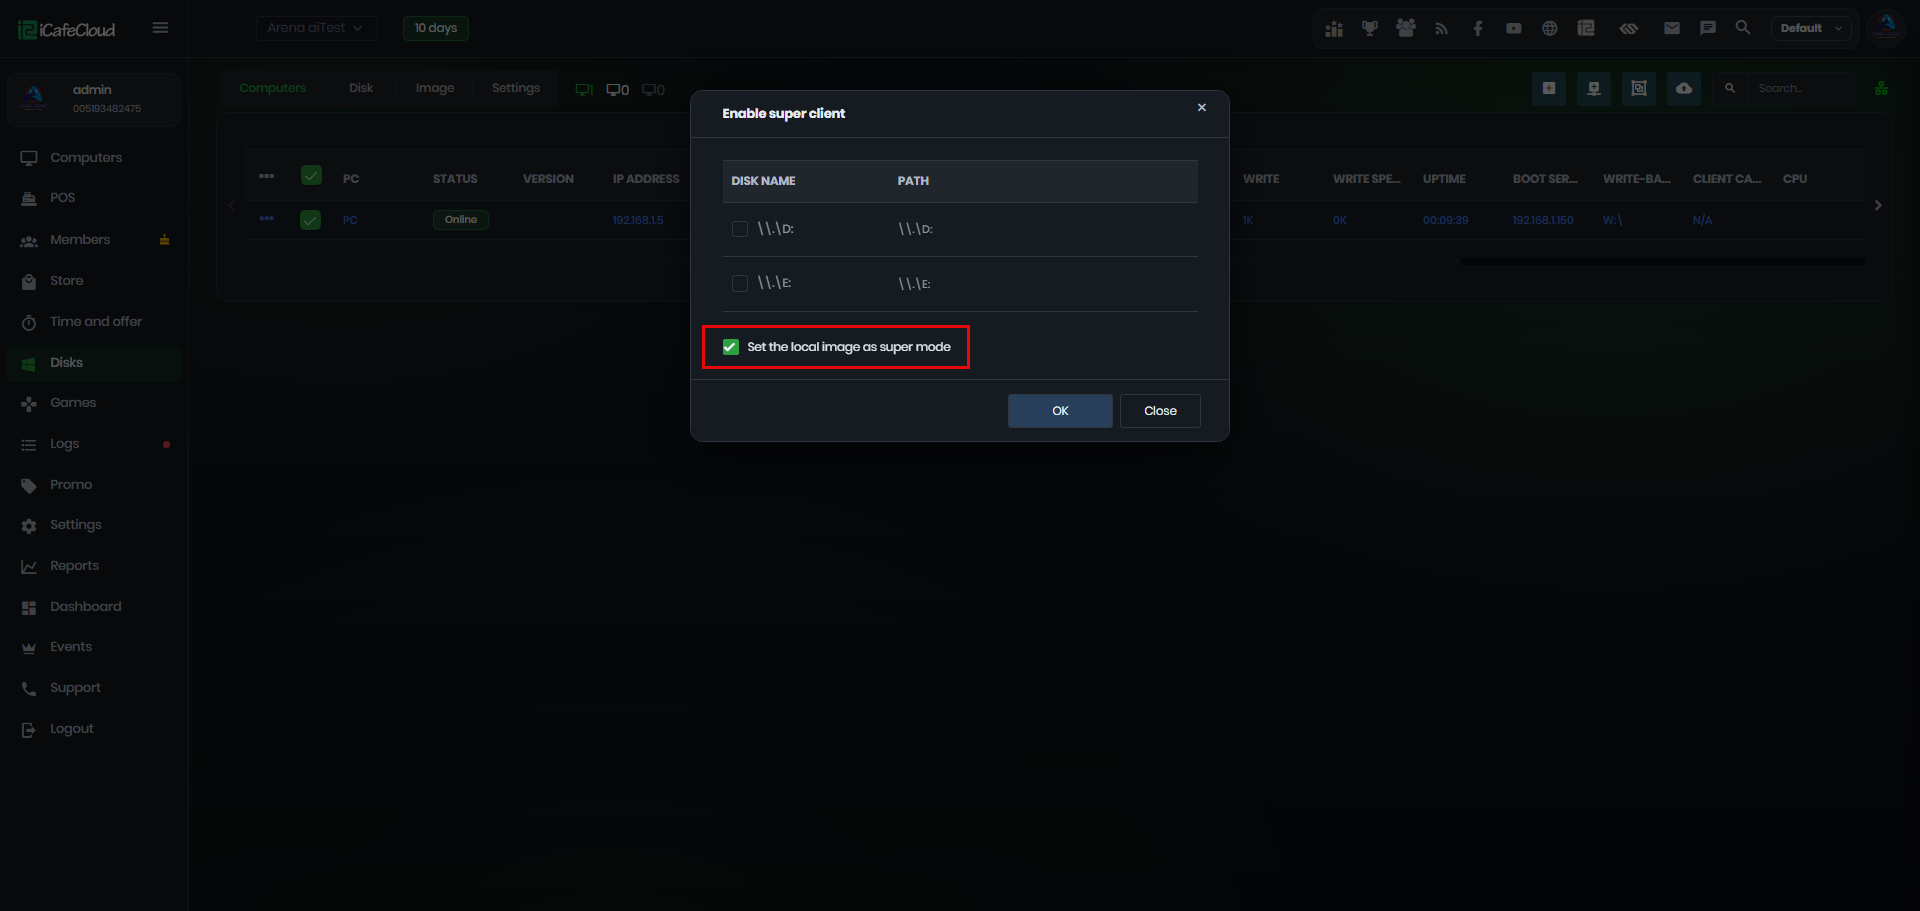
Figure 7
- Once Super Client is enabled, the client PC will automatically reboot and start in Super Client mode. A PC running in Super Client mode will display its PC name in red. (Figure 8)
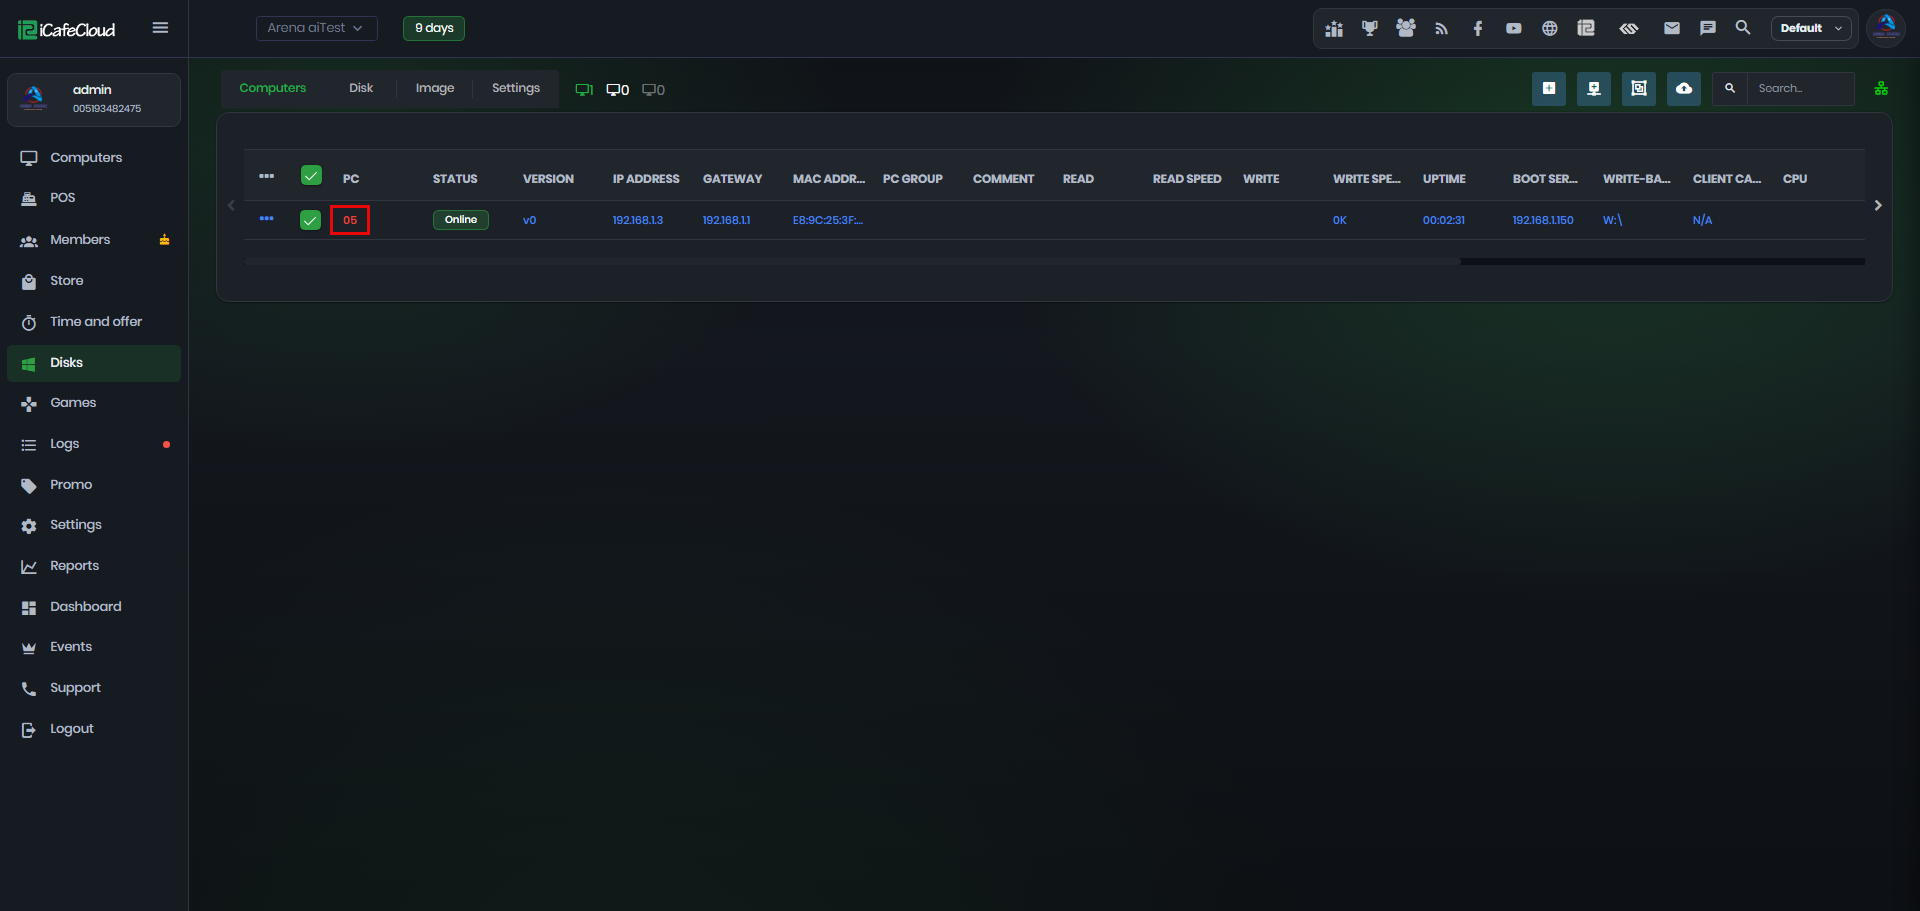
Figure 8
- Locate CCBootClient.exe in C:\CCBootClient and run the application. (Figure 9)
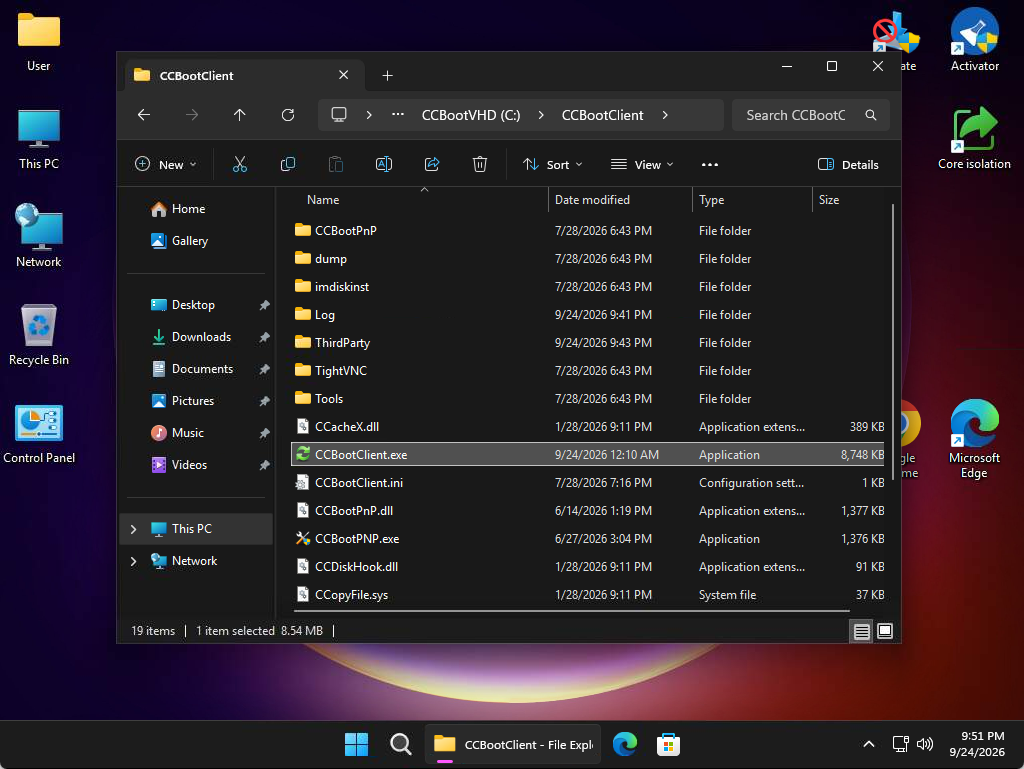
Figure 9
- Click Initialize Disk Boot to complete the configuration. (Figure 10)
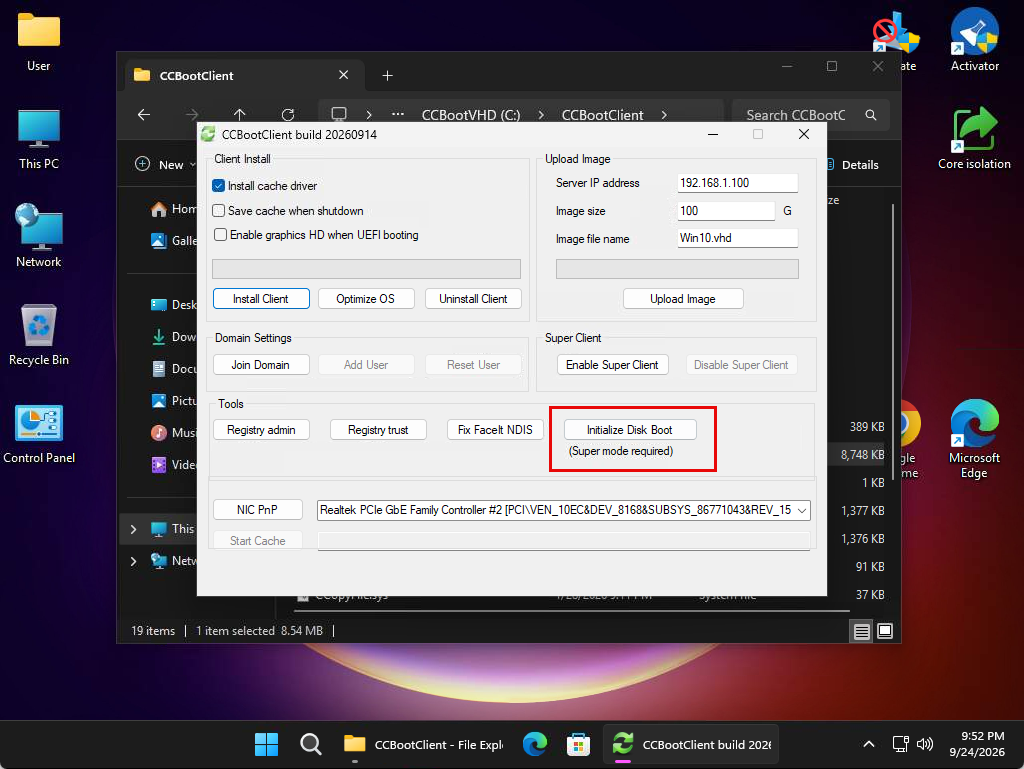
Figure 10
- Set a password and enter it again to confirm. Make sure to remember this password, as it will be required to unlock Windows for the user account.
- In the BCD Menu, select the lowest available timeout so the menu does not remain visible during the boot process. (Figure 11)
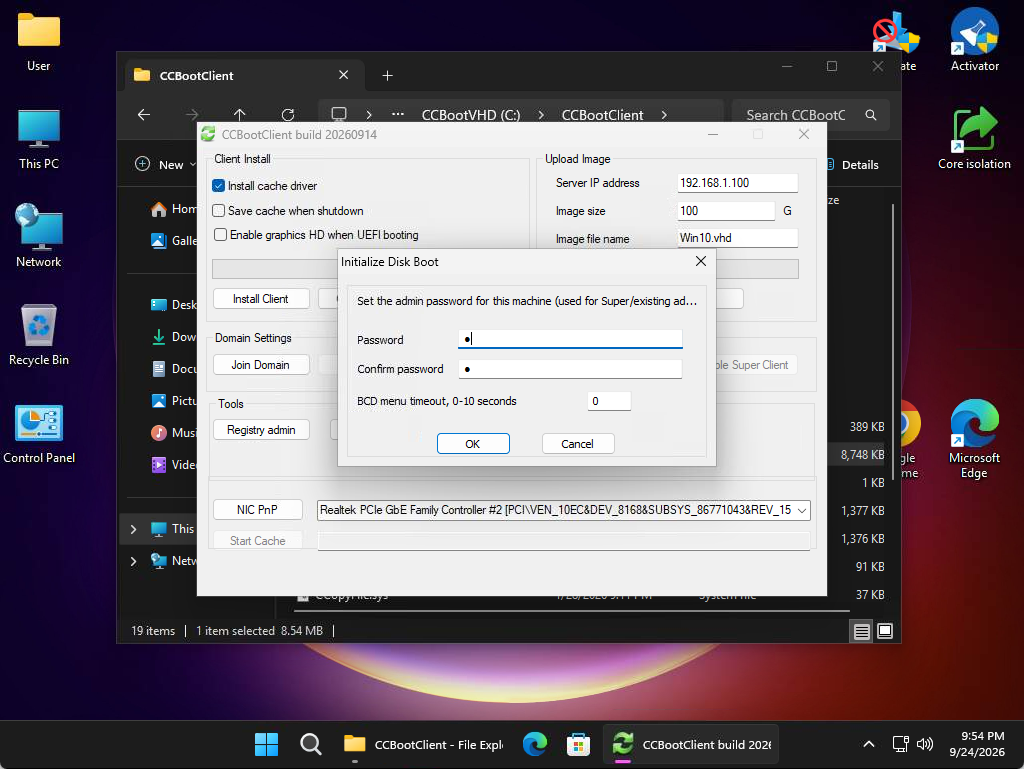
Figure 11
- Click Complete to finish the process. The Boot Disk Initialize Results will then be displayed.(Figure 12)
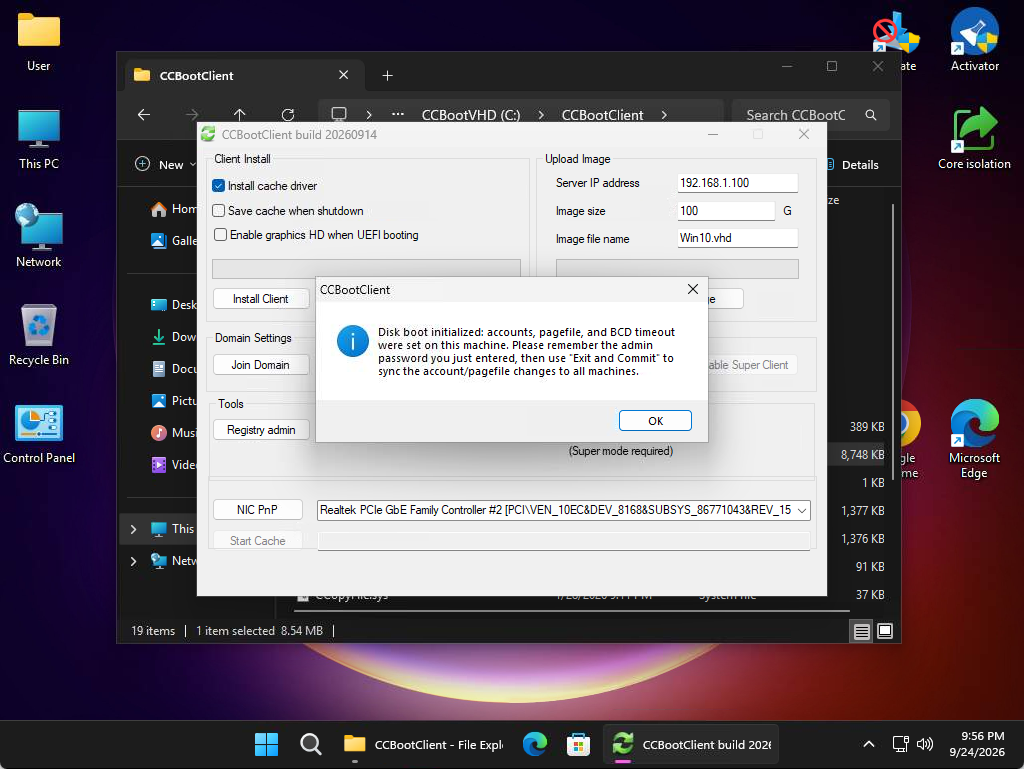
Figure 12
- Click OK to close the results window. Then, return to the Boot page, select the PC, and disable Super Client. (Figure 13)
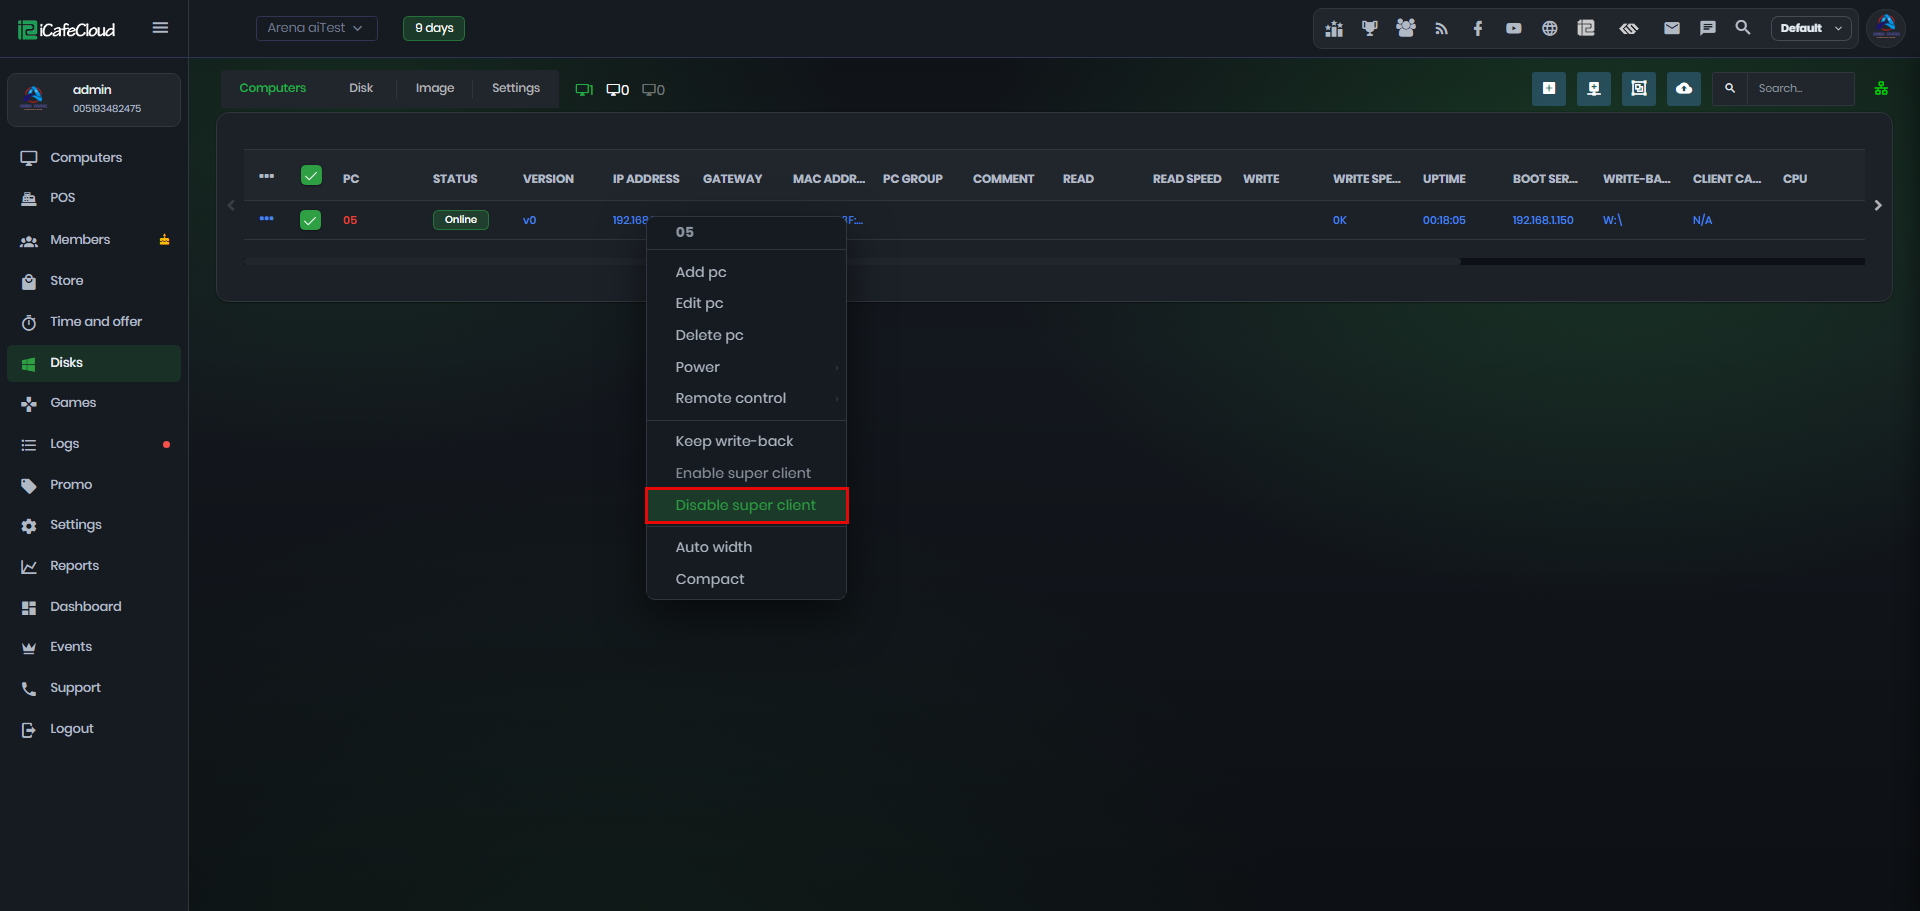
Figure 13
- Click Exit the Local Super Image Mode, then select Keep the Changes to save all changes made so far. Click OK to confirm. (Figure 14)
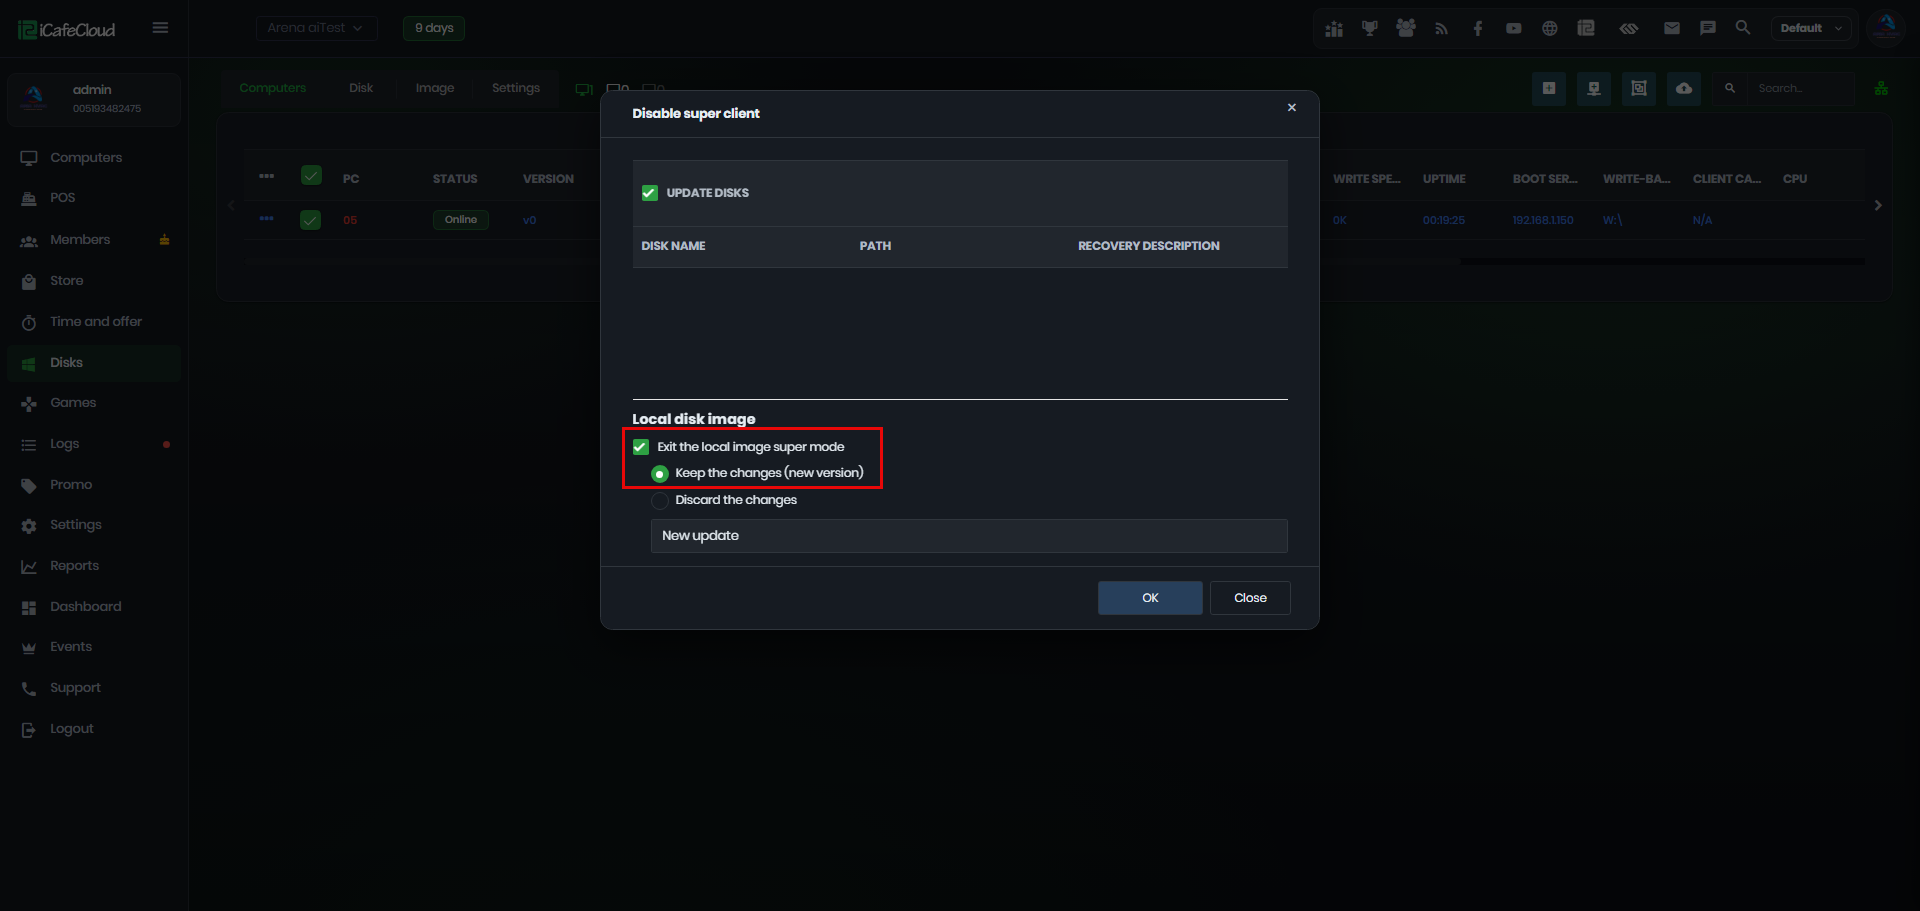
Figure 14
- The client PC will automatically reboot. Once it starts again, you will notice a loading percentage displayed on the Boot page. Allow the process to finish, as the system is copying the changes to the image. (Figure 15)
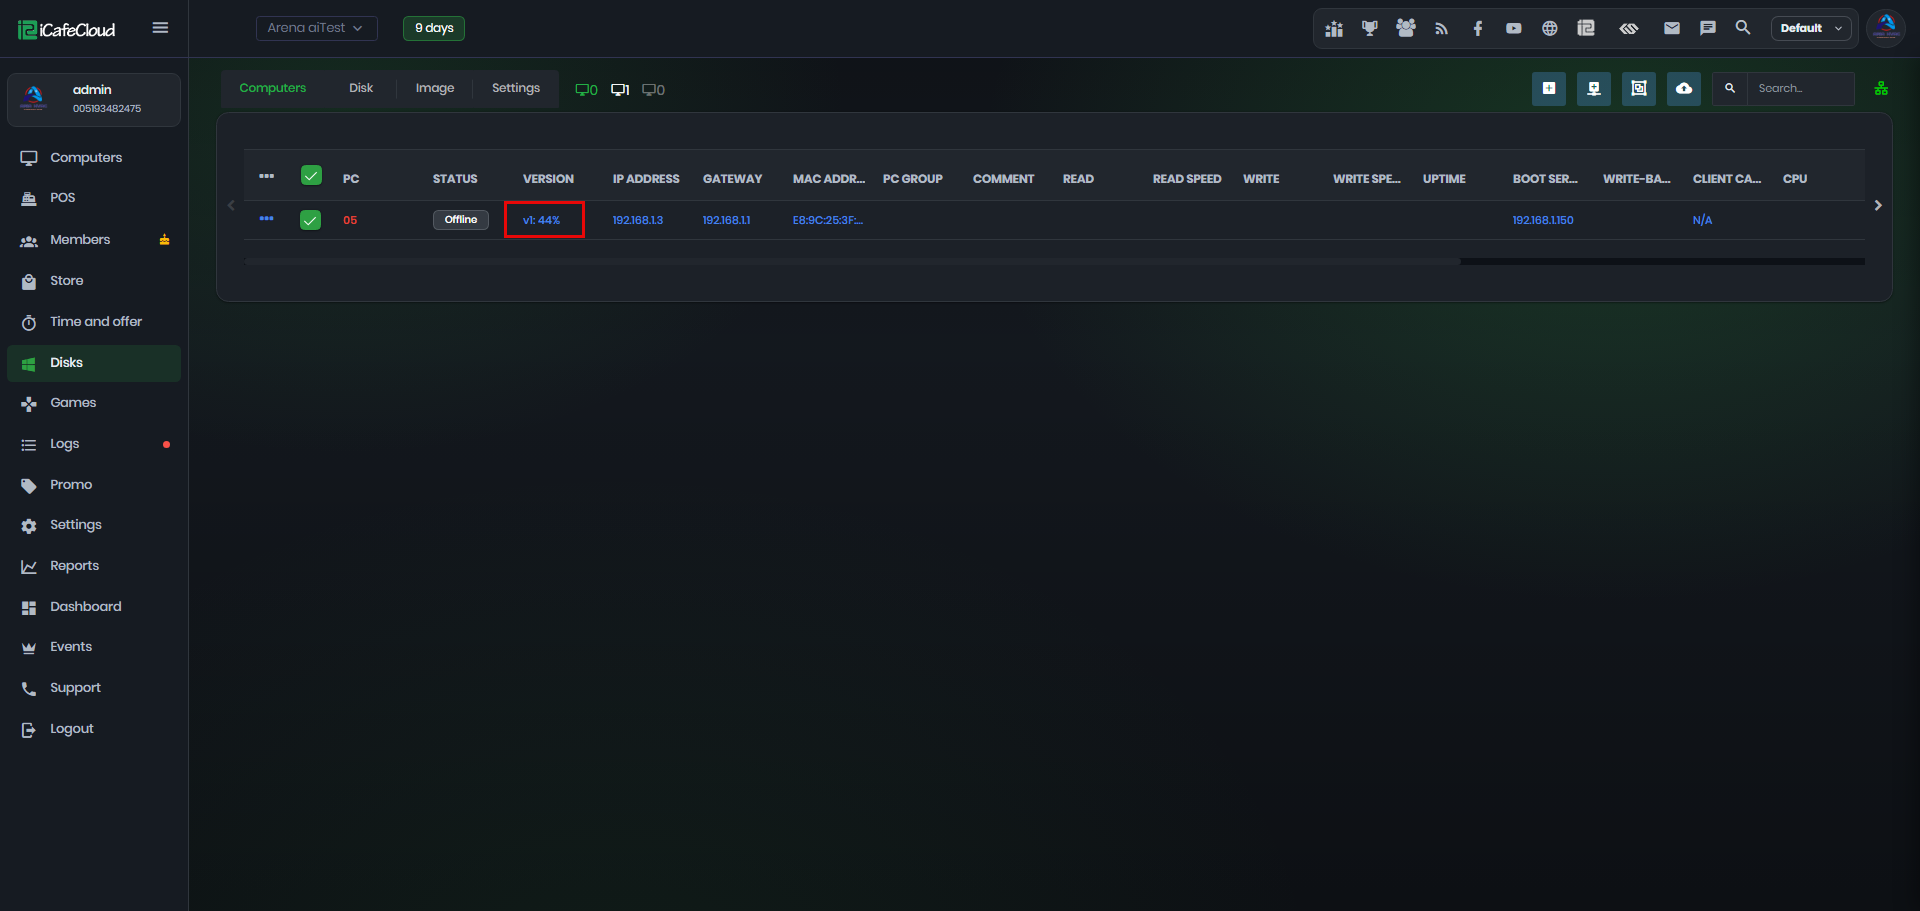
Figure 15
- The progress percentage will reach 100% twice, as the process consists of two stages. Once the final stage is complete, the client PC will reboot again.
- After the reboot, the image will be displayed as v1 in the version list, indicating that a new version of the image has been created with the changes you made.(Figure 16)
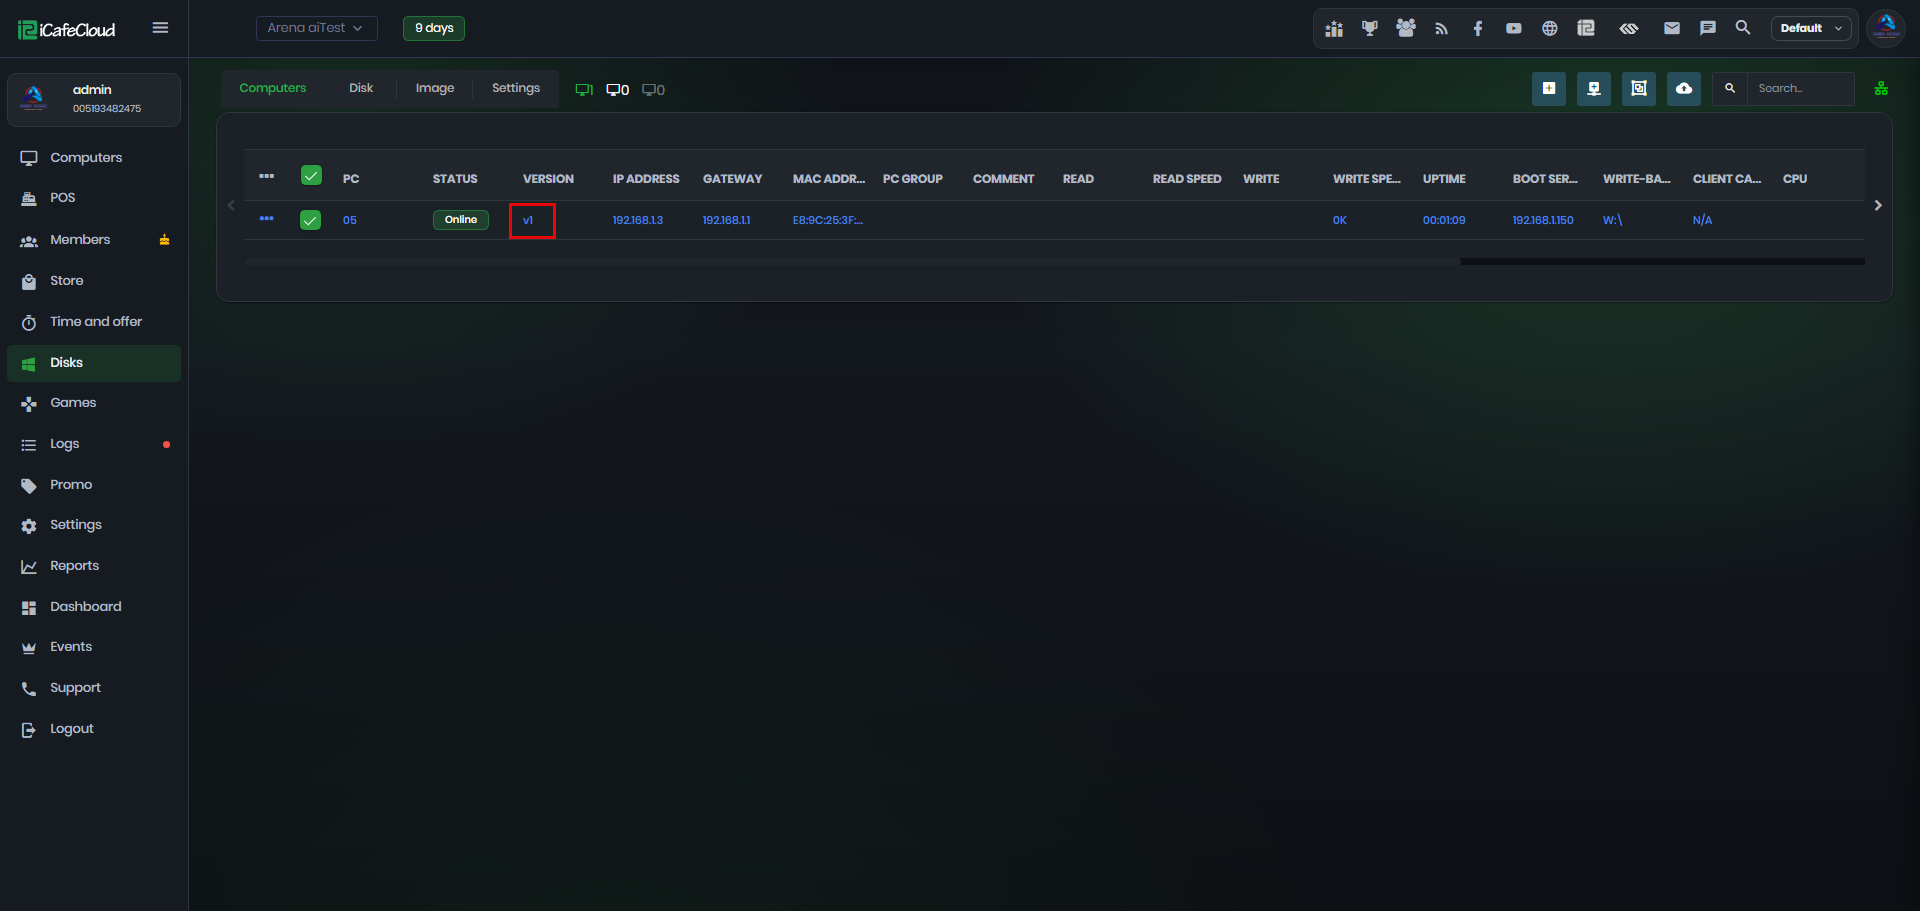
Figure 16
- In Boot → Images, you can view all available image versions. From there, you can restore a previous version or merge all versions into a single image. (Figure 17)
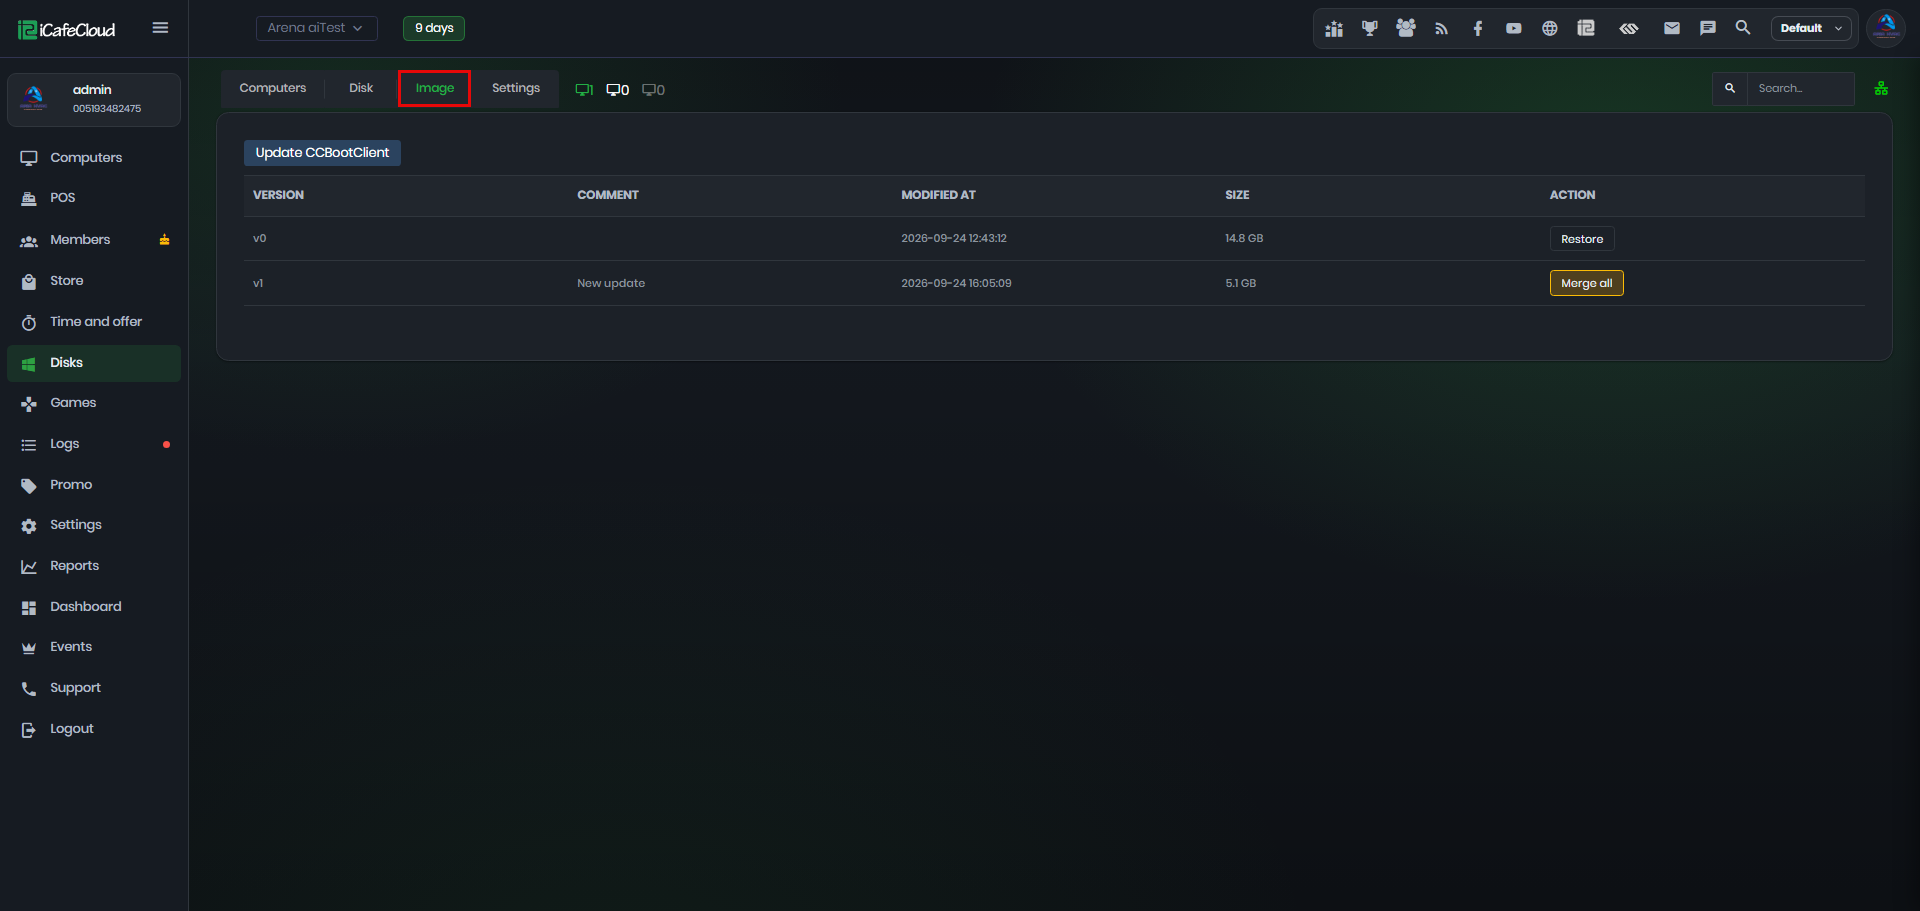
Figure 17
- The client PC is now ready for use. Any changes or software installations made while Super Client is disabled will be reverted after a reboot, returning the PC to its previous clean state.