Wiki Home Create Boot Image Standard Method to Create Boot Image for Legacy PCs
Standard Method to Create Boot Image for Legacy PCs
2019/12/02 20:12
Notice: This wiki is for the old version CCBoot. Please click HERE to access the new version wiki
Here is the standard method to create bootable client image.
Important: When you create USB bootable drive to Install OS, please make sure the "Partition Scheme" is MBR and not GPT as GPT will make the USB drive install UEFI based OS instead of legacy BIOS. Learn to create bootable USB in MBR , refer to wiki : Create a bootable USB to install Windows OS in client. We recommend to use clean windows ISO, use of image from microsoft site is better because images have modifications on patches made by third-party so they can cause lags and issues in future on diskless PC.
1) Choose one of the client PC as master PC and connect HDD. If you have many different motherboards/specifications PCs, then choose the newest one. For example, the motherboard that was released recently.
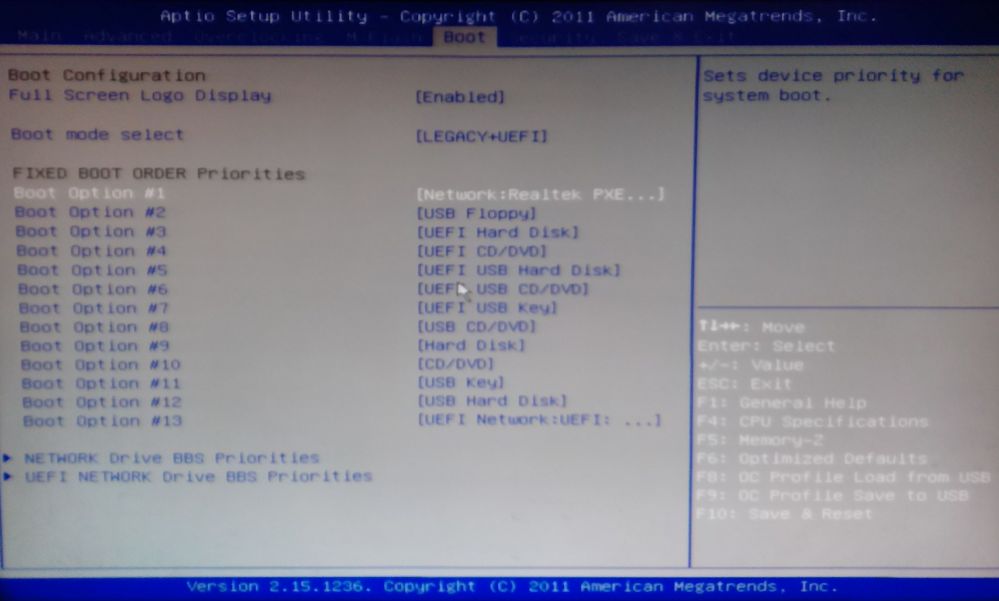
Note: Before install Windows to your client PC's harddisk, make sure the BIOS is set to Legacy (or Legacy+UEFI) mode and is not set in UEFI boot mode (Figure 1).
2) Please format C: to NTFS and default cluster size. The disk should be formatted in MBR partitioning (If your OS is installed in GPT Partitioning, then the image will not boot)
Notes: When you install Windows 7 with DVD, it will allocate a 100 MB hidden partition if the HDD is not formatted. CCBoot cannot boot it if there is 100 MB hidden partition.So, only create a single partition to install windows.
3) Install the client OS system. CCBoot client supports Windows XP, Windows 2003, Vista, and Windows 7, Windows 2008 and Windows 8, Windows 10 All Builds. Both 32-bit and 64-bit are supported.
4) Install the latest patches of Windows as well as the service packs if available. (DO NOT skip this step)
5) Install the motherboard chipset drivers and NIC driver. With only chipset and NIC driver installed the image will be compatible with most specifications. If you install all device drivers, the image may have graphics and other driver conflict with different specifications. We can install other device drivers once the client has successfully booted and is placed in super client mode.
6) Open the local area connection network properties (Figure 1-1).

Figure 1-1
7) Click "Properties". Please uninstall "QoS Packet Scheduler" (Figure 1-2).
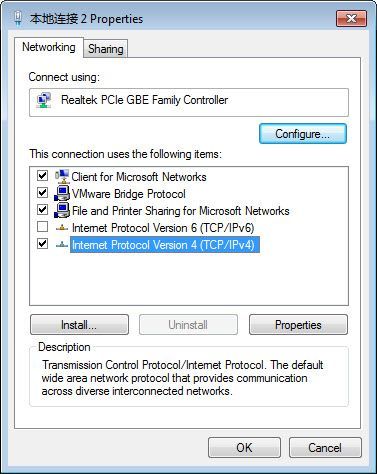
Figure 1-2
8) Select "Internet Protocol (TCP/IP)" and click "Properties".
9) Select "Use the following IP address" and "Use the following DNS server addresses", then set the IP address, gateway address and the DNS address for the client. After that, click "OK" to save (Figure 1-3).
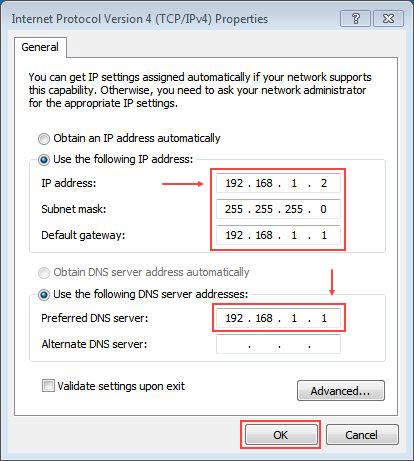
Figure 1-3
10) Once this is done, download the latest version of CCBoot installation package from our website. Launch setup package and and keep pressing the next button to the end. Then launch CCBoot client and you will see the main interface as below (Figure 1-4).
Note:If you have multiple NICs, refer Create Client Image with Dual NICs or disable the other NIC in Device Manager before installing CCBoot Client, and then upload the image.
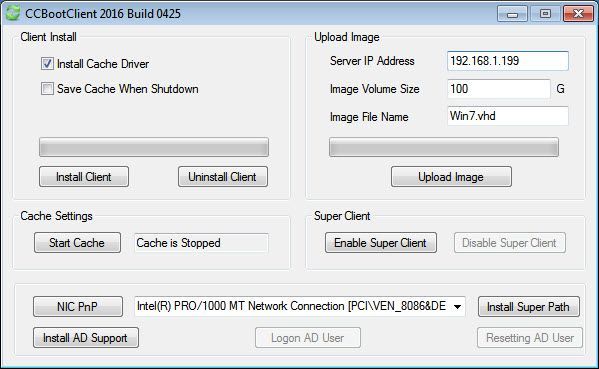
Figure 1-4
11) Press the "Install Client" button. After finished, it will require reboot system. Reboot the client PC.
12) Now go to the client PC, launch CCBootClient application again, click "NIC PnP" button (see Figure 1-5). (This step is optional)
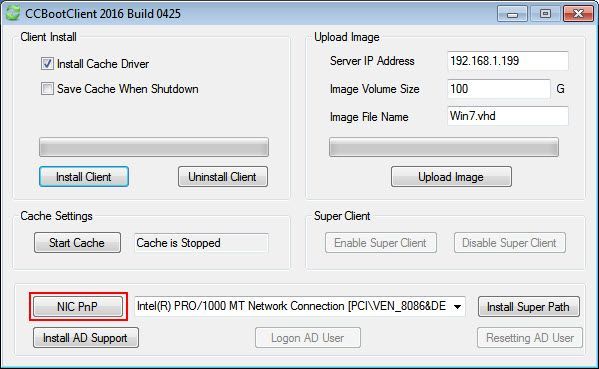
Figure 1-5
13) On the "CCBoot PnP" dialog box, click "Install Known NIC" button, you will get a NIC driver list. Please check "Select All", click "OK" to install (Figure 1-7). (This step is optional)
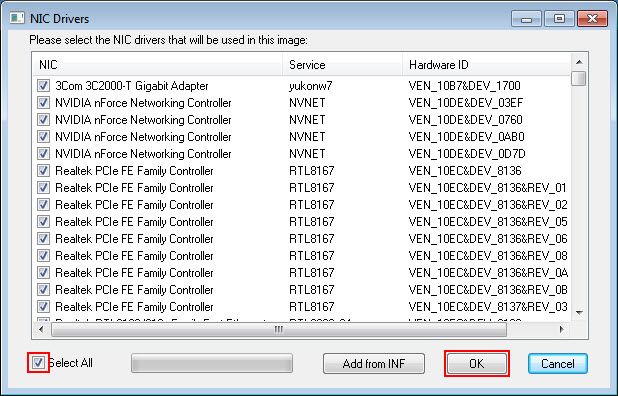
Figure 1-6
14) Input the server IP address in "Server IP address", it should be the IP address of the CCBoot server has been located. Enter the size of the image you want to make for the boot image. Input the image file name as you wish in the "Image File Name". Press the "Upload Image" button to upload the image to the CCBoot server (Figure 1-8).
Note: The image should have the extension ".vhd", do not use any other formats.
Note: The name of the image file should not include any space in them. Eg. Windows 7.vhd - is incorrect, it should be Windows7.vhd.

Figure 1-7
If the client OS is Windows 10 (Refer Upload Windows 10 Image):
Note: For Windows 10 image Upload, Please make sure that sharing is working between client and server. To fix any sharing isuse refer this wiki.
If the client OS is Windows XP, Windows7, Windows 8, Windows 8.1:
15) When you click "Upload Image", a dialog box will open, it will ask for CCBoot Admin password, enter it then click the "YES" button. CCBoot will create a boot image in the image disk drive on the server.
Refer "Set Admin Password" to set CCBoot admin password beforehand.
Notes:
If the client OS system is Windows XP, it will pop up dialog box "Upload Pagefile.sys?". Click the "NO" button to prevent C:\pagefile.sys being uploaded to the server.
If you have not set image disk in the CCBoot Server then the image will be uploaded to C: by default.
16) The image uploading will start, please wait until the upload is completed, and shutdown the client after the image is uploaded.
Note: When you uninstall CCBoot from client after uploading new version of CCBoot will restore all the services change done for optimizing the client windows.
This will make the windows be changed back to default settings and you can use it for making new images in future
When you uninstall CCBoot from client after uploading new version of CCBoot will restore all the services change done for optimizing the client windows.
This will make the windows be changed back to default settings and you can use it for making new images in future
Related:
Create Client Image with Dual NICs