Wiki Home Create Boot Image CCBoot Client Interface
CCBoot Client Interface
2020/08/15 00:29
Notice: This wiki is for the old version CCBoot. Please click HERE to access the new version wiki
CCBoot Client Application Interface.
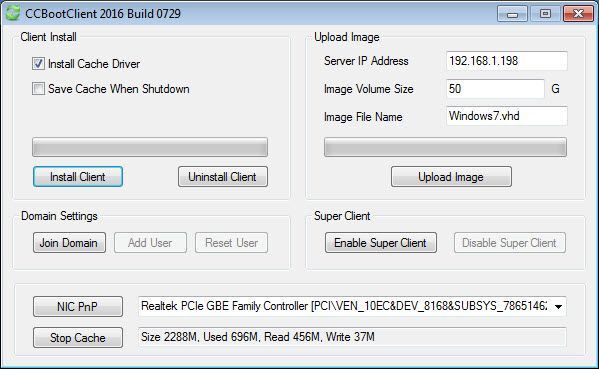
Figure 1‑6‑1
Install Cache Driver: Select this check box, and click "Install Client" button, to install client cache driver.Otherwise, the client cache driver will not be installed.
Save Cache When Shutdown: If checked this check box, the client cache data will be saved to the server.
Install Client:To install all components for diskless boot.
Uninstall Client: Click the "uninstall client" button to uninstall some CCBoot client drivers.
Server IP Address: Input the CCBoot Server’s IP address.
Image Volume size:Input the size of the desired image size in the server. The created vhd/vhdx files are dynamic format.
Image File Name: The boot image file name.
Upload Image: Click the button to upload the image to the server, while uploading the progress bar above the button will show the progress.
Join Domain: Click this button to enable domain function.
Enable Super Client: If you click this button you can enable super client right from the server.Enabling super client will reboot the client PC.
Disable Super Client: If you click this button you can disable super client mode right from the server. Once you click it, you will be asked if you want to save the changes to the image.
The following two option is only enabled when domain administrator is logged on the the client PC in AD environment.
Logon AD User: This will allow you to add/login to domain user in the client PC.
Reset AD User: This will allow you to reset domain user account.
NIC PnP: Open CCBoot NIC PNP tool which you can use to install all available PNP Drivers to the image allowing different hardware PC to boot from single image.
Start/Stop Cache: Starts/Stops the client cache in the client PC. The box beside the button displays client’s cache status.