Wiki Home Performance Optimization Removing Win7 x64 Watermark
Removing Win7 x64 Watermark
2018/12/25 00:25
Notice: This wiki is for the old version CCBoot. Please click HERE to access the new version wiki
In the win7-64 system, after installing the CCBoot client, it will have the "test mode" of the watermark, which is displayed in the lower right corner.
The methods of removing watermark:
1) Download RemoveWatermarkX64.zip file from the CCBoot official website.
Download address: http://www.ccboot.com/download/RemoveWatermarkX64.zip
2) Start the client with the super user mode. (in the case of PC101)
3) Copy RemoveWatermarkX64.zip file to PC101, and extract the file, then double-click to run RemoveWatermarkX64.exe.
4) In the "Command line" window, enter "Y",and click the "Enter" button, run the program (Figure 1‑1).
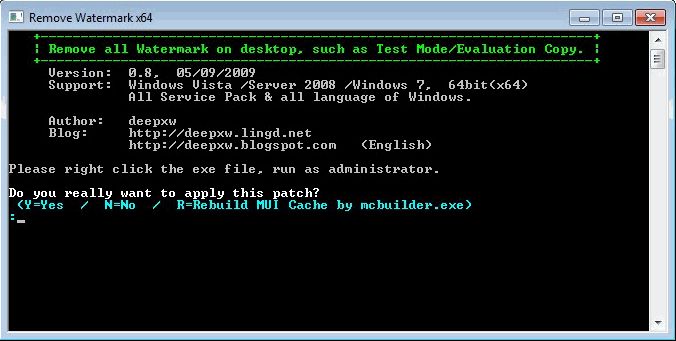
Figure 1‑1
5) After the successful operation, close the client PC101.
6) On the CCBoot of the server, uncheck "super user".
We have created a video - "Remove the Watermark" (start from about 11:01).
Note: From CCBoot v3.0 20140627, we add digital signature to CCBoot Client driver, it does not need to enable Test Mode any more. For details, please refer to "Add Digital Signature Solved Test Mode Problem".
Note: If the above program is not working then please download Universal Watermark Disabler and install it. It will remove the watermark from your windows. Refer more from Universal Watermark Disabler setup