Wiki Home Boot Issues Client Diskless Boot Failed
Client Diskless Boot Failed
2019/06/26 21:10
Notice: This wiki is for the old version CCBoot. Please click HERE to access the new version wiki
1. Failure of booting from network
1) The first booting item in the BIOS is not "boot from network".
2) The electricity in the BIOS battery is not enough.
3) The BIOS setup is in a mess, please reset up the BIOS.
4) Because of the humid climate, the connection between the RAM and main board is not good. Please wipe the gold fingers in the RAM.
5) The network cable is not well plugged.
6) Sometime the client do not boot, even after checking all possibility in server. This means issue is with network switch, you need to power cycle the switch (turn off/ on) once. After that clients will boot fine. If this happens frequently. We recommend replacing the switch with a better one.
7) Client will fail to boot if the IP address of client PC is conflicted with another PC or device (Wifi Extender, router, or mobile devices). If this happens please change the IP of the devices and reboot the client.
2. Stops at DHCP
The client stops at DHCP when booting and the address of the sever IP can't be obtained.
1) Problem of the network: testing method, use one computer to PING server and use the server to PING the computer.
2) Problem of the switch. Solution: check the main switch and the sub switch to see whether the power supply is normal.
3) Problem of network cable. Solution: Check whether there is a problem for the client network cable and the server network cable and make sure they have been connected to a LAN.
4) Problem of the firewall. Solution: Shutdown the firewall of the server.
5) The CCBoot service stops. Solution: Click the "start" button in the main interface of CCBoot, start the CCBoot service.
6) The server port needed by DHCP is blocked. Solution: open port 67 on the server.
7) The client is not added to the user list of CCBoot and the server of CCBoot hasn’t enabled the "auto add client" option.
3. Stops at the TFTP
In the process of booting of the client, DHCP can obtain the IP address of the server, but it stops at location of "TFTP" and the error of TFTP occurs.
1) CCBoot hasn’t started the TFTP service.
2) The firewall of the server system does't open TFTP port, solution: to open the port 69 in the firewall.
3) Reset up TFTP. Solution: in the tool bar of the main interface of CCBoot, click "Options" button. In the popup dialogue box of "CCBoot Setting", choose the "DHCP Setting" tab, and unselect the "TFTP" check box. Click the "Yes" button, and reselect the check box of the "TFTP".
4) On new motherboards, sometimes "gpxe.pxe" and "gpxex.pxe " will take much time to start windows booting. In this case you can use "ipxe.pxe".

Figure 1-1
4. Stops at www.ccboot.com
1) PXE's loading file problem. The default PXE file doesn’t support some special network card.
Solution: Change PXE file, take the examples of PC101, the concrete procedures are as follows:
a. In the main interface of the CCBoot, click "Client Manager" and double click "PC101" in the right detail box.

Figure 1‑2
b. The "CCBoot Client" dialogue box pops up, changes the default "gpxe.pxe" in the editing box into "gpxex.pxe" and click "save" button.
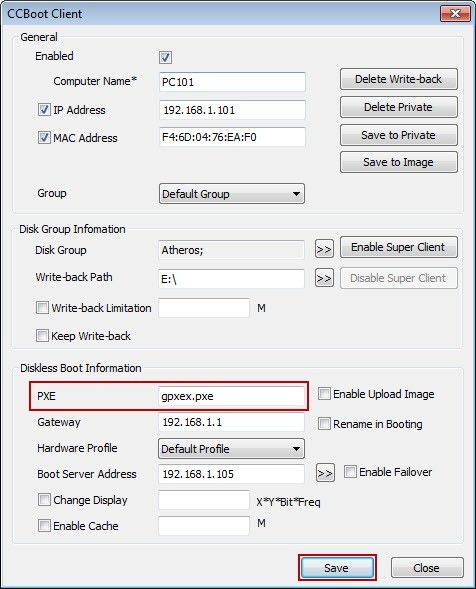
Figure 1‑3
Note: It would be better to use "gpxe.pxe", but if you cannot diskless boot the client via using "gpxe.pxe", you can try to change the PXE value to "gpxe0.pxe". If this doesn't work, please modify the value to "gpxex.pxe". If you can successfully use “gpxe.pxe" in CCBoot 20120817, but failed to use it in the new build, please try ”gpxe1.pxe". From CCBoot v3.0 Build 20130710, "gpxe1.pxe" means "gpxe.pxe" of 20120817. If Realtek 8111E NIC has blue screen problem, you can try to change the PXE value to "ipxe.pxe".
2) If your disk sorting is wrong, the client will only read 1k and stop, please find the solution as below.
a. In the left side of the CCBoot form, click the "Disk Manager" node on the directory tree, and select the game disk group node, you'll find the image disk is on the bottom of this disk group (Figure 1-3).
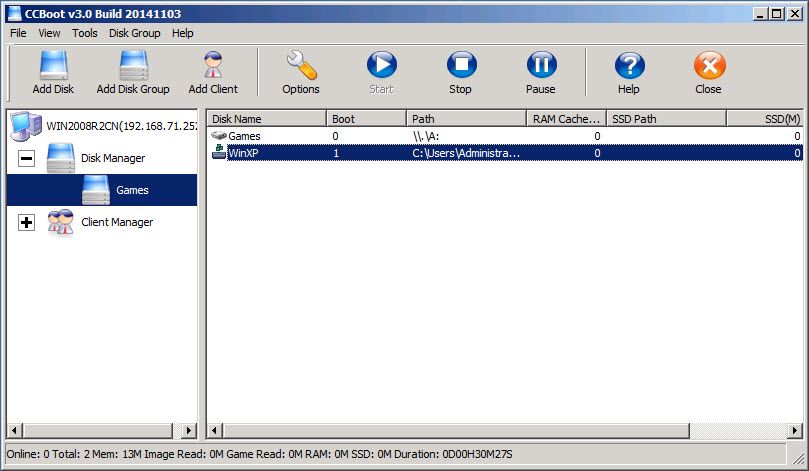
Figure 1-4
b. Right click the image disk and click the "Move Disk Up" button (Figure 1-4).

Figure 1-5
Note: Please select the "Bootable" check box in the image disk properties.
5. No more network devices/iSCSI boot 192.168.0.1::3260:: error occurs
When booting the client, the error of "iSCSI boot 192.168.0.1: 3260: No more net work devices" occurs.
The reasons of error and the solution are as follows:
1) Format writeback disk if you see "No more network devices" and "Not supported".
2) The trial version of CCBoot only supports 5 users, if the number exceeds 5, it will stop at "iSCSI boot 192.168.0.1: 3260". Solution: Purchase the serial number and register.
3) The registered number has been exceeded. Solution: Add license number.
4) In the 32 operation system, the single process shall not exceed 1.6 G. When the CCBoot process reaches 1.6 G, the CCBoot server can no longer allocate memory and then error occurs. Solution: Change the server into the 64 bit operation system.
5) The router has opened DHCP and it has disturbed the normal operation of the client. Solution: shut down the inbuilt DHCP of the router.
6) In the LAN, other software has opened DHCP functions. Solution: temporarily shut this software and reboot it after client is in normal startling.
7) The disturbing of the DHCP for CCBoot. For example: in the same LAN, there are two CCBoot servers, two servers are prepared for the load balance (please check the "CCBoot load balance" chapters for details). The server A has deleted the client PC 101, when the client PC101 reboots, it stops at the "No more network devices". Solution: open the installation folder of the server B, copy the "db.xml" file to the installation folder of server A and replace the file of the same name.
8) In "CCBoot Client" dialog box, the "Disk Group" hadn't been assigned. Please select a disk group.
9) Maybe the BIOS battery has no power.
10) The image has problems.
11) The client of the CCBoot property doesn’t set the "Boot Server Address".
12) Haven't set correct writeback path in the CCBoot client properties.
6. Stop at Windows Logo
For details, please refer to "Stop at Windows Logo".
7. Blue screen when the client boots
Cause and solution are as follows:
1) The physical RAM of client has problems. Solution: Change the client physical RAMS.
2) The network driver has problems. Solution: change other versions of network card driver.
3) Software conflict (for example, billing software). Solution: uninstall some software which can cause conflicts.
4) The problem of images package. Solution: Remade image package.
8. Automatic restart
Before the client boots to desktop and reboot automatically, the causes and solutions are as follows:
1) When the client writes cache setting of the client is too big, the client will start automatically. Solution: Adjust the size of client write cache.
2) Problem of network card driver. Solution: Change other versions of network card driver.
9. Stops at NTLDR is missing
The client boots with hardware profile image (Please refer to the "CCBoot single image package+ multiple settings PnP" for details). Then the client will stop at the picture shown.

Figure 1‑6
There are the following reasons for the phenomenon above:
Setting error of hardware configuration
In the properties of the client, there’s no correctly written hardware ID. Solution: input the correct hardware ID.
Problem of the CCBoot version
If using the CCBoot2.1 version for setting multiple configurations of hardware, there’s certain possibility for the phenomenon above. Solution: updates to the CCBoot3.0 version.
10. Stops at the PXE-MOF Exiting PXE ROM
Problem of PXE loading file
The PXE loading files of CCBoot doesn’t support the diskless boot of the client. Solution: Change the PXE loading files.
Solution: Change PXE file, take the examples of PC101, the concrete procedures are as follows:
1) In the main interface of CCBoot, click "Client Manager" and double click "PC101" in the right detailed box.
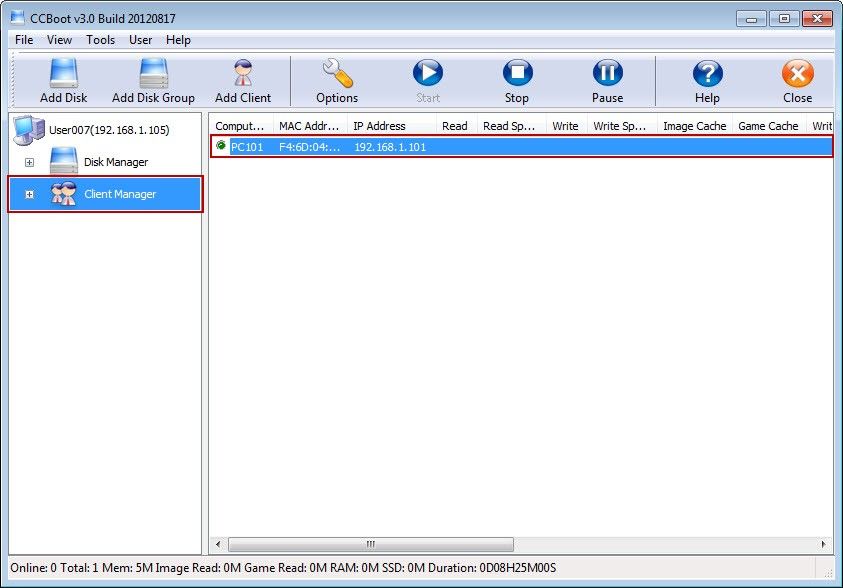
Figure 1‑7
2) The "CCBoot Client" dialogue box will popup and change the default "gpxe.pxe" in the edit box into "gpxex.pxe" and click "Save" button.

Figure 1‑8
Note: If this problem still cannot be solved by using the above method, please try to update the BIOS ROM to the latest version.
11. Diskless Boot Failed with Two NICs
Problem:
If you have two NICs on the client, one is Realtek and the other is the built-in wireless card. Sometimes, after uploading image, you can not diskless boot the client successfully.
Solutions:
1) As CCBoot can not diskless boot with wireless card. You should disable the wireless card on the client first; otherwise, CCBoot will treat the wireless card as the boot NIC. You can disable the wireless card in Device Manager.
2) Install "CCBootClient" program.
3) Upload image.
4) Diskless boot the client.
Note:
If you want to use the disabled NIC in the future, after diskless booted the client successfully, you can enable super client for this PC, and then go to Device Manager to enable that NIC. Finally, disable super client. For details, please refer to "Create Client Image with Dual NICs".
12. Error Message of "Database server security does not have a computer account for the trust relationship with this workstation"
If you encountered an error message of "Database server security does not have a computer account for the trust relationship with this workstation" when diskless booting CCBoot v3.0, there may be two reasons for this problem.
Reason 1 It may because that you haven't added the computer name on CCBoot AD.
Please follow the following steps.
1) Open the CCBoot installation directory, copy "CCBootAD.exe" files to the domain server.
2) Run the "CCBootAD.exe" program on the domain server.
3) Click the "Add" button in the popup "CCBoot AD" dialog box.
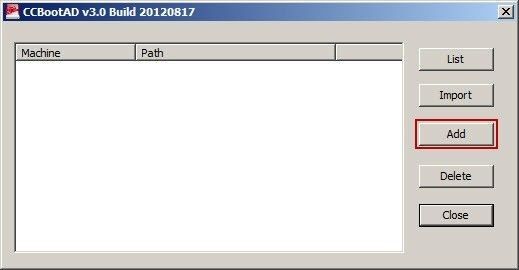
Figure 1-9
4) Click the "..." button in the popup "CCBootAD Machine" dialog box to select domain "Computers", type PC101 into the "Machine Name" edit box, and click the "OK" button, then the operation is completed.
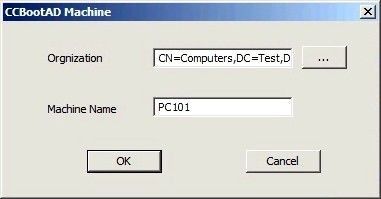
Figure 1-10
5) If you want other clients to join the domain as well, you can repeat the above operation steps.
6) Add a domain user of User001.
7) Add other domain users.
Reason 2 It may because that you haven't added "joindomain".
Please follow the following steps.
1) Click the "Options" button on the toolbar of CCBoot main interface.
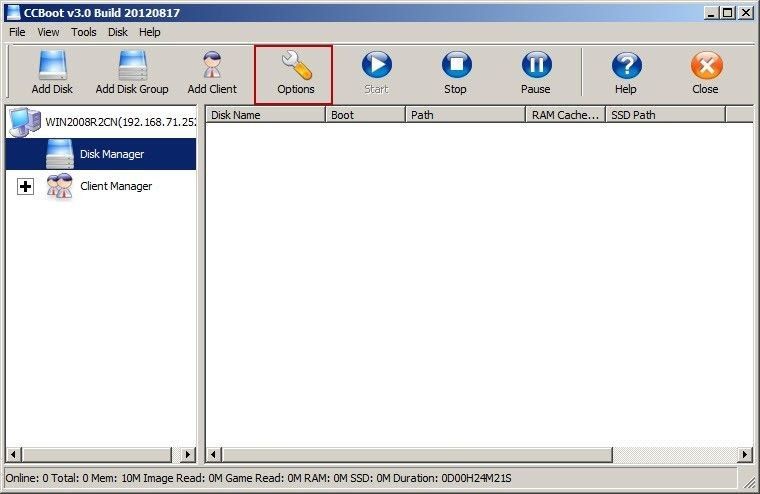
Figure 1-11
2) In the popup "CCBoot Options" dialog box, click the "General" tab, select the "Run Batch Command at Client" check box, then click the ">>" button in the right side of the "Run Batch Command at Client".
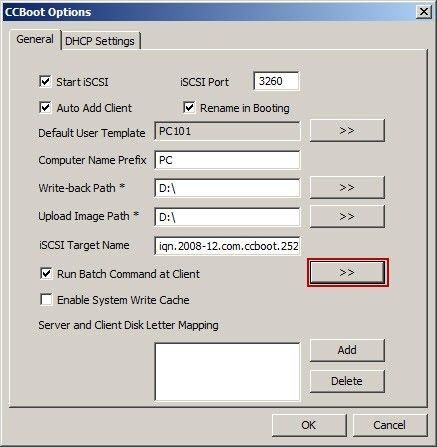
Figure 1-12
3) Add an order of "joindomain domain name" at the bottom of the popup "public - Notepad" (E.g. "joindomain test.com"), and enable clients to join the "test.com" domain.
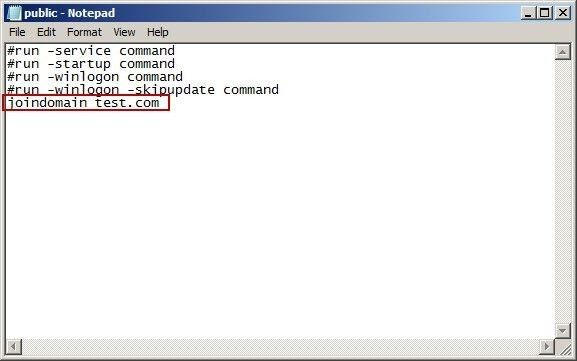
Figure 1-13
Note: You can also watch the video of "How to Use CCBoot in Windows Domain" (about 06:55).
13. Connect Host Failed
Please check whether the client and server can ping each other successfully or not. Also, you can try to change the client IP address, and delete the old client on CCBoot server, and then auto scan the new changed IP. Besides, please check whether the Windows firewall has been turned off.
14. PXE Boot Windows 8 Failed
For details, please refer to http://www.ccboot.com/how-to-solve-pxe-boot-windows-8-failed.htm.
15. "Failed to Start TFTP" and" Failed to Start DHCP"
If the server IP address was changed, it will report the error of "Failed to Start TFTP" and "Failed to Start DHCP". You can solve this problem according to the following steps.
1) On CCBoot main interface, click the "Options" button.
2) In the pop up "CCBoot Options" dialog box, click the "DHCP Settings" tab, and then click the "DHCP Server IP" combo box, and select the right IP address.
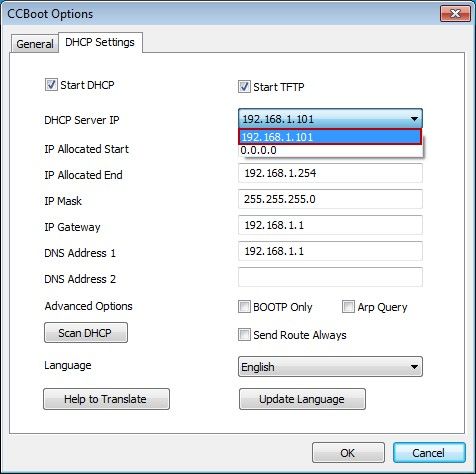
Figure 1-14
16. After windows activation
17. Hardware Failure
If you still cannot diskless boot your client properly then the issue is in client hardware.
Sometime bad parts or components cause the client to fail to boot.
The main culprit for this is usually CPU or RAM and sometime NIC as well.
So check then by replacing them with working PCs components.
18. Using third party dhcp pxe option
Change the line