Wiki Home Client Manager Add Client
Add Client
2016/08/07 12:50
Notice: This wiki is for the old version CCBoot. Please click HERE to access the new version wiki
There are four methods to add clients.
1. Add Client Manually
1) Click the "Add Client" button on the toolbar.
2) Fill in the Computer Name, IP Address, MAC Address, gateway and DNS (if blank will take DNS from CCBoot DHCP settings and choose the image (Figure 1-1).
3) If "Boot Server Address" is "0.0.0.0" then change it to server's IP address. Eg. 192.168.1.198.
4) If you want to set client cache then tick the "Enable Cache" checkbox and then enter desired cache value (Eg. 512), please refer to "Client Cache".
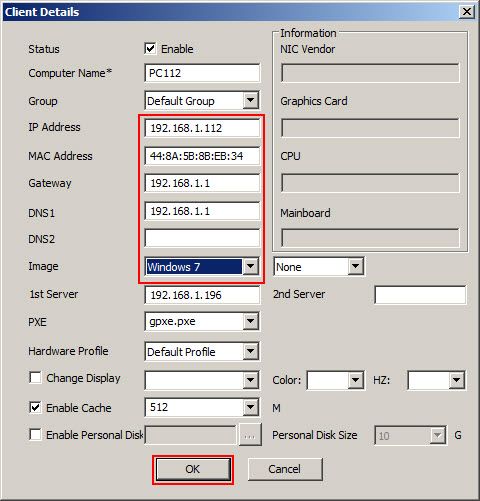
Figure 1-1
5) Click "OK" to add the PC to CCBoot.
2. Add Client Automatically
Before automatically added, you need to set a default client and all automatically added client will get the default settings from that default client. You can set any already added client as the default client.
1) Click the "Options" button on the toolbar. Click the ">>" button besides the "Default User Template" (Figure 1-2).

Figure 1-2
2) In the "CCBoot User List", select one proper user, then click "OK". Now this user's settings will be the automatically added users' default settings (Figure 1-3).

Figure 1-3
2.1. Add Client At Client PC
1) Click "Options" on the toolbar.
2) Select "Auto Add Client" and "Rename in Booting" (if you want to set custom name for client during boot) check box (Figure 1-4).

Figure 1-4
3) Now diskless boot the client, it will take IP from CCBoot server and then will be listed in the "Client Manager". If you have checked "Rename in Booting" then you will see the screen below after client takes IP from server. You can change the Computer Name and IP Address, press "Enter" key.
The client PC will reboot once again then boot normally to desktop.
Once client is added it will take same settings as the Default User Template (Figure 1-5).
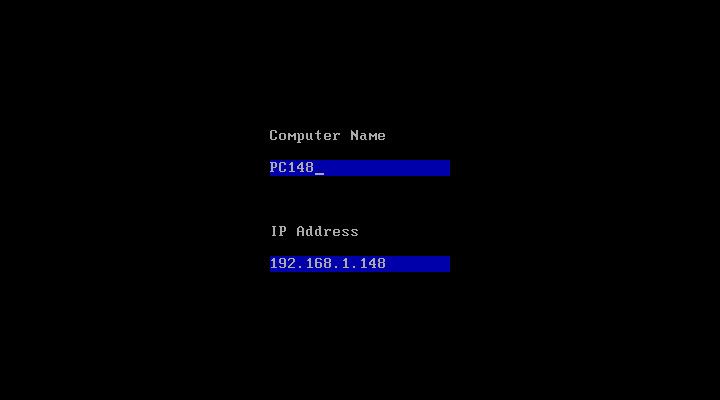
Figure 1-5
2.2. Automatically Scan to Add Client
1) Select "Client Manager" node in the tree, and right click on the blank area and then choose "Auto Scan" (Figure 1-6).

Figure 1-6
2) It will open the"Auto Scan" window, click "Start" to start the scan (Figure 1-7).

Figure 1-7
3) it will start to scan all online computers in your LAN and add them to the "Client Manager" list automatically. By default the new clients will be added to "Default Group" and will have the same settings as the Default User Template (Figure 1-8).

Figure 1-8
2.3. Add Client by Importing from File.
1) Click "Tools" menu and select "Import Users" (Figure 1-9).

Figure 1-9
2) You can select a csv file to import the clients.
The csv file format is
One client information per line.
The first column is ComputerName.
The second column is IP Address.
The third column is MAC Address. The MAC address should be 12 letters (case insensitive).
The column is splitted by comma (,).
For example:
PC001,192.168.1.101,001C5A3CA5F1
PC002,192.168.1.102,001C5A3CA5F2
PC003,192.168.1.103,001C5A3CA5F3
3) After you import the csv file, all clients will be added to CCBoot and they have the same settings as the Default User Template.
3. How to delete client?
