Wiki Home Single Image for Multiple Specs Create Single Image for Multiple Specs
Create Single Image for Multiple Specs
2019/07/04 00:31
Notice: This wiki is for the old version CCBoot. Please click HERE to access the new version wiki
The PnP function of CCBoot makes it is possible for you to create a single image for all client PCs with various specifications so that they can diskless boot with this single image. Suppose you need to implement PnP for 30 client PCs Intel, AMD and with different types of Video Card and Sound Card, below are the steps for you.
Note: From CCBoot v3.0 build 20131023, we add the "Add from INF" function. With this new function, as long as one client can diskless boot successfully, you could use the CCBoot PNP tool to add NIC drivers (such as Win7 Realtek NIC drivers) from INF on that client directly, which is more convenient. For details, please refer to "Add from INF".
1) Install Windows XP or Windows 7 on the client (suppose PC-1) which has the best hardware specifications. Please install Windows first on AMD client PC in this way it will avoid such problem like BSOD, and it is much stable to merge different drivers into one image in this process.
2) Install NIC driver, chips driver and other low level drivers on PC-1.
3) Install CCBoot Client on PC-1 and restart it as required.
4) After rebooted, launch CCBoot Client again, and click "NIC PnP", "Install Known NIC" and check "Select All", then upload image from PC-1 to CCBoot server(Figure 1-1).
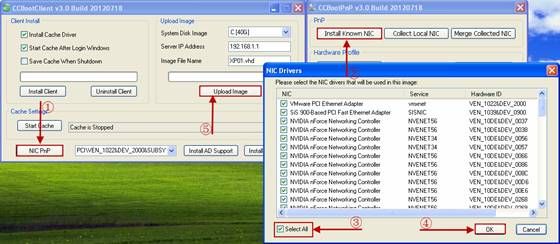
Figure 1-1
5) Diskless boot PC-1 by super client and install all the other drivers and software you need on it, insert a USB Flash Drive on PC-1, copy "C:\CCBootClient\CCBootpnp.exe" to the USB key, shutdown PC-1 then disable super client. Now the master image is created successfully(Figure 1-2).
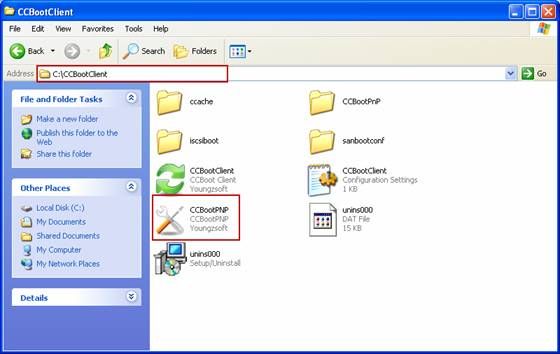
Figure 1-2
6) Try to diskless boot all client PCs one by one with the master image. If one client PC can boot successfully, please go to Step 12. If one client (suppose PC-2) cannot boot successfully, normally it stops at the Windows logo then BSOD, it because the master image doesn't have the NIC driver of PC-2. So we will use CCBootPnP to collect the NIC drive of PC-2 and merge it to the master image. Please follow the steps at below.
7) HDD Boot PC-2 and install the same Windows edition on it.
8) Install NIC driver on PC-2. Only need to install NIC driver because we just need to collect the NIC driver of PC-2.
9) Insert this USB key to PC-2. Run "CCBootpnp.exe" and click the "Collect Local NIC" button, it will create a folder in this USB Key, named "Drivers", which includes NIC driver of PC-2. (If there is 'Drivers' folder already before click "Collect Local NIC", that doesn't matter, just leave it there.).
10) Insert this USB Key on PC-1 and diskless boot PC-1 by super client. Run "CCBootpnp.exe" on the USB key and click the "Merge Collected NIC" button. When finish, please shut down PC-1, disable super client(Figure 1-4).

Figure 1-4
11) Now, you are able to diskless boot PC-2 with the master image successfully.
12) Diskless boot PC-2 by super client with restored point, install other devices' drivers on PC-2 if necessary. After installed or updated the drivers, shutdown PC-2 and disable super client.
13) Do the same as Step 8-12 for other unable diskless boot PCs, and so on and so forth.
14) If all client PCs with different specifications have successfully diskless boot by using one image, you need to merge the image in order not to degrade the image performance. Please refer to “How to Merge Image”.
We have created a video - "Single Image for Multiple Specifications" on Youtube.
Related:
Create Client Image with Dual NICs
Standard Method to Create Boot Image for Legacy PCs