This article is for CCBoot v2.1 only. For CCBoot v3.0, please refer to "Preparation for Quick Start" in wiki.
iSCSI boot is a very good solution for network administrators. Suppose you're responsible for a network of about dozens of computers or more, it may occupy you much time to do a clean install of the operating system every now and then. Fortunately, iSCSI boot software - CCBoot can help you out of such annoyance. CCBoot makes it possible to diskless boot Windows for computers with no OS installed or even without local hard disk.
CCBoot allows devices to boot up via their network interface(s). The entire process follows a specific "client-server" model. iSCSI boot software - CCBoot is based on several network protocols like IP (Internet Protocol), UDP (User Datagram Protocol), DHCP (Dynamic Host Configuration Protocol) and TFTP (Trivial File Transfer Protocol).
In a word, the iSCSI boot server built by CCBoot is combination with DHCP and TFTP server. After you have set the client firstly boot from network in BIOS, it will get an IP address from the DHCP. Then the iSCSI boot server will push NBP (Network Bootstrap Program) and operating system stored in the network to client by TFTP so that client can bootup even without a harddisk.
iSCSI Boot Solution Advantages
- Significantly reduce initial capital and implementation costs.
- Reduce power and cooling requirements.
- Accelerate deployments, upgrades, and server repurposing.
- Reduce complexity and risk.
- Improve critical system availability.
- Implement enhanced Disaster Recovery solutions.
-
Preparation on iSCSI Boot Server
Windows Server 2003 for CCBoot Server
- All drives should be formatted as NTFS. When format drives, set "Allocation unit size" as "Default" for Windows system drive, and set "Allocation unit size" as "32K" for other drives.
- Please use Windows Server 2003 R2 + SP2, 32 bit.
- Allocate hard disks for image, game (raid 0) and write back (2-3 hard disks). If you have an SSD disk, please format it to only one partition for cache.
- Download CCBoot Server install package, install and register.http://www.ccboot.com/download.htm
- Install Teamviewer so that we can take a remote control to help if necessary.
-
Recommended Server Cache Settings
Suppose the CCBoot server has 4GB physical RAM, the recommended cache settings are as bellow.
Suppose the CCBoot server has 8GB physical RAM, the recommended cache settings are as bellow.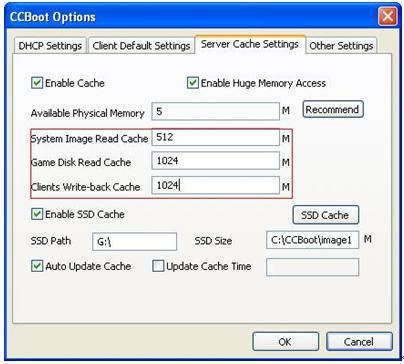
Figure 1
Suppose the SSD is 60GB, please reserve certain SSD space, then allocate the rest (suppose about 58GB) for SSD cache. The recommended SSD cache settings are as bellow.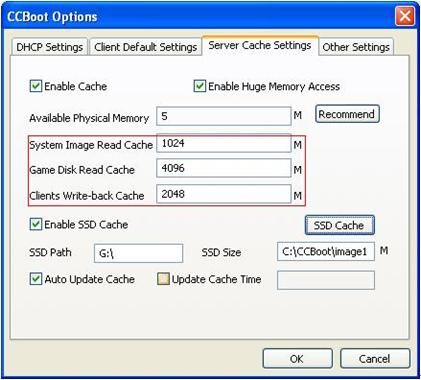
Figure 2
Allocate 4GB for every image, such as image1.vmdk and image2.vmdk.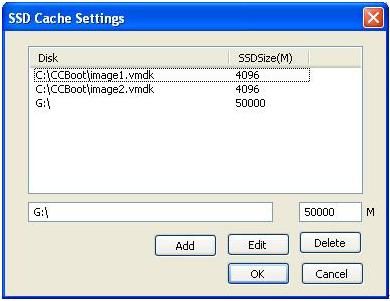
Figure 3
The rest are for Game disk, such as G:\.
Windows 7 for CCBoot Server
- All drives should be formatted as NTFS. When format drives, set "Allocation unit size" as "Default" for Windows system drive, and set "Allocation unit size" as "32K" for other drives.
- Please use Windows 7 Ultramate, 64 bit.
- Allocate hard disks for image, game (raid 0) and write back (2-3 hard disks). If you have an SSD disk, please format it to only one partition for cache.
- Download CCBoot Server install package for 64 bit, install and register. http://www.ccboot.com/download.htm
- Install Teamviewer so that we can take a remote control to help if necessary.
- Recommended Server Cache Settings – "System Image Read Cache" and "Game Disk Read Cache" are the same as Windows Server 2003. Set "Clients Write-back Cache" as 0.
-
Make sure you have enabled the "Enable write caching on the device" for every disk. This will take place of "Clients Write-back Cache" of CCBoot.
- Click Start, right-click Computer and select Properties.
- In the left panel, click Device Manager.
- Expand Disk Drives and right-click on one of the disks.
- Click the Policies tab and check "Enable Write Caching on the device" to enable (it’s a default setting of Windows 7).
- To further improve the disk performance (needless to say, higher the risk now), check the box "Turn off Windows write-cache buffer flushing on the device".
- Press "OK" to save.
- Implement step d - f for other disks.
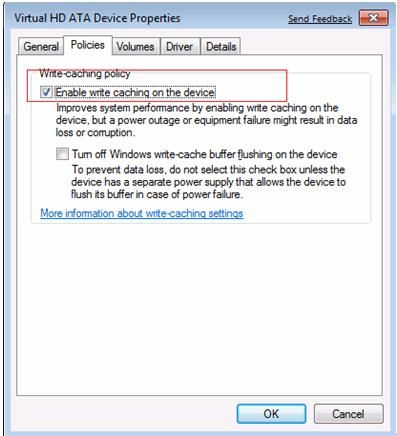
Figure 4
Windows 2008 for CCBoot Server
- All drives should be formatted as NTFS. When format drives, set "Allocation unit size" as "Default" for Windows system drive, and set "Allocation unit size" as "32K" for other drives.
- Please use Windows Server 2008 R2, 64 bit.
- Allocate hard disks for image, game (raid 0) and write back (2-3 hard disks). If you have an SSD disk, please format it to only one partition for cache.
- Download CCBoot Server install package for 64 bit, install and register. http://www.ccboot.com/download.htm
- Install Teamviewer so that we can take a remote control to help if necessary.
- Recommended Server Cache Settings – the same as Windows 7 mentioned above.
-
Make sure you have enabled the "Enable write caching on the device" for every disk. This will take place of "Clients Write-back Cache" of CCBoot.
- Click Start, right-click Computer and select Properties.
- In the left panel, click Device Manager.
- Expand Disk Drives and right-click on one of the disks.
- Click the Policies tab and check "Enable Write caching on the device" to enable (it’s a default setting of Windows 2008).
- To further improve the disk performance (needless to say, higher the risk now), check the box "Enable Advanced Performance".
- Press "OK" to save.
- Implement step d - f for other disks.
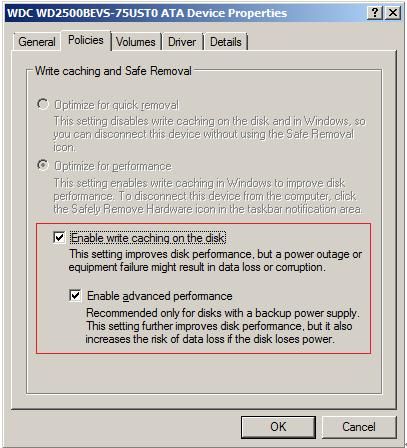
Figure 5
-
Preparation on iSCSI Boot Client
Prepare to Create Image
- The Windows system drive should be formatted as NTFS and set the "Allocation unit size" as "Default" then install Windows XP on client computer.
-
Run "compmgmt.msc" command, "Computer Management (Local)" -> "Device Manager" -> "IDE ATA/ATAPI controllers" -> "Primary IDE Channel" -> "Properties" -> "Advanced Settings" -> Set "Device Type" as "None" for both Device 0 and Device 1.
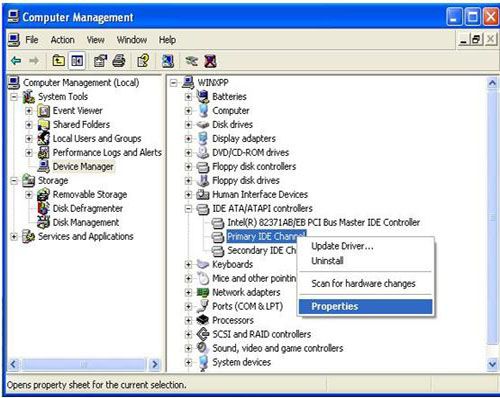
Figure 6 - Run "eventvwr.msc" command, clear all logs.
- Install only NIC driver, chips driver and other low level drivers.
- Download CCBootClient install package, keep all default settings to install. http://www.ccboot.com/download.htm
-
Reboot PC then upload image.
How to iSCSI boot Windows XP How to iSCSI boot Windows 7 How to iSCSI boot Vista