Wiki Home Disk Manager CCBoot Used as Virtual Disk Server
CCBoot Used as Virtual Disk Server
2016/05/09 12:26
The specific steps: (Only works in Windows 7, 2008 or above)
1) Right-click "My Computer", and click the "Manage".
2) In the "Computer Management", click the "storage", expand it, and then click "Disk Management" (Figure 1-1).
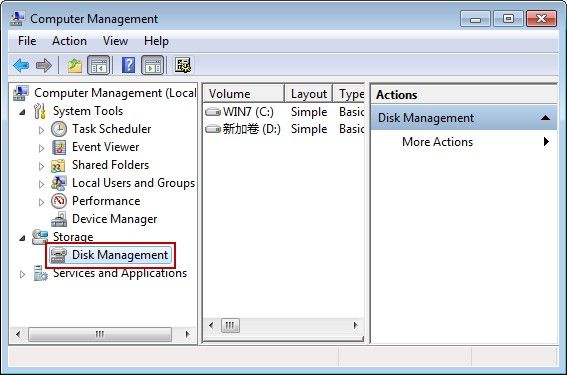
Figure 1‑1
3) In the "Action" menu, click "Create VHD" (Figure 1-2).
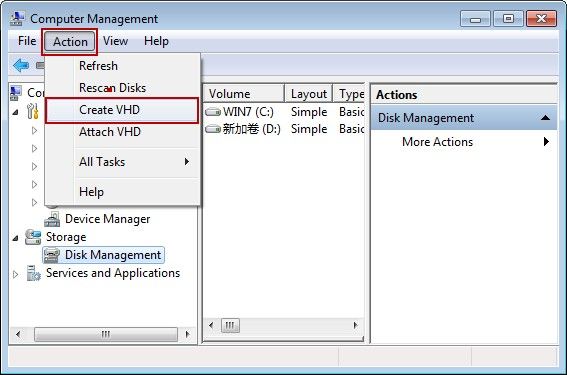
Figure 1‑2
4) In the "Create and Attach Virtual Hard Disk" dialog box, set the VHD file location and file name, and create a 10MB size virtual hard disk (Figure 1-3).
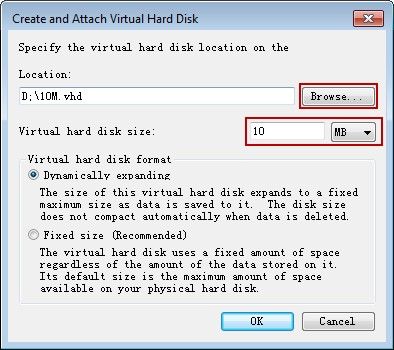
Figure 1‑3
5) After create VHD successfully, leave it as "Not Initialized" (Figure 1-4).
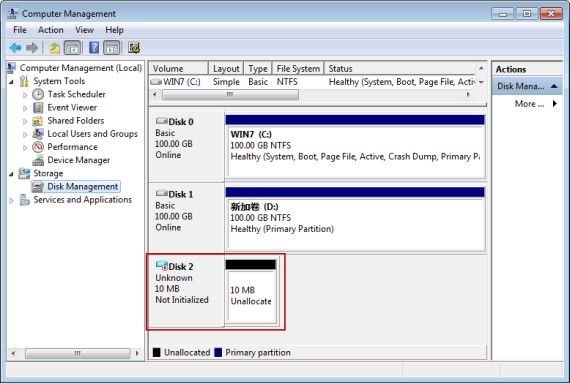
Figure 1‑4
6) Right-click the blue disk "Disk 2", and click "Detach VHD" (Figure 1-5).
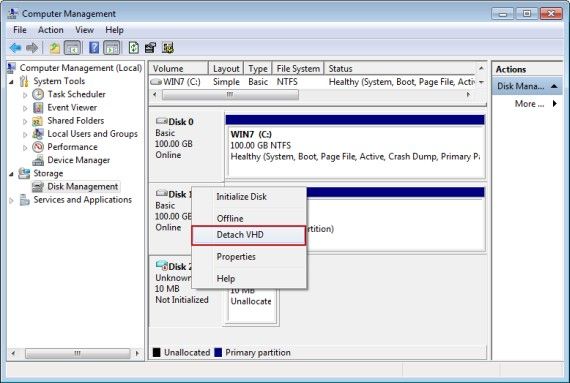
Figure 1‑5
7) In the the "Detach Virtual Hard Disk" dialog box, click the "OK" button (Figure 1-6). Notes: DO NOT select the "Delete the virtual hard disk file after removing the disk".
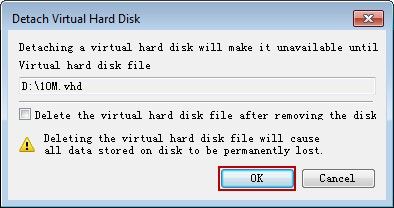
Figure 1‑6
8) In CCBoot server main interface, click the "Add Disk" button on the toolbar.
9) In the "CCBoot Disk Properties" dialog box, select the "Image" radio check box, and then click the "..." button, select "10M.vhd" that created by the above steps, and click "OK" button (Figure 1-7).
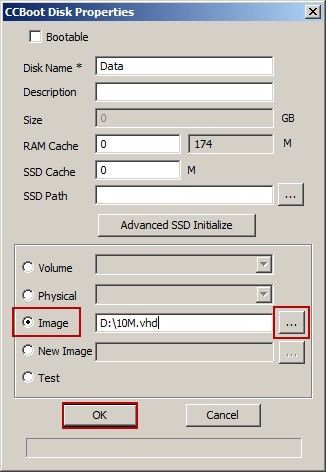
Figure 1‑7
10) Click "Add Disk Group" on the toolbar, "CCBoot Disk Group" dialog box will pop up, input a name in "Disk Group Name" edit box, and then click the "OK" button (Figure 1-8).
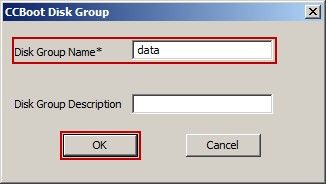
Figure 1‑8
11) In the dialog box that pops up, click on the "Yes" button (Figure 1-9).
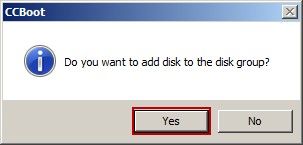
Figure 1‑9
12) in the "CCBoot Disk List" dialog box, select the disk that created just now, click the "OK" button (Figure 1-10).
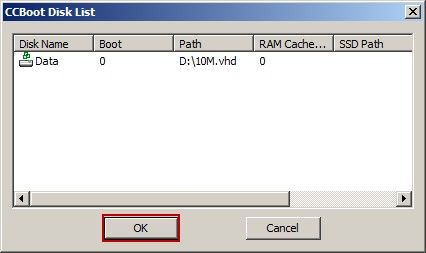
Figure 1‑10
13) Click "Add Client" button on the toolbar.
14) In the "CCBoot Client" dialog box, set "Computer Name" as "PC000", set "IP Address" as "192.168.1.1", and then click the ">>" button at the right side of ""Disk Group"(Figure 1-11).
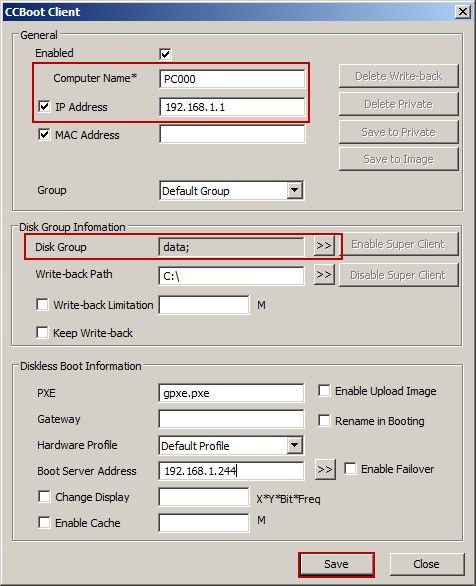
Figure 1‑11
15) In the "CCBoot Disk Group Selection" dialog box, select the "data" check box, and then select the check box "Enable Personal Disk" in the right side of the "Personal Disk", click "..."button, select the virtual disk storage path, "Personal Disk Size" edit box, enter the virtual disk size, "G" (Figure 1-12).
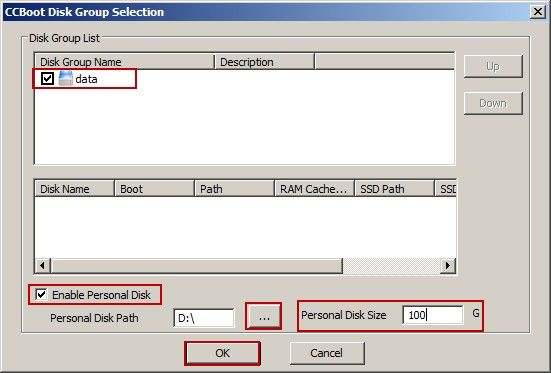
Figure 1‑12
16) In the toolbar on the CCBoot main interface, click on the "Options" button in the pop-up "CCBoot Options" dialog box, and then click the "Default User Template" right ">>" button (Figure 1-13).
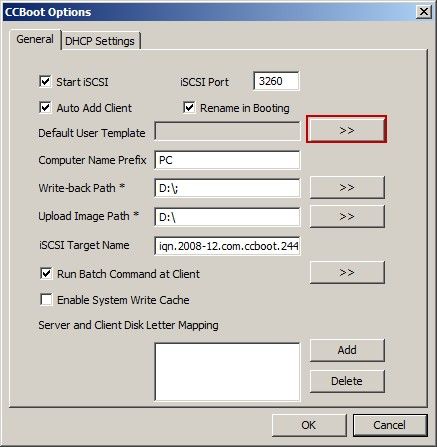
Figure 1-13
17) "CCBoot User List" pop-up dialog box, select "PC000", click the "OK" button (Figure 1-14).
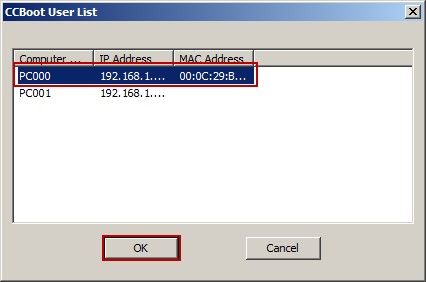
Figure 1-14
18) CCBoot main interface, right-click "Client Manager", click "Auto Scan" (Figure 1-15).
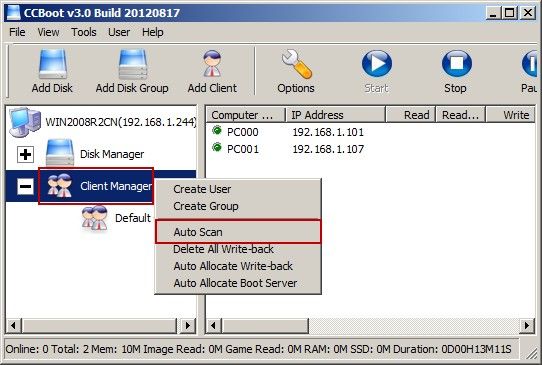
Figure 1‑15
19) "CCBoot Auto Scan" pop-up dialog box, enter the starting IP address and ending IP address, click the "Start" button to add all users to the user list (Figure 1-16).
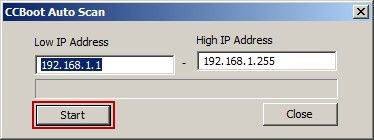
Figure 1‑16
20) Open a client download the ISCSI installation package, and install ISCSI.
21) The installation is complete, run ISCSI.
22) In the dialog box that pops up, click the "Discovery" tab, then click the "Add" button; then "Add Target portal" dialog box pops up, fill in the "IP address or DNS name" edit box CCBoot server IP address, port defaults to 3260, and finally click "OK" button (Figure 1-17).

Figure 1‑17
23) In the "iSCSI Initiator Properties" dialog box, click the "Targets" tab, and then click the "Log On" button (Figure 1-18).
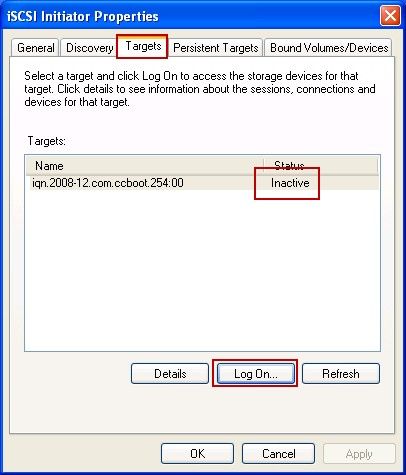
Figure 1‑18
24) In the pop-up "Log On to Target" dialog box, select the "Automatically restore this connection when the sysytem boots" check box, and click the "OK" button, ISCSI setup is complete (Figure 1-19).

Figure 1-19
25) In the "Computer Management" window, disk activation and format the disk 2, the "Disk 2" is load of CCBoot on the individual disc (Figure 1-20).
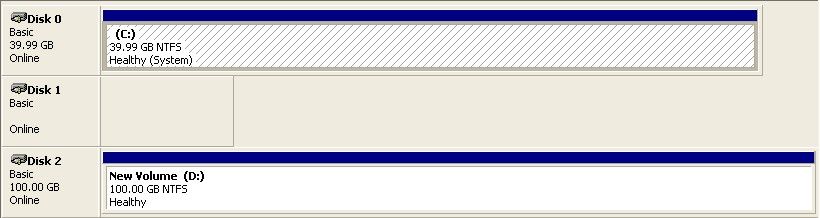
Figure 1-20
26) Each client is set in the beginning of time, the future does not need to set, you can read and write operations on the disk.
Related:
Update Game Disk on the Server
Update Boot Image/Game Disk using Super Client