Wiki Home Active Directory CCBoot Works With Active Directory
CCBoot Works With Active Directory
2019/04/15 20:12
Preparation
1) You should have successfully installed CCBoot and diskless booted your clients. In this example, CCBoot server's IP address is 192.168.1.200
2) Windows Domain Services has already been installed, and the domain server's IP address is 192.168.1.200.(For details, please refer to "Install Windows Domain Service").
Note. Window Server 2008 is used as Domain Server as well as CCBoot Server.
3) CCBoot server can be on the same computer with Windows domain server or different computer,depends on you.
4) Prepare a client example. "PC101" with IP address 192.168.1.101.
5) Set administrator password for the client.
1. Add PC to Domain
1) Open the CCBoot installation directory, copy "CCBootAD.exe" files to the domain server.
2) Run the"CCBootAD.exe" program on the domain server.
3) Click the"Add" button in the popup "CCBoot AD" dialogbox (Figure 1).
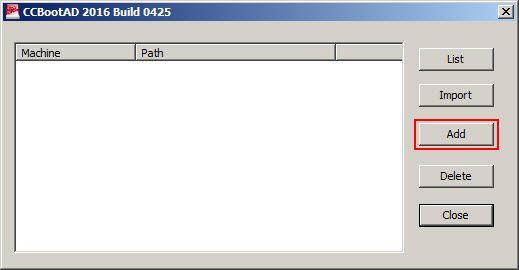
Figure 1
4) Click the"..." button in the popup "CCBootAD Machine" dialog box to select domain "Computers", type PC101 into the "Machine Name" edit box, and click the "OK" button, then the operation is completed (Figure 2).
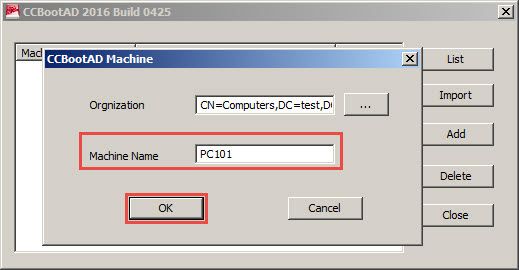
Figure 2
5) If you want other clients to join the domain as well, you can repeat the above operation steps.
6) Also you can add PCs from command line. Follow this template: CCBootAD [Machine Name] [Organization] (Figure 3).
Parameter "Organization" - you can use from step 4.
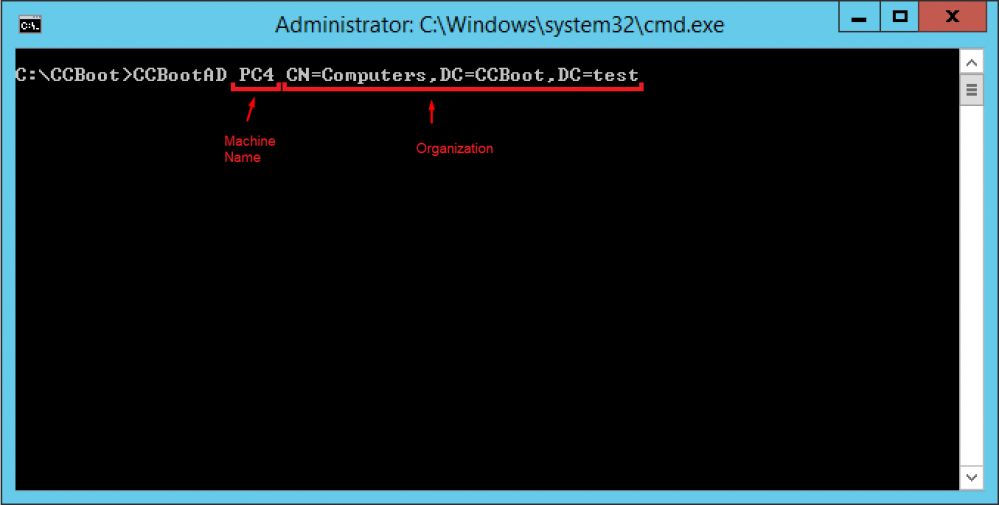
Figure 3
7) Then you can open the CCBoot installation directory and run "CCBootAD.exe" and Press "List" to check if PC was added properly (Figure 4).
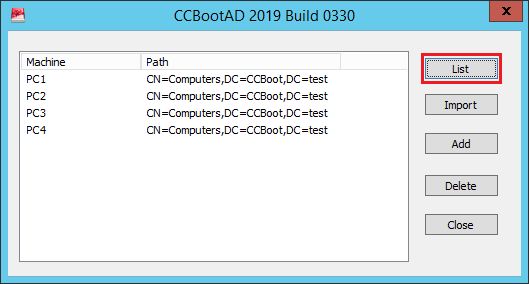
Figure 4
2. Add Personal Disk
1) Set a personal disk for PC101. Please refer to "The usage of personal disk" for details.
3. CCBoot Settings and Boot Parameter
1) Click the"Options" button on the toolbar of CCBoot main interface.
2) In the popup"CCBoot Options" dialog box, select the "DHCP Settings" tab, and type the domain server's IP address into the "DNS Address 1"edit box, then click the "OK" button (Figure 5).
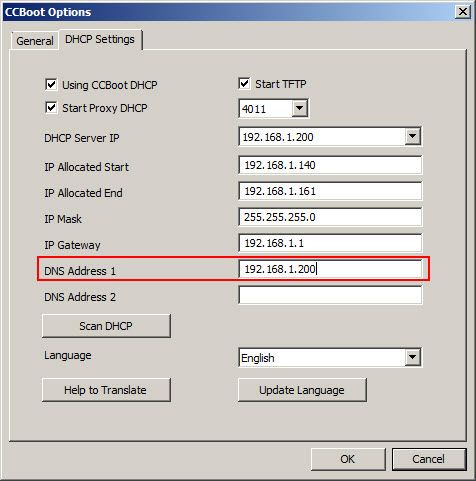
Figure 5
4) In the popup "CCBoot Options" dialog box, click the "General" tab, tick the “Login With Domain” check box and type in the domain name in this case it “test.com”, if have OU settings, you can set domain name as "test.com OU=testOU,DC=test,DC=com" (more info), and click “OK” to save the settings (Figure 6).
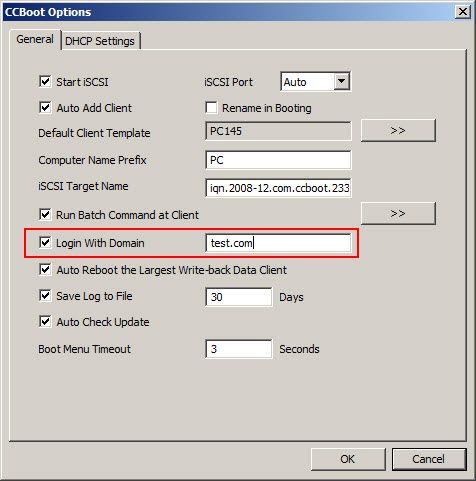
Figure 6
4. Add AD Support
Since test version 20160516 the addition of AD support has been changed to make it easier for users to use Active Directory function.
1) Diskless boot PC101 with super client which has personal disk enabled.
2) Login PC101 with the local account of administrator.
3) Run the C:\CCBootClient program, in the "CCBoot Client" dialog box and click the "Install AD Support" button in the "CCBoot Client"dialog box, then click “Yes” in the preceding dialog box (Figure 7).
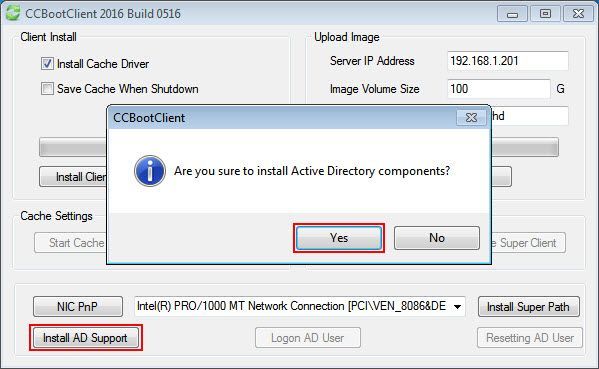
Figure 7
4) Now another pop up dialog box will open asking you to choose the drive to store the “User Profile” ( Figure 8).
Note: The drive referred here is personal disk assigned to the clients. Hence, before you do this step you need to enable personal disk for the client.

Figure 8
5) Now, click the drop down menu in the red box and choose the drive (in this case we E:\),now click “OK” to continue (Figure 9).
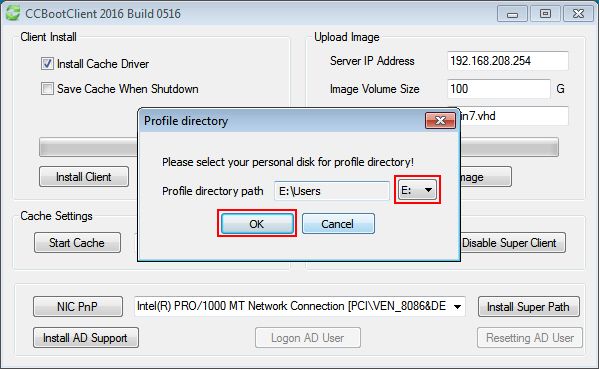
Figure 9
6) Once you click the OK button, it will notify you that the client needs to be restarted. Click OK or close the prompt and client will reboot.
7) Once the client reboots i will show you the domain login window.
8) Login to Domain Administrator account to Add domain users to the client PC.
5. Add Domain User
From Version 20151216 we have introduced two function “Add Domain User” and “Reset Domain User”.
1) After rebooting PC101, a prompting of"Press CTRL + ALT + DELETE to log on" will pop up (Figure 10). Press “CTRL +ALT + DELETE” to enter credentials.

Figure 10
2) Login the computer with the domain administrator account. In this case “TEST\Administrator” (Figure 11) .
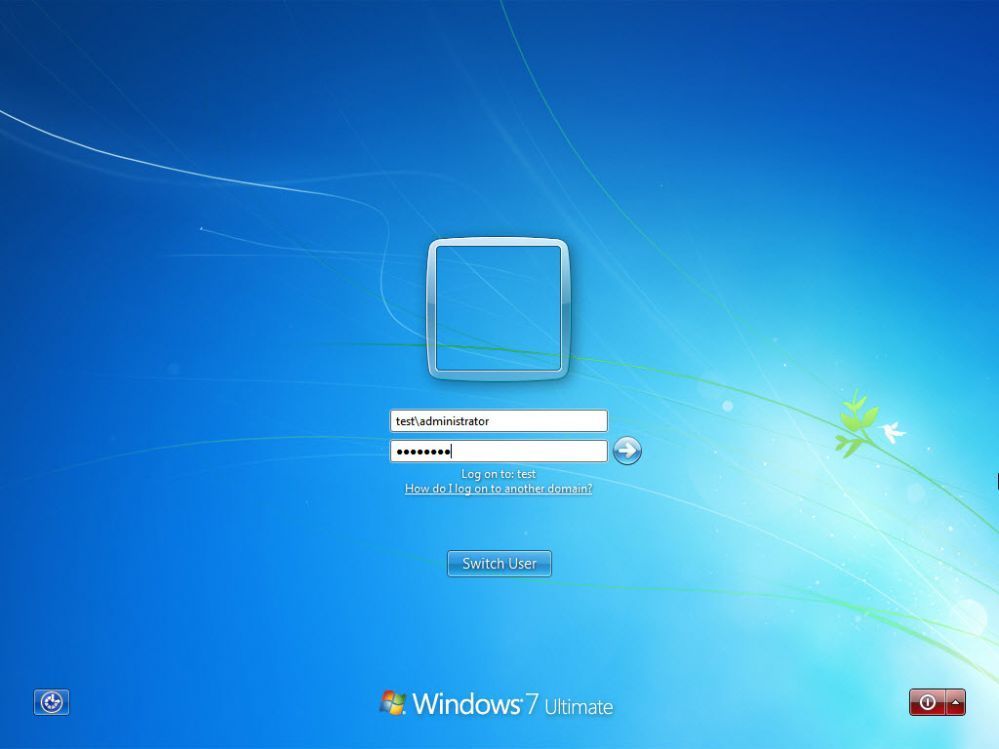
Figure 11
3) Now, you can login to domain using “Users” account. To login, Open CCBoot Client Application, then choose “Logon AD user” (Figure 12).
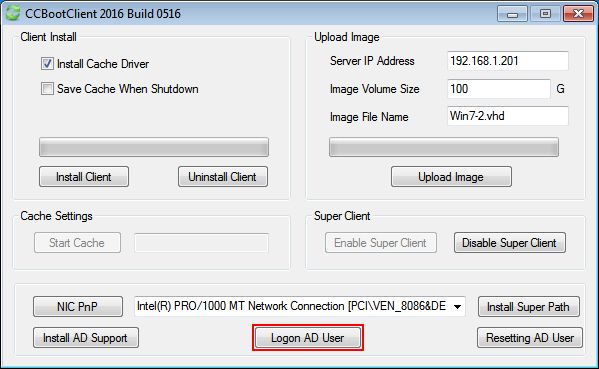
Figure 12
4) It will Open “AD User” dialog box,there enter your domain username, password and domain name and click “OK” (Figure 13).
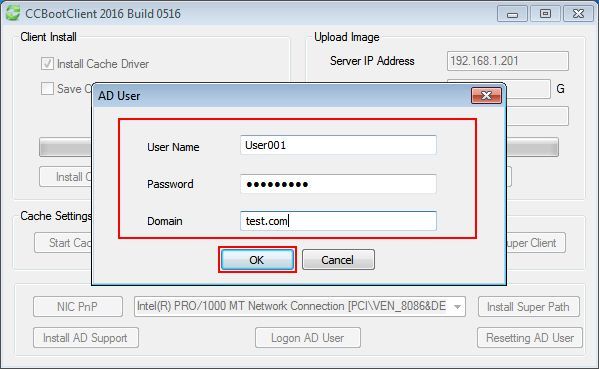
Figure 13
5) Once it successfully logins then another prompt will open, telling you the adding user was successful and disable the superclient and update the image. Press “Yes” to proceed with saving the image (Figure 14).
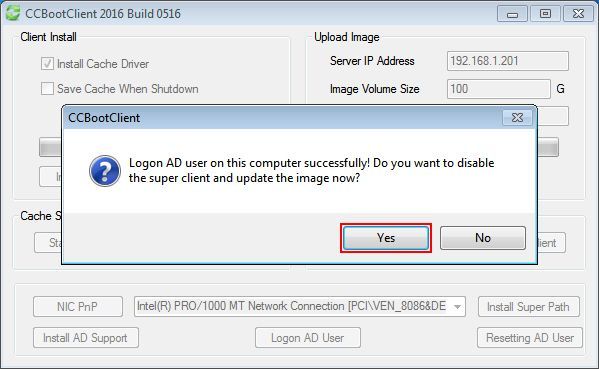
Figure 14
6) Press “Yes” in the preceding dialogbox to save the image, you can create recovery image you like (Figure 15).
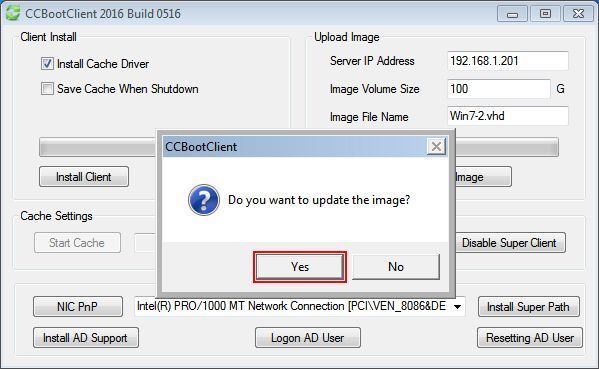
Figure 15
6. Reset Domain User
1) Super client a PC and then boot your client, After booting is successful login to the client with domain administrations credentials (Figure 16).
Figure 16
2) Now, you can reset any users you want. To reset a user, Open CCBoot Client Application, then choose “Resetting AD user” (Figure 17).
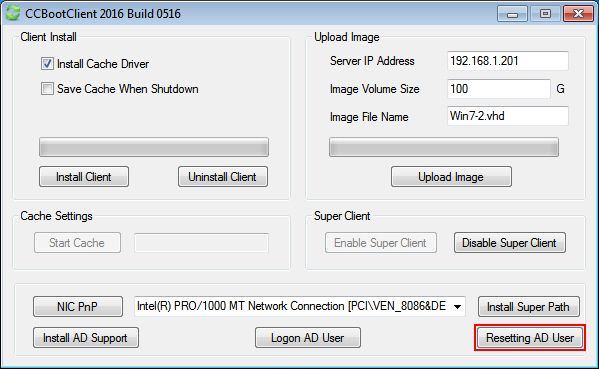
Figure 17
3) It will Open “AD User” dialog box, there enter your domain username, password and domain name you want to reset and click “OK” (as in Figure 18).
Figure 18
4) Once the user has been successfully reset then another prompt will open, telling you the Resetting user was successful and disable the superclient and update the image. Press “OK” to proceed with saving the image (Figure 19).
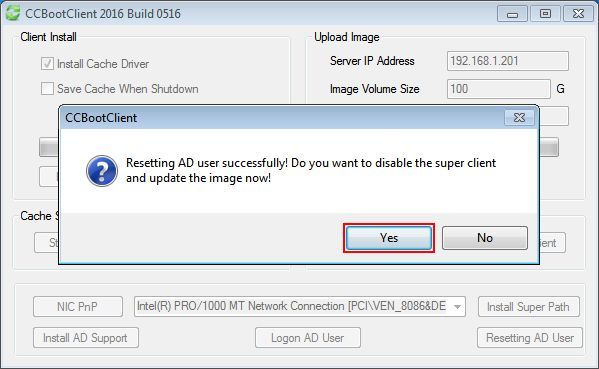
Figure 19
5) Press “Yes” in the preceding dialogbox to save the image, you can create recovery image you like (Figure 20).
Figure 20
Note: The computers, which are needed to join the domain, should be set the correct time,otherwise it will be failed to join the domain.
We have created a video - "CCBoot Works With Active Directory"
7. Add a New User
1) Add a new domain account on the domain server.
2) Enable super client for PC201 on the CCBoot server.
3) Login PC201 with the newly added domain account.
4) Disable super client on the CCBoot server.
Notes:
1. The computers, which are needed to add into domain, should be set for the right time, or it will be failed to add.
2. Use Win2008 system as domain server, XP system as client, please process following operations on domain server:
(Remember: If you use windows 7 or higher on client you can skip this step.)
1) Log in domain server of Windows Server 2008.
2) Click "Start" and enter "gpmc.msc" in edit box of "Run", then press "Enter".
3) Unfold "Domain Name" in popup window of "Group Policy Management", then right-click "Default Domain Policy", and click to choose "Edit" (Figure 21).
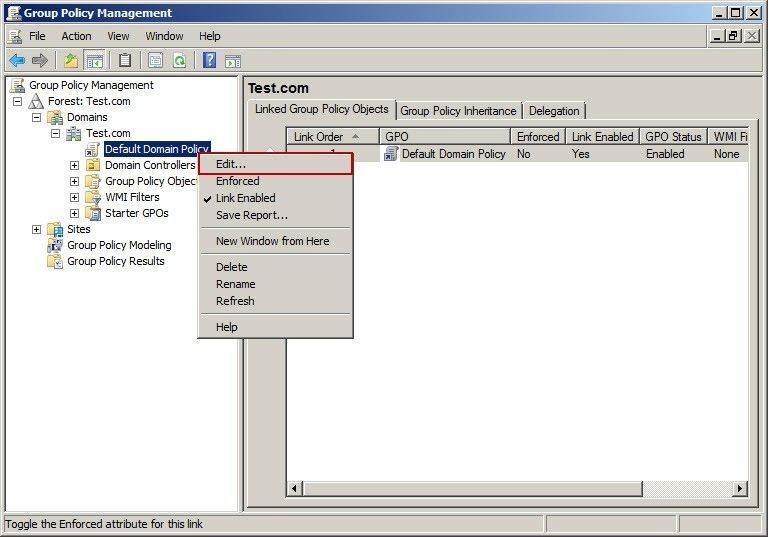
Figure 2
4) Unfold "Computer Configuration"->"Policies"->"Administrative Templates"->"System" in popup dialog box of "Group Policy Management Editor", then click "Net Logon", and double-click "Allow cryptography algorithms compatible with Windows NT 4.0" in detailed windows at right side (Figure 22).
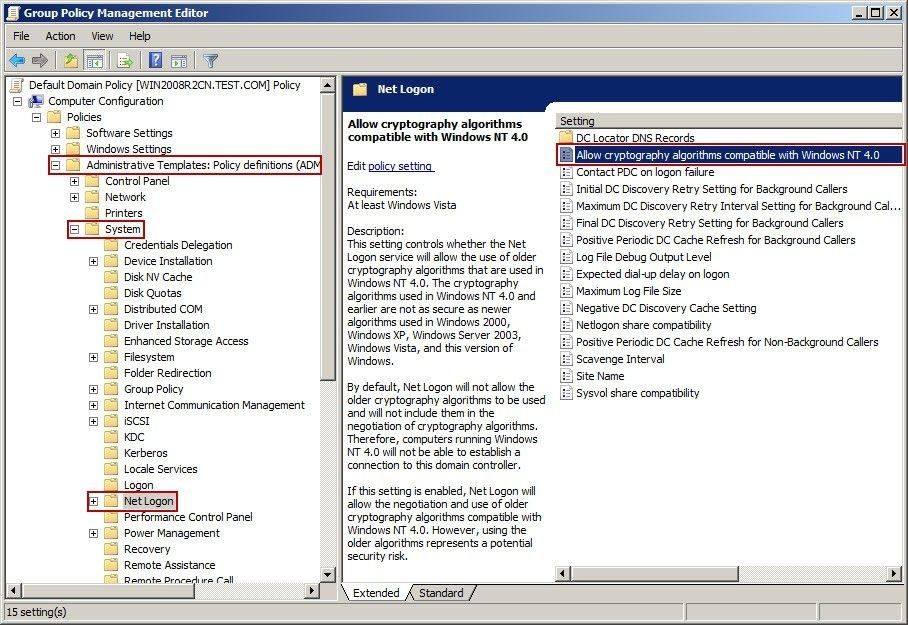
Figure 22
5) Choose "Enabled" radio button in popup dialog box of "Allow cryptography algorithms compatible with Windows NT 4.0", then click "OK" button (Figure 23).

Figure 23
6) Close all dialog boxes at last.